
Continuous Insulation vs. Double-Stud Wall
Although builders can make either approach to high-performance walls work, we decided continuous insulation (or CI for short) made the most sense to us. And while continuous insulation has its own challenges, especially in terms of air and water sealing details around windows and doors, intuitively we felt insulation on the outside of our sheathing would give us our best chance at long-term durability for the structure.
In spite of the fact that these kind of wall assemblies are climate specific, for anyone interested in the performance of various wall assembly approaches this BSC paper is an excellent place to start:
High R-Walls
Or you can check out Hammer and Hand’s evolving wall assembly strategies here:
Passive House Lessons
And here’s a mock-up wall assembly by Hammer and Hand showing many of the details we incorporated into our own house:
While many believe a double stud wall simplifies much of the framing, we decided that a continuous insulation approach, which in theory should better manage seasonal moisture changes inside the walls while it also eliminates thermal bridges, was worth the extra effort.
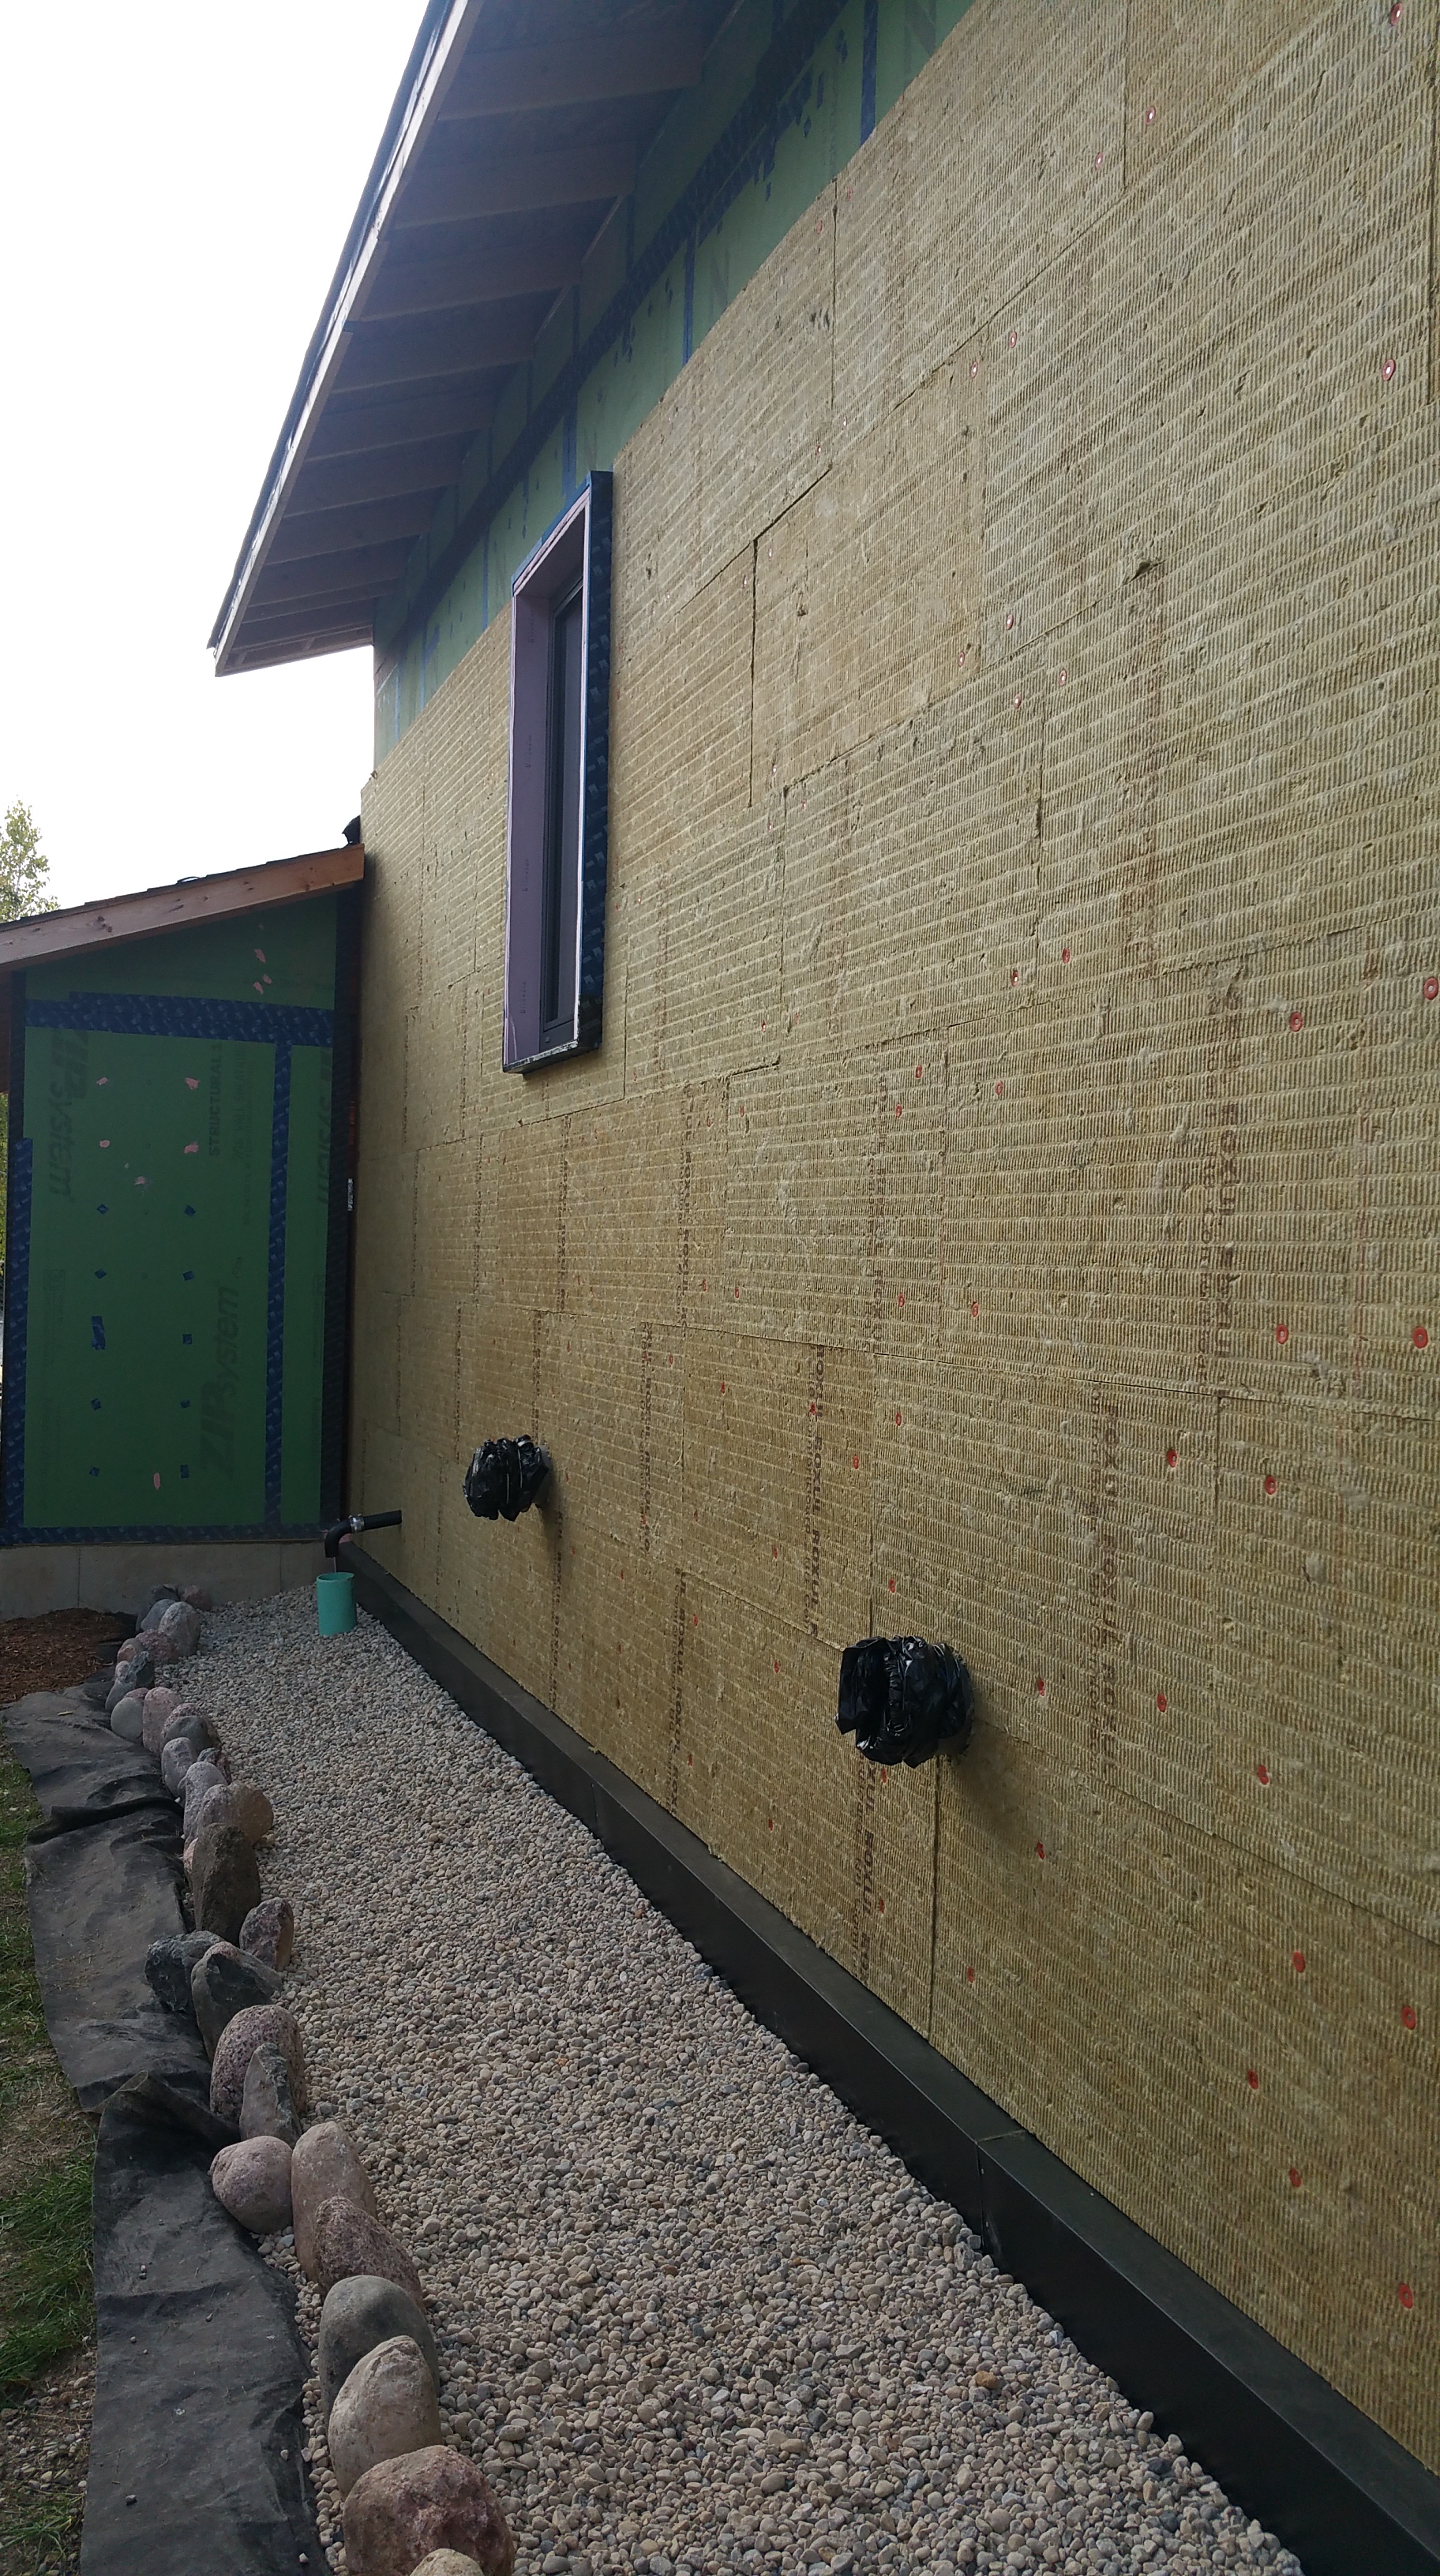
2 Layers of Rockwool over Zip Sheathing
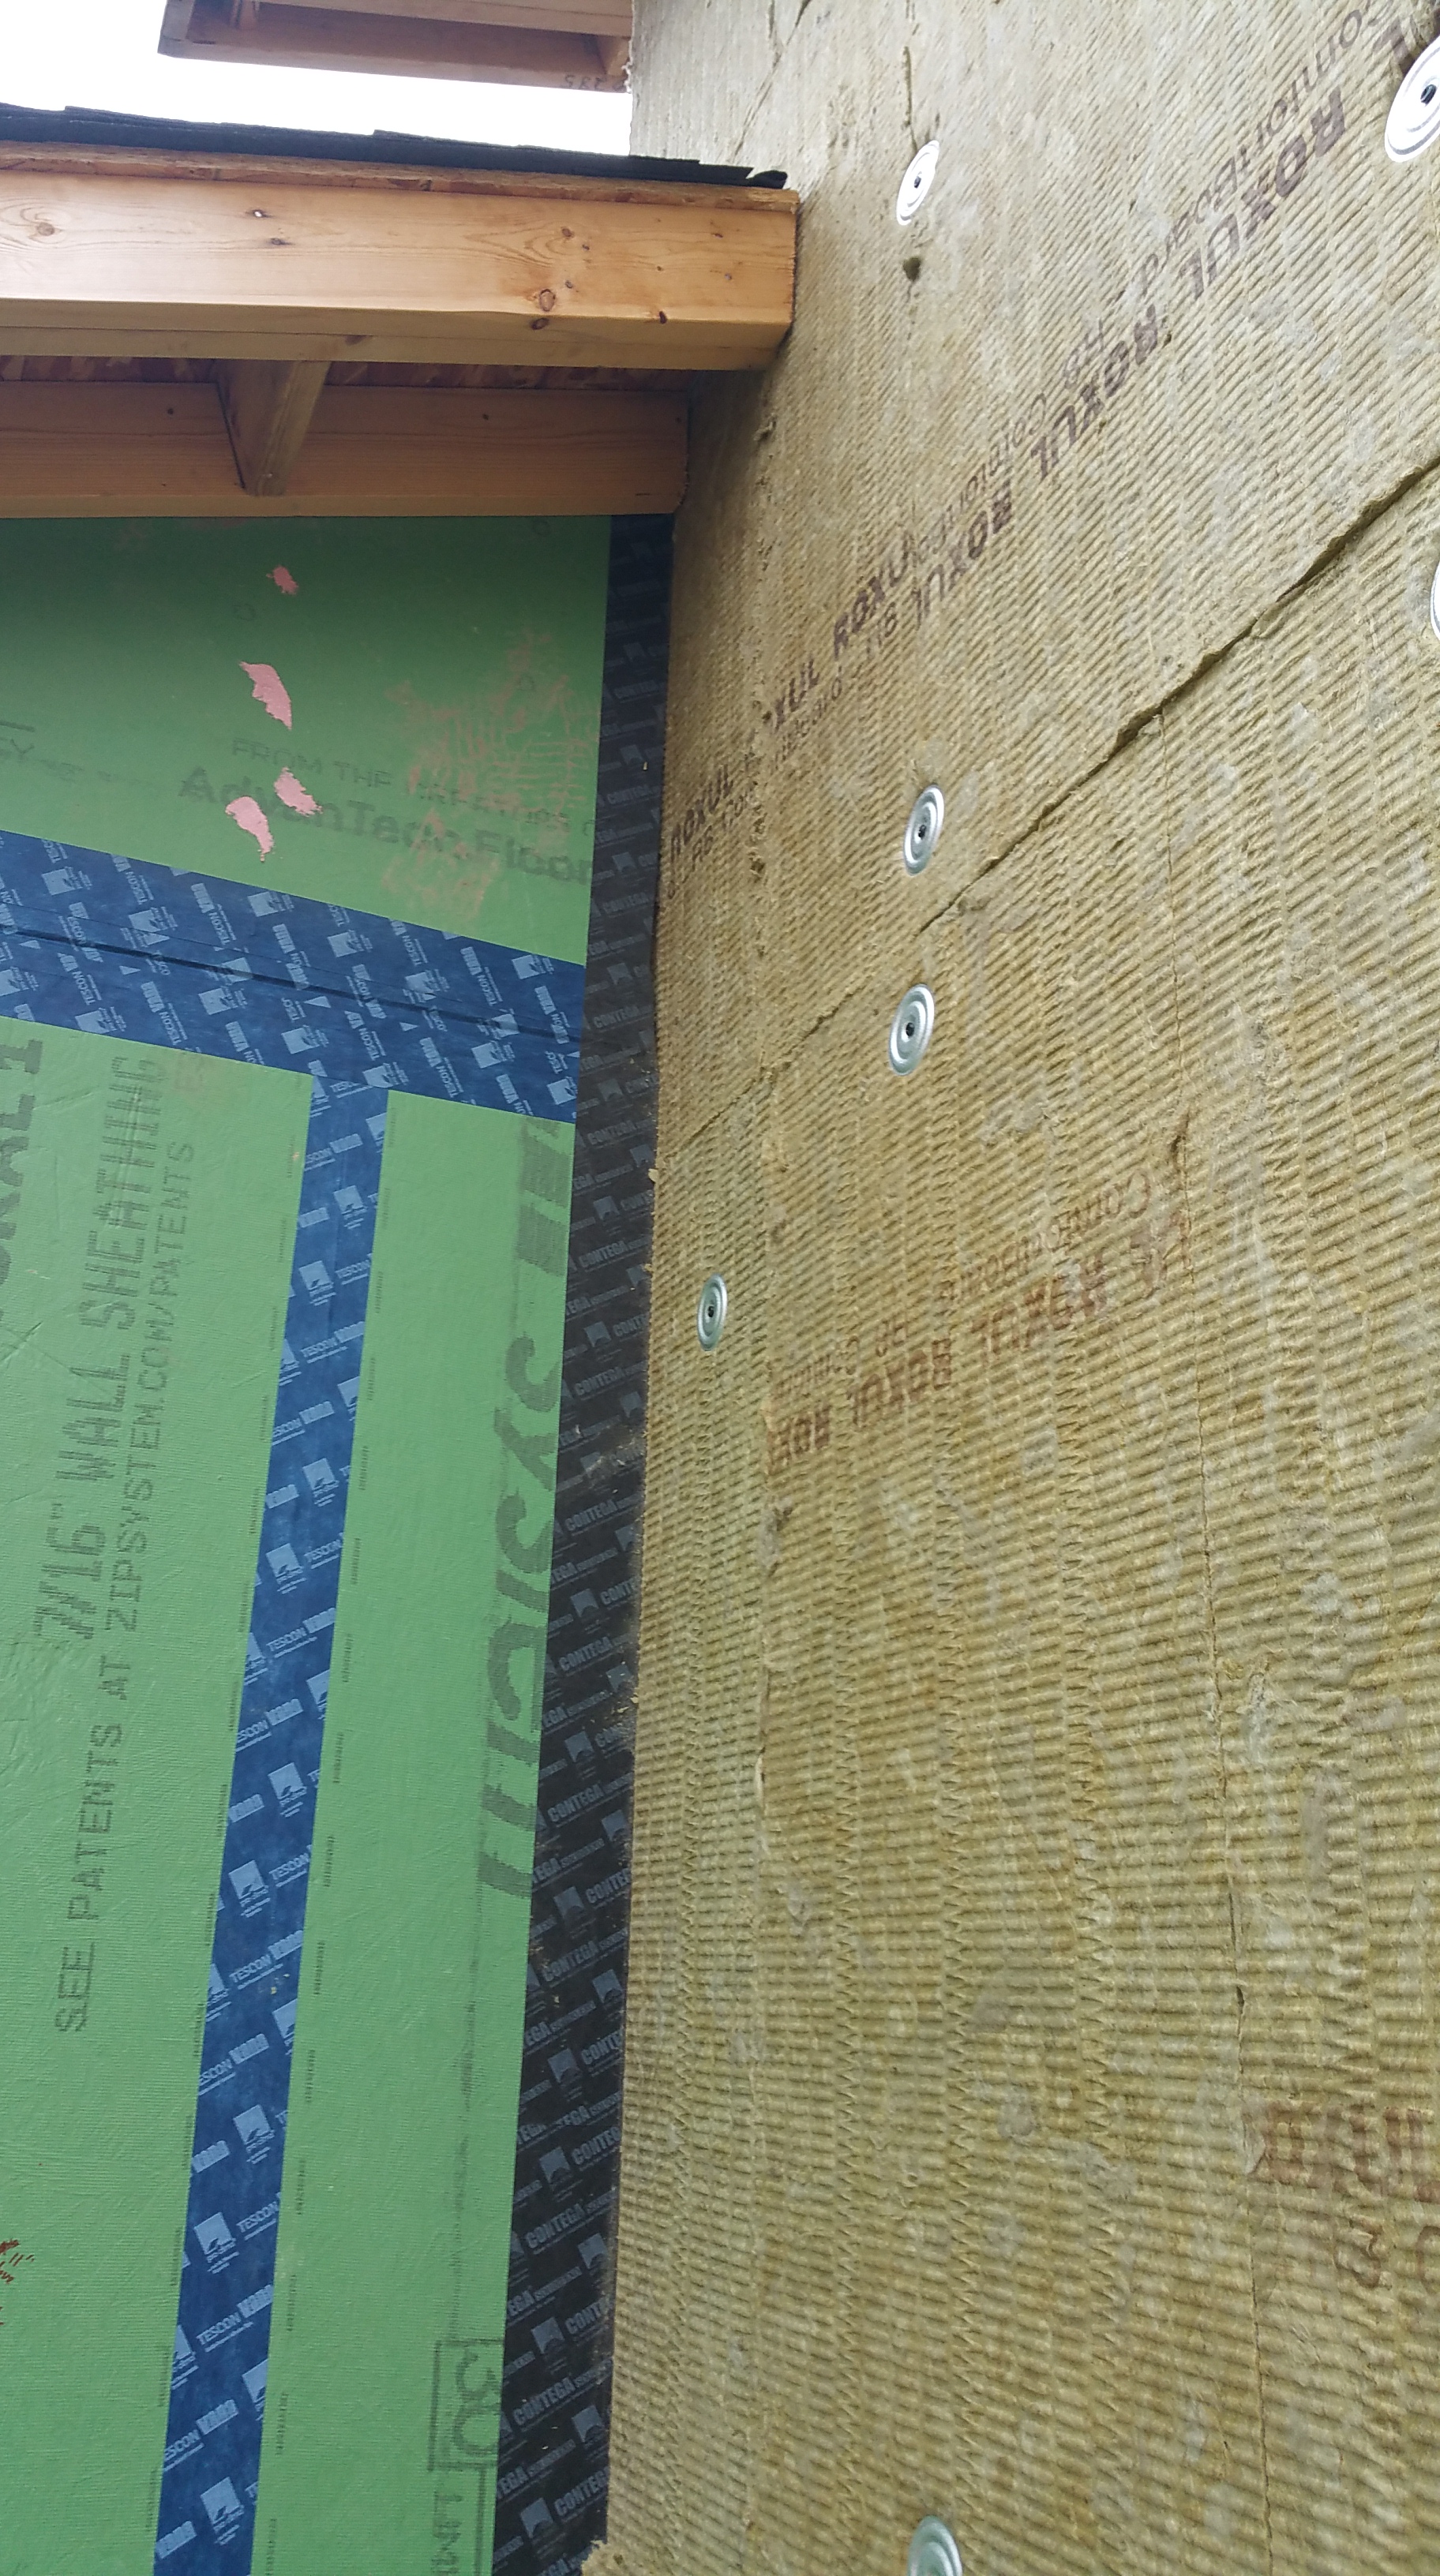
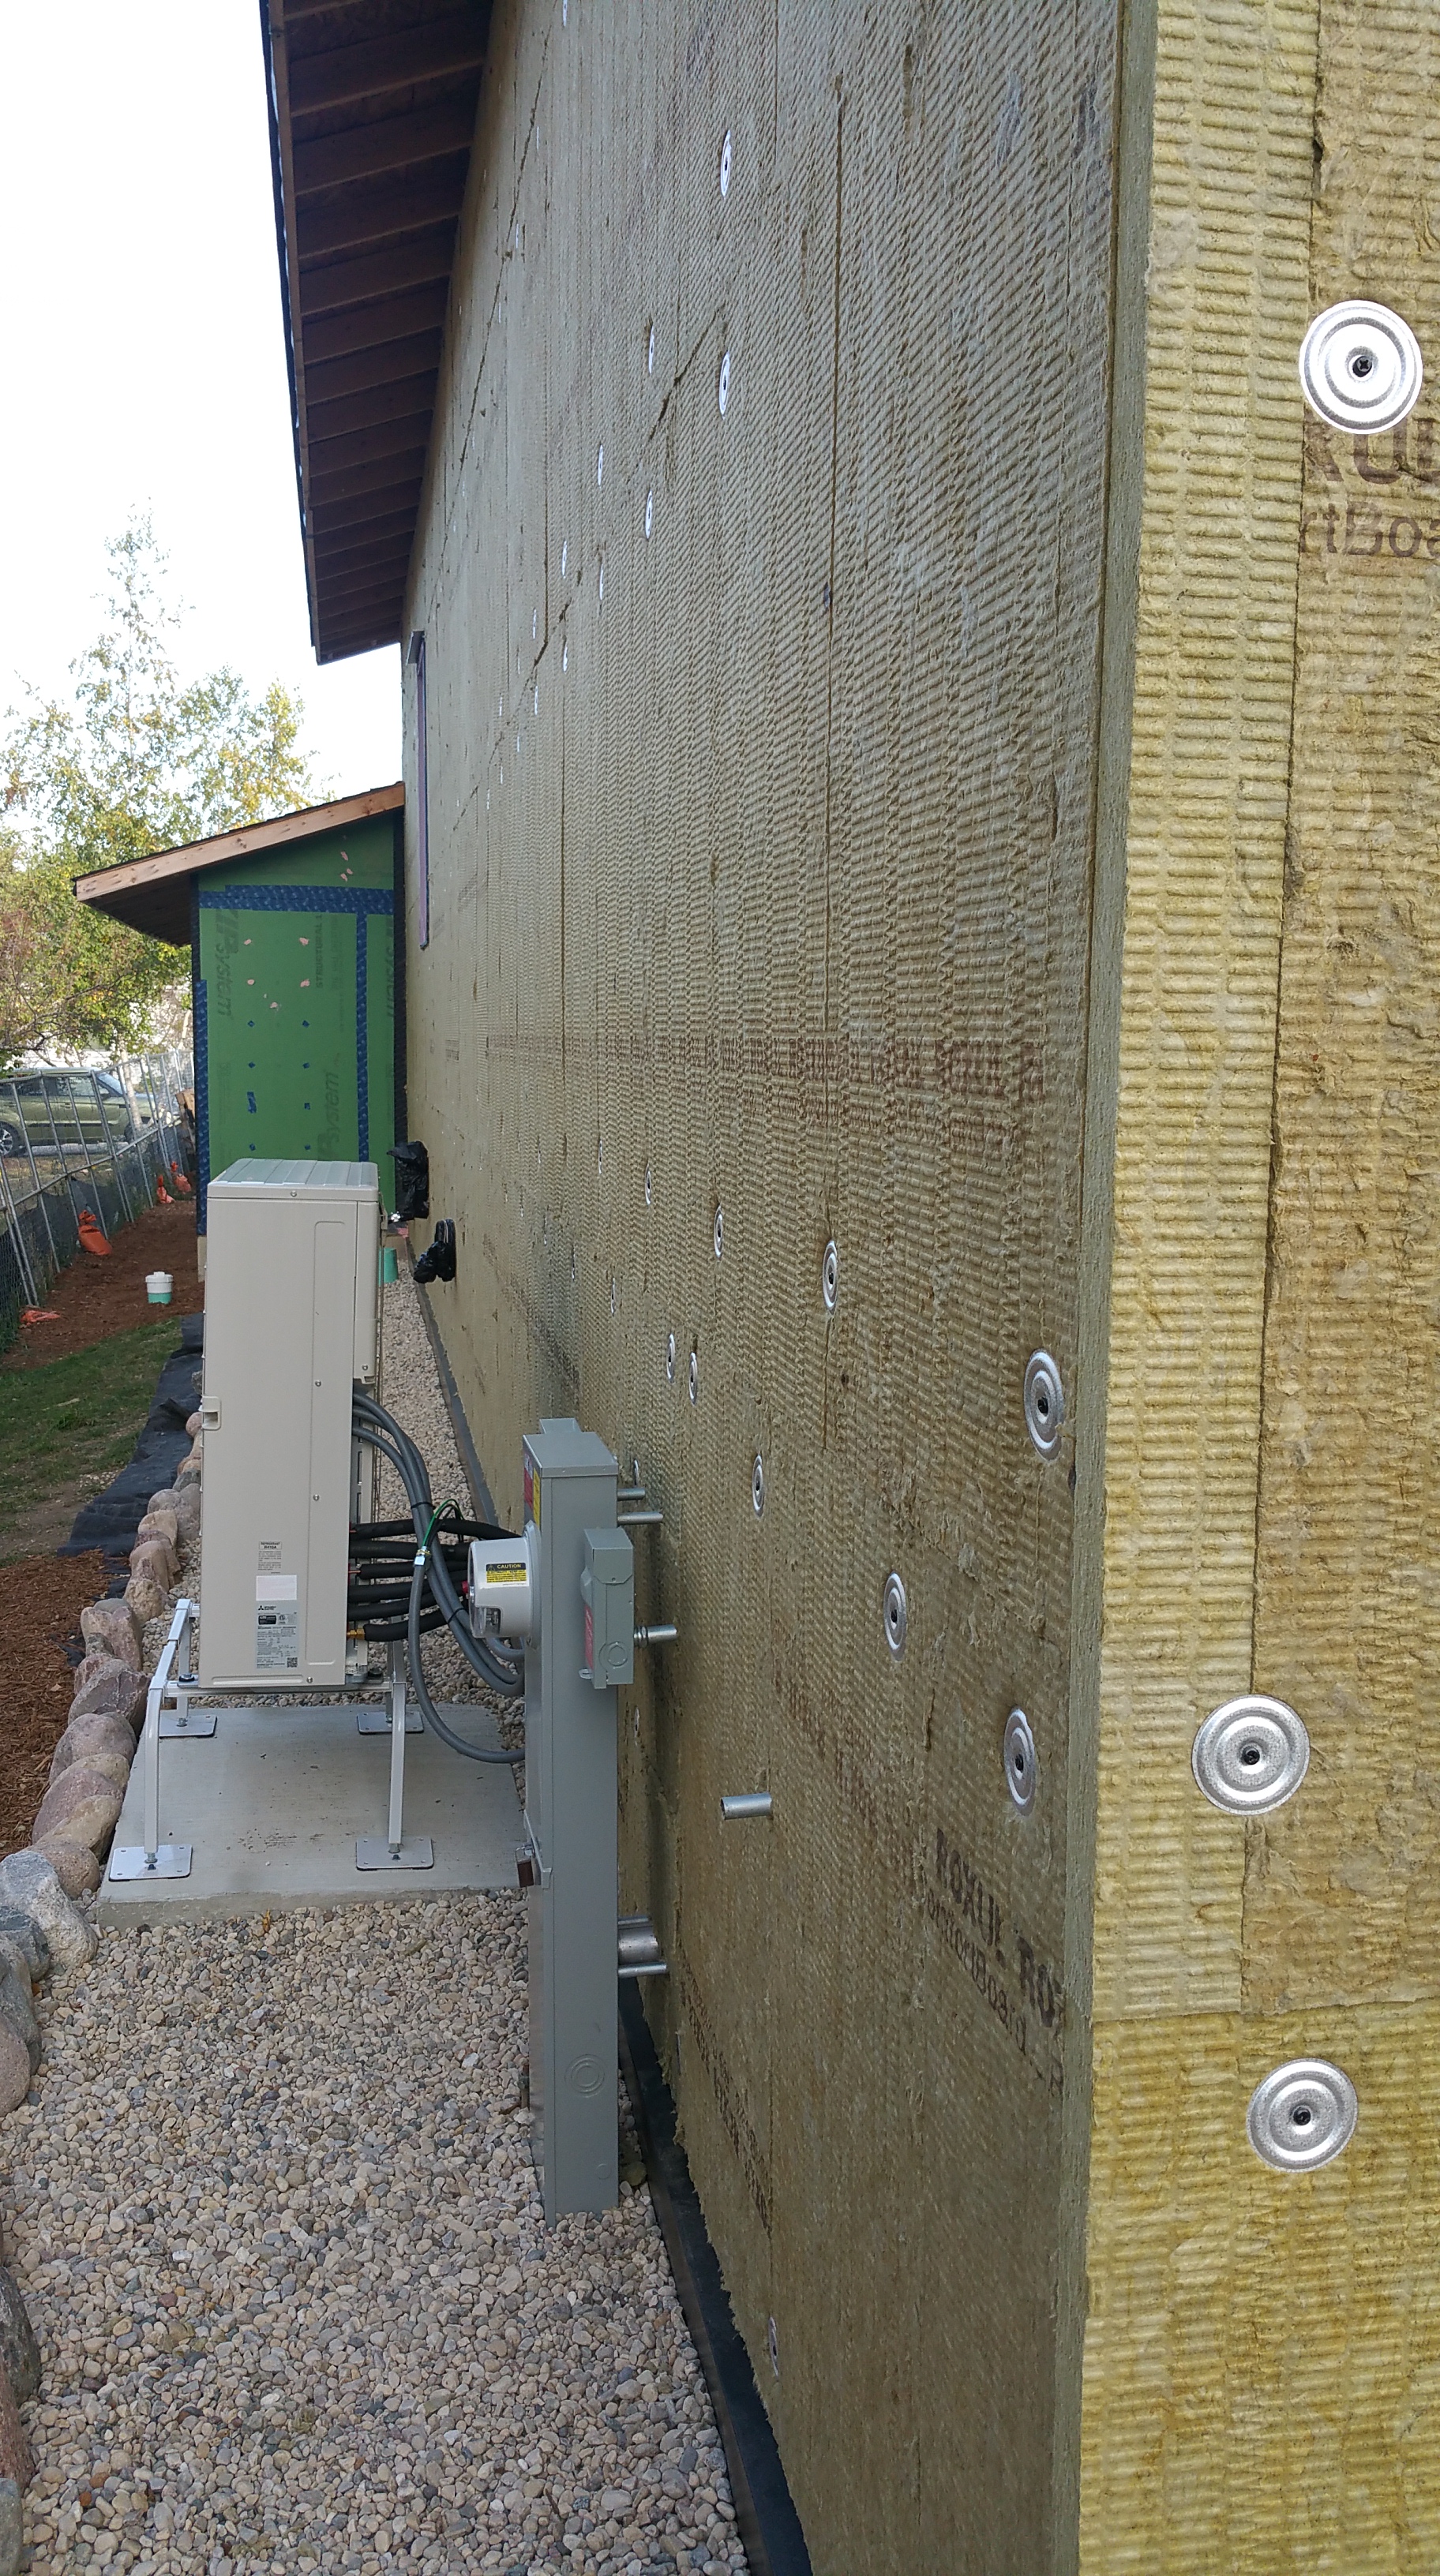
Based on the drawings from our original builder, Evolutionary Home Builders, who was going to use 3.75″ inches of rigid foam, and the recommendations of both PHIUS and Green Building Advisor for our climate zone 5 location (leaning heavily towards PH performance), we decided to go with 4″ of Rockwool Comfortboard 80 on top of our Zip Sheathing.
For more information regarding how we came up with the specifics of our wall assembly, go here:
Wall Assembly
Finding Subcontractors for a Passive House
In the Chicagoland area it’s still a struggle to find builders or subcontractors who are knowledgable about, or even interested in, “green building”. In fact, despite our well-documented experience with Evolutionary Home Builders, clients continue to hire Brandon Weiss (Dvele and Sonnen) and Eric Barton (apparently now on his own as Biltmore Homes, or Biltmore ICF) presumably because the options here in Chicago remain so limited. We assume this is the case because we still get the occasional email from current or former clients who have also had a negative experience working with Brandon or Eric. In addition, even though PHIUS has dozens of certified builders and consultants listed for Illinois and the larger Midwest region, it’s unclear just how many of them have worked directly on an actual Passive House project.
Until there’s more demand from consumers, or the building codes change significantly, it’s difficult to imagine the situation improving much in the near future. This is unfortunate since particularly here in the Chicago area, or the Midwest more broadly, homes could really benefit from the Passive House model, or something close to it, e.g. The Pretty Good House concept, because of our weather extremes (dry, cold winters and hot, humid summers). The combination of meticulous air sealing, high R-values, and continuous ventilation associated with any high-performance build is hard to beat in terms of day-to-day occupant comfort, not to mention the significant reduction in both overall energy demand and the cost of utilities.
In our own case, when I think of all the individual trades we had to hire, securing a siding contractor was far and away the most difficult. Our HVAC contractor for the ductless mini-splits was already somewhat familiar with “green” building and PH, so working with me on air sealing details and dealing with a thick wall assembly didn’t worry him. Also, if I had it to do over, I don’t think I’d bring up all the PH details with a plumbing or electrical contractor when getting bids since the air sealing details are pretty straightforward and can easily be planned for and executed on-site after they begin their work (assuming someone else, most likely a rough carpenter, GC, or homeowner is tasked with all the air sealing chores). And if the concrete sub is unfamiliar with insulation under a basement slab, or over the exterior walls of the foundation, then it’s easy enough for framers, or even homeowners if necessary, to do this work, along with installing a vapor barrier like Stego Wrap before the basement slab gets poured.
For siding, however, because of the level of detail involved before the siding itself could be installed, it was a real challenge to even get quotes. As things turned out, we had nearly twenty contractors (a mix of dedicated siding contractors and carpenters) visit the job site before we received an actual estimate. Many of those who visited the job site expressed genuine interest, most going so far as to acknowledge that this kind of wall assembly made sense and would probably be mandated by the residential code at some point in the future, but almost without exception they would disappear after leaving the job site — no bid forthcoming, and no response to my follow-up phone calls or emails.
Clearly they were terrified, not without justification, to tackle something so new, viewing our project through a lens of risk rather than as an opportunity to learn something new. From their point of view, why not stick with the type of jobs they’ve successfully completed hundreds of times in the past? It also didn’t help that I was a first time homeowner/GC, rather than a GC with a long track record of previously built homes in the area.
In addition, not only is continuous insulation over sheathing a novel concept in the Chicago area, especially in residential builds, even utilizing a ventilated rainscreen gap behind siding is almost unheard of — typically Hardieplank lap siding is installed directly over Tyvek or similar housewrap (this can be observed directly on hundreds of job sites across the city and suburbs). And this isn’t entirely the fault of contractors. For instance, how many homeowners when presented with the idea of continuous insulation, or a rain screen gap, balk at the extra costs associated with these techniques without carefully considering the potential energy savings or increased durability for the structure?
While there are any number of certified LEED projects in our area, and even some Passive House projects (both residential and commercial) in Chicago and the surrounding suburbs, for the most part consumers are still largely unaware of Passive House or other “green” building standards like Living Building Challenge. Clearly “green” building, let alone Passive House, has its work cut out for it here in the Midwest if it ever hopes to have a meaningful impact on the construction industry.
Installing Rockwool over the Zip Sheathing
Mike Conners, from Kenwood Passivhaus, was nice enough to recommend Siding and Window Group, which definitely got us out of a jam. Thankfully, Greg, the owner, was up for the challenge and was nice enough to let us work with two of his best guys, Wojtek and Mark.
Initially Wojtek and Mark dropped off some of their equipment at the site the day before they were to start work on the house. This gave me a chance to go through many of the details with them directly for the first time. Although a little apprehensive, they were also curious, asking a lot of questions as they tried to picture how all the elements of the assembly would come together. In addition to the construction drawings, the series of videos from Hammer and Hand regarding their Madrona Passive House project were incredibly helpful (this project in particular was a big Building Science inspiration for us).
Also, this video from Pro Trade Craft helped to answer some of the “How do you…?” questions that came up during the design and build phases:
As sophisticated and intricate as some architectural drawings may be, in my experience nothing beats a good job site demonstration video that shows how some newfangled product or process should be properly installed or executed.
On the first day, while Wojtek and Mark installed the Z-flashing between the Zip sheathing and the foundation, along with head flashings above the windows and doors, I started putting up the first pieces of Rockwool over the Zip sheathing.

For the first layer of Rockwool we installed the pieces horizontally between studs as much as we could, knowing that the second layer of Rockwool would be oriented vertically. This alternating pattern helps to ensure seams are overlapped between layers so there aren’t any areas where the seams line up, an outcome that could undermine the thermal performance of the 2 layers of Rockwool.

We didn’t worry too much about the orange plastic cap nails missing studs since they were sized to mostly end up in the Zip sheathing. In the end only a couple of them made it completely through the Zip without hitting a stud.

Every so often Wojtek would come around the corner and watch what I was doing before asking questions about specific elements in the wall assembly.

By the time I had about a quarter of the north side covered, Wojtek and Mark were ready to take over from me.
In a pattern that would repeat itself with each layer of the remaining wall assembly, Wojtek and Mark would carefully think through the details as they progressed slowly at first, asking questions as issues arose, before getting the feel for what they were doing and eventually picking up speed as they progressed around each side of the house.

Working through the many details with Wojtek and Mark — the majority of which occur at junctions like windows and doors, the top and bottom of the walls, along with mainly outside corners — was both collaborative and deeply gratifying. They demonstrated not only curiosity and an ability to problem solve on the fly, they also clearly wanted to do things right, both for me as a customer and for the house as a completed structure (it felt like both aesthetically and in building science terms).

They never hurried over specific problem areas, arrogantly suggesting they knew better, instead they patiently considered unanticipated consequences, potential long-term issues, and actively questioned my assumptions in a positive way that tried to make the overall quality of the installation better. This mixture of curiosity, intelligence, and craftsmanship was a real pleasure to observe and work with.

If a GC built this level of rapport with each subcontractor, I can certainly understand their refusal to work with anyone outside of their core team — it just makes life so much easier, and it makes being on the job site a lot more fun.


For the second layer of Rockwool, Wojtek and Mark tried to hit only studs with the black Trufast screws. In fact, screwing into the studs with these fasteners, in effect, became a guide for accurately hitting studs with the first layer of strapping.

These Trufast screws and plates worked well and were easy for Wojtek and Mark to install.


If our lot had been larger, we would’ve gone with a completely detached garage, but unfortunately it just wasn’t an option.
It was exciting to see the house finally wrapped in its 4″ of Rockwool insulation.
Installing Battens and Creating our Rainscreen
Initially we were going to use 2 layers of 1×4 furring strips (also referred to as strapping or battens); the first layer installed vertically, attaching directly over the 2×6 framing members through the 2 layers of Rockwool and the Zip sheathing, with the second layer installed horizontally, anticipating the charred cedar that would be oriented vertically on the house.
Pro Trade Craft has many really informative videos, including this one on using a rainscreen behind siding:
Nevertheless, as the second layer of Rockwool went up, Wojtek and Mark pointed out that putting the siding in the same plane as the Rockwool/metal flashing on the basement foundation would be needlessly tricky. In other words, maintaining about a 1/8″ horizontal gap between the bottom edge of the vertical siding and the metal flashing on the foundation around the house would be nearly impossible, and any variation might prove unsightly.
As a solution, we decided to use 2×4’s for the first layer of strapping. By adding to the overall thickness of the remaining wall assembly it meant the eventual siding — now pushed slightly out and farther away from the Z-flashing covering the face of the Rockwool on the foundation — could be lowered so that visually it slightly covered what would’ve been a gap between the top of the metal flashing on the foundation insulation and the bottom edge of the siding. Wojtek and Mark also found that the 2×4’s were easier to install than the 1×4 furring strips directly over the Rockwool so that it didn’t overly compress the insulation (an easy thing to do).
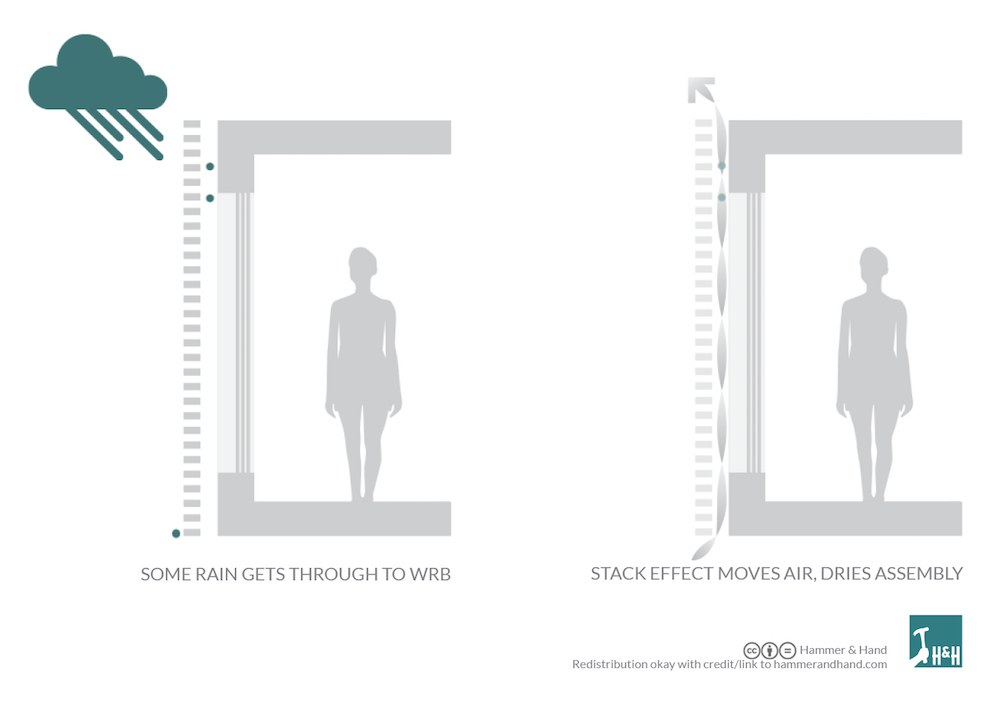
Unfortunately, increasing the overall wall thickness with 2×4’s meant having to use longer Fastenmaster Headlok screws (it would also cost us later when it came to the siding on the north side of the house — more on this later). Apart from this change, the additional overall wall thickness mostly just increased the air gap in our rainscreen, which arguably just increased potential air flow while also expanding the drainage plane behind the eventual siding.
In one of the Hammer and Hand videos Sam Hagerman mentions that at least 1.5″ of screw should be embedded into the framing (excluding the thickness of the sheathing) for this type of wall assembly, but when I asked a Fastenmaster engineer about this directly he recommended a full 2″ of their screws should be embedded into the framing members in order to avoid any significant deflection over time.
As a result, we ended up using 8.5″ Headlok screws. The screws work incredibly well, requiring no pre-drilling, and they’re fun to use with an impact driver (keep your battery charger nearby). Along with the plastic cap nails and Trufast screws, I think we ended up with less than a dozen fasteners that missed the mark for the entire house — a testament to Wojtek and Mark’s skill. I was able to seal around these errant fasteners from the inside with a dab of HF Sealant.

During the design stage, using these longer screws prompted concerns regarding deflection, but based on this GBA article, data provided by Fastenmaster, along with some fun on-site testing, the lattice network of strapping (whether all 1×4’s or our mix of 2×4’s and 1×4’s) proved to be incredibly strong, especially when the siding material is going to be relatively light tongue and groove cedar.
For the garage, since insulation wasn’t going to cover three of the walls (only the common wall with the house was treated as part of the house wall assembly), we used significantly shorter Headlok screws for the first layer of furring strips.


Mark took the time to recess these screws to make sure they didn’t interfere with the eventual drywall.

A small detail, but one of many examples showing Wojtek and Mark’s attention to detail, not to mention their ability to properly assess a situation and act appropriately without having to be told what to do.
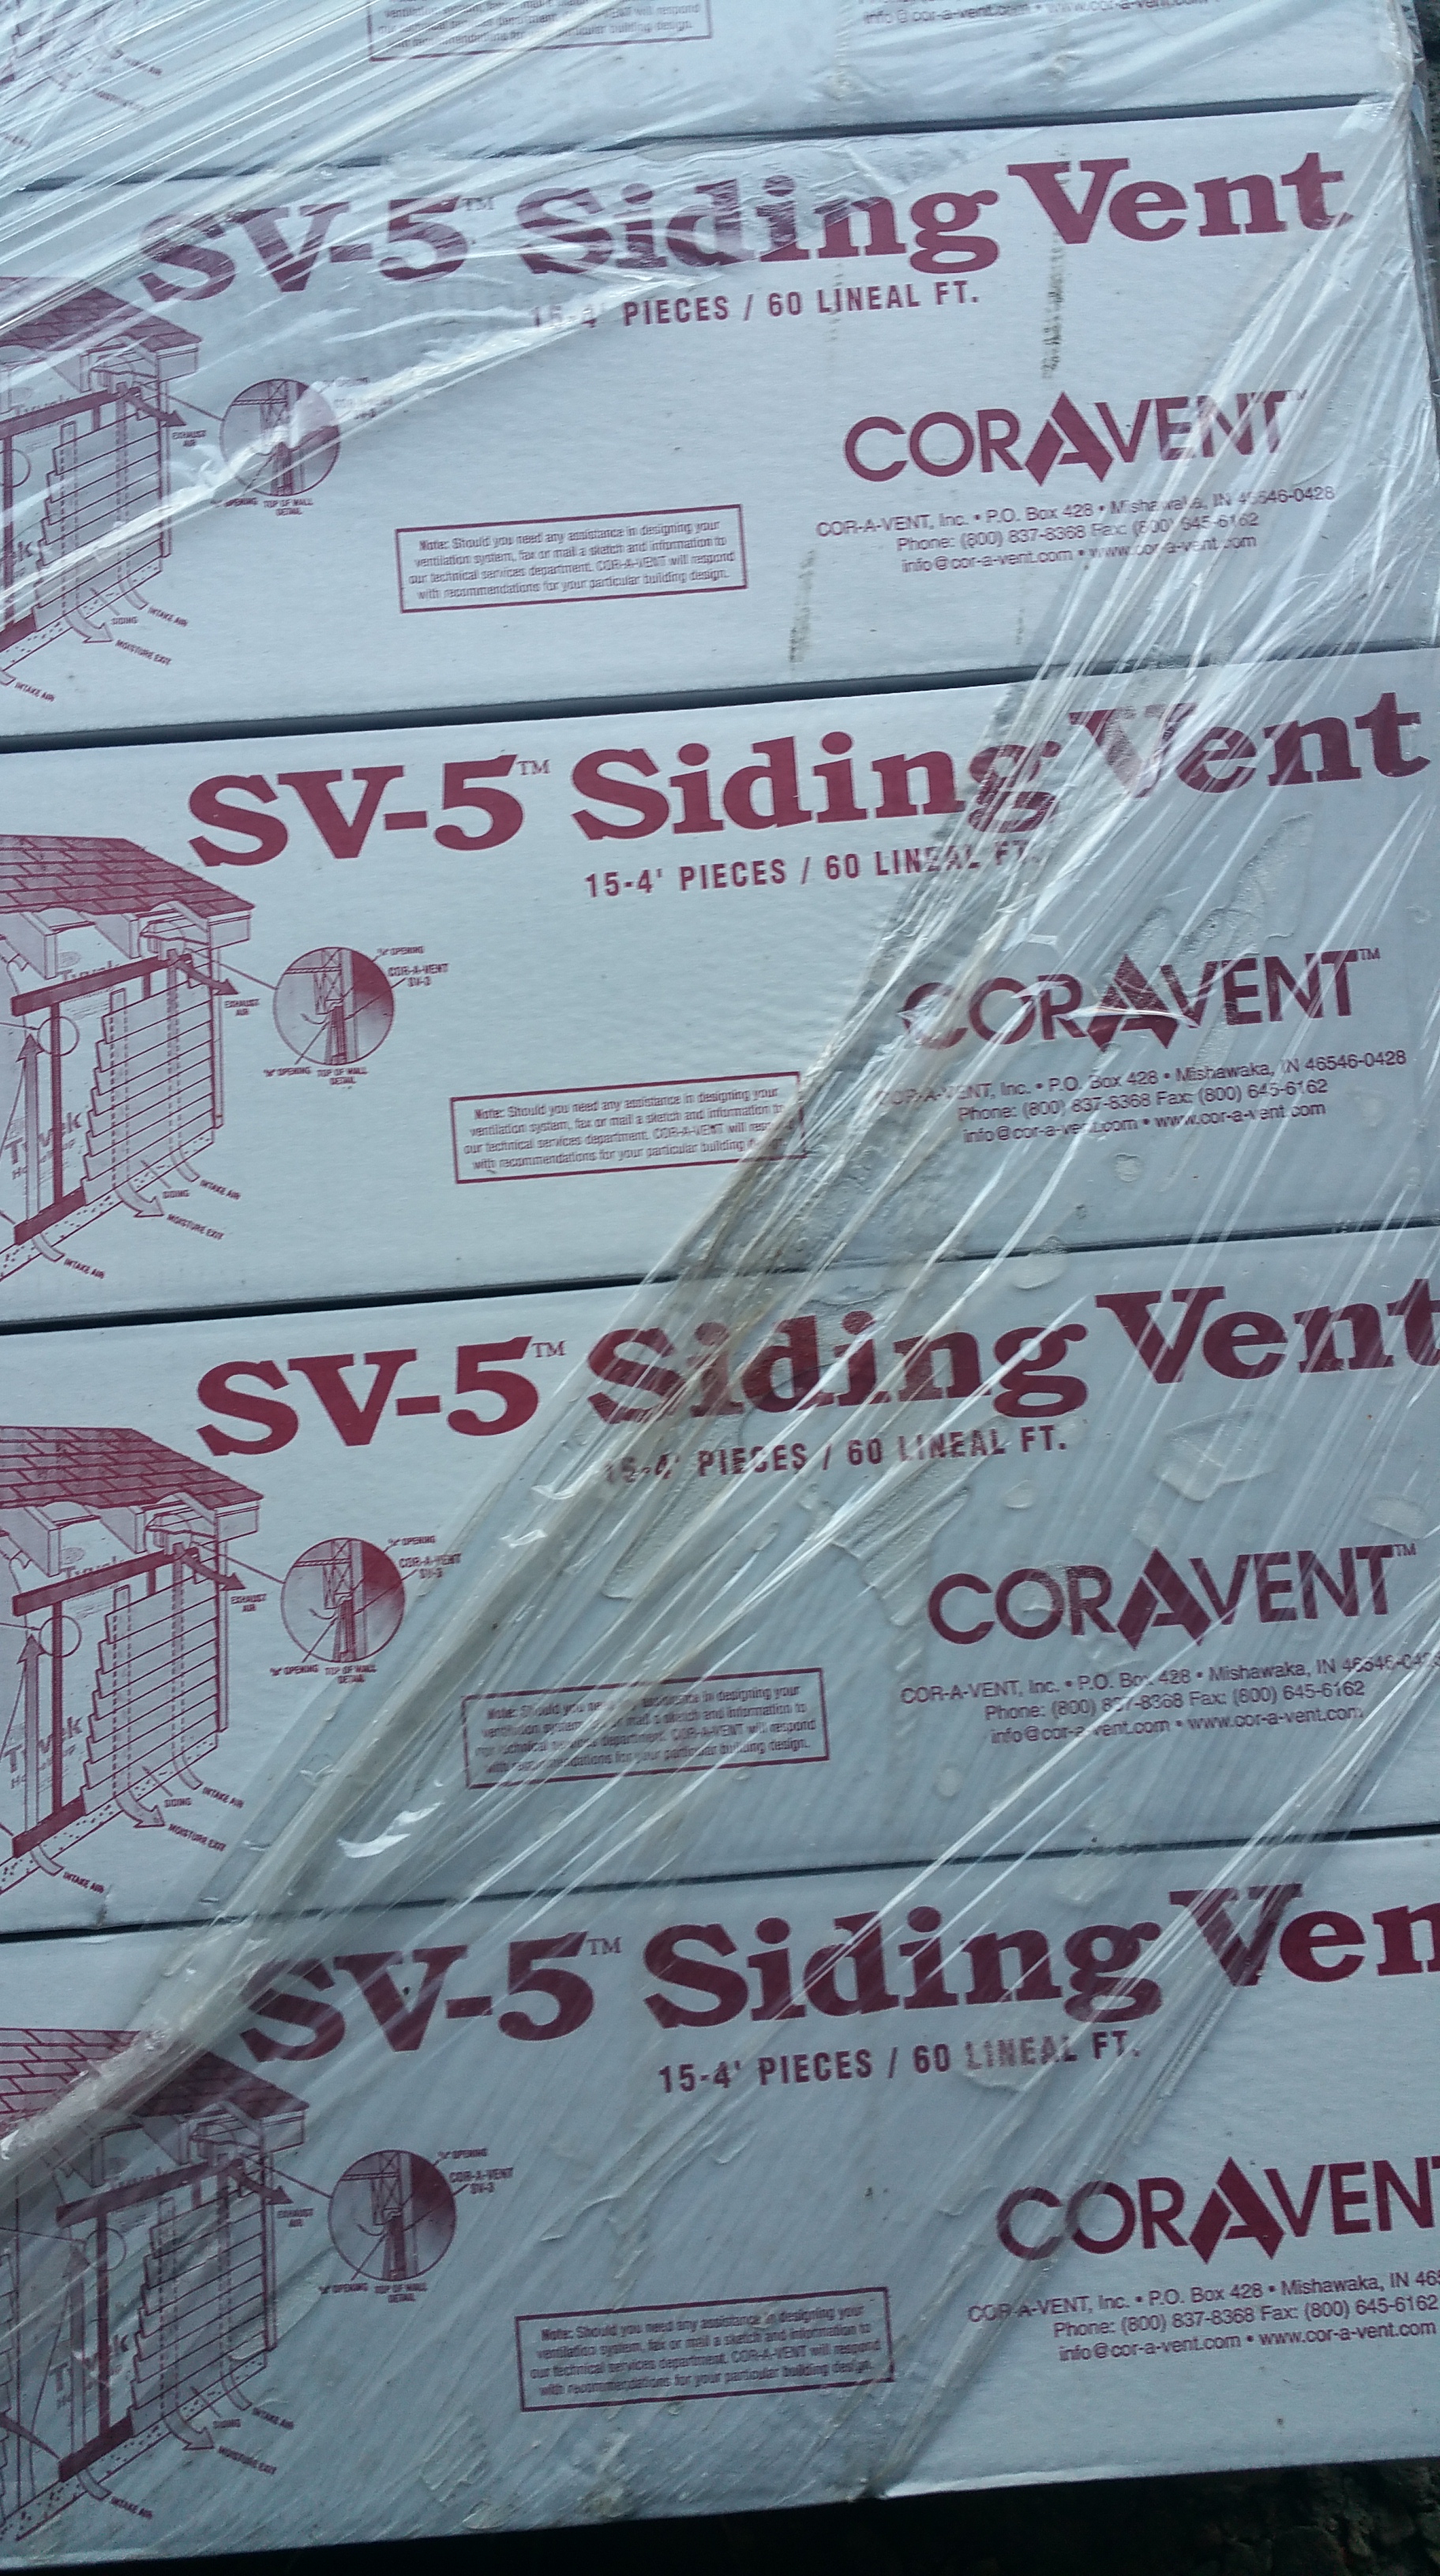
Once the 2×4’s were all installed vertically through the structural 2×6’s as our first layer of strapping, Wojtek and Mark could install the components of the rainscreen, including the Cor-A-Vent strips at the top and bottom of the walls, as well as above and below windows and doors. In combination with the 2×4’s and the 1×4’s, this system creates a drainage plane for any water that makes its way behind the siding, while also providing a space for significant air flow, speeding up the drying time for the siding when it does get wet.
In addition to the Cor-A-Vent strips, we also added window screening at the bottom of the walls just as added insurance against insects. We noticed that on the garage, even without any insulation, the Cor-A-Vent didn’t sit perfectly flat in some areas on the Zip sheathing. Since the Rockwool on the foundation, now covered by the metal flashing, was unlikely to be perfectly level, or otherwise true, along any stretch of wall, it made sense to us to double up our protection in this way against insects getting into the bottom of our walls at this juncture.


Wojtek and Mark also did a nice job of taking their time to shim the 1×4 layer of furring strips, thus ensuring a flat installation of the charred cedar.

This really paid off, not only making their lives easier when installing the tongue and groove cedar, but also providing aesthetic benefits in the overall look of the siding. This was especially true on the north side of the house, which has the largest area of charred siding with almost no interruptions, apart from a single window. It’s also the tallest part of the house, so without proper shimming the outcome could’ve been really ugly. Instead, once the cedar siding was installed it was impossible to tell there was 4″ of Rockwool and 2 layers of strapping between it and the Zip sheathing.
Really impressive work by Wojtek and Mark.

Things got somewhat complicated around windows and doors, but once we worked through all the details for one window it made the remaining windows and doors relatively straightforward to complete.
Below you can see all the elements coming together: the window itself, the window buck covered with tapes for air and water sealing, the over-insulation for the window frame, the Cor-A-Vent strip to establish air flow below the window and behind the eventual cedar siding, along with the strapping that both establishes the air gap for the rainscreen while also providing a nailing surface for the siding.
Once most of the siding was complete around each window, but before the 1×6 charred cedar pieces used to return the siding to the window frames were installed, each window received a dedicated metal sill pan. The pan slid underneath the bottom edge of the aluminum clad window frame and then extended out just past the edge of the finished siding (I’ll include photos showing this detail in the next blog post about installing the charred cedar siding).
Here’s a JLC article discussing a couple of options for trim details in a thicker wall assembly with similar “innie” or “in-between” windows:
Window Trim
And here’s a detailed slide presentation by Bronwyn Barry regarding details like these for a Passive House wall assembly:
Sills and Thresholds – Installation Details


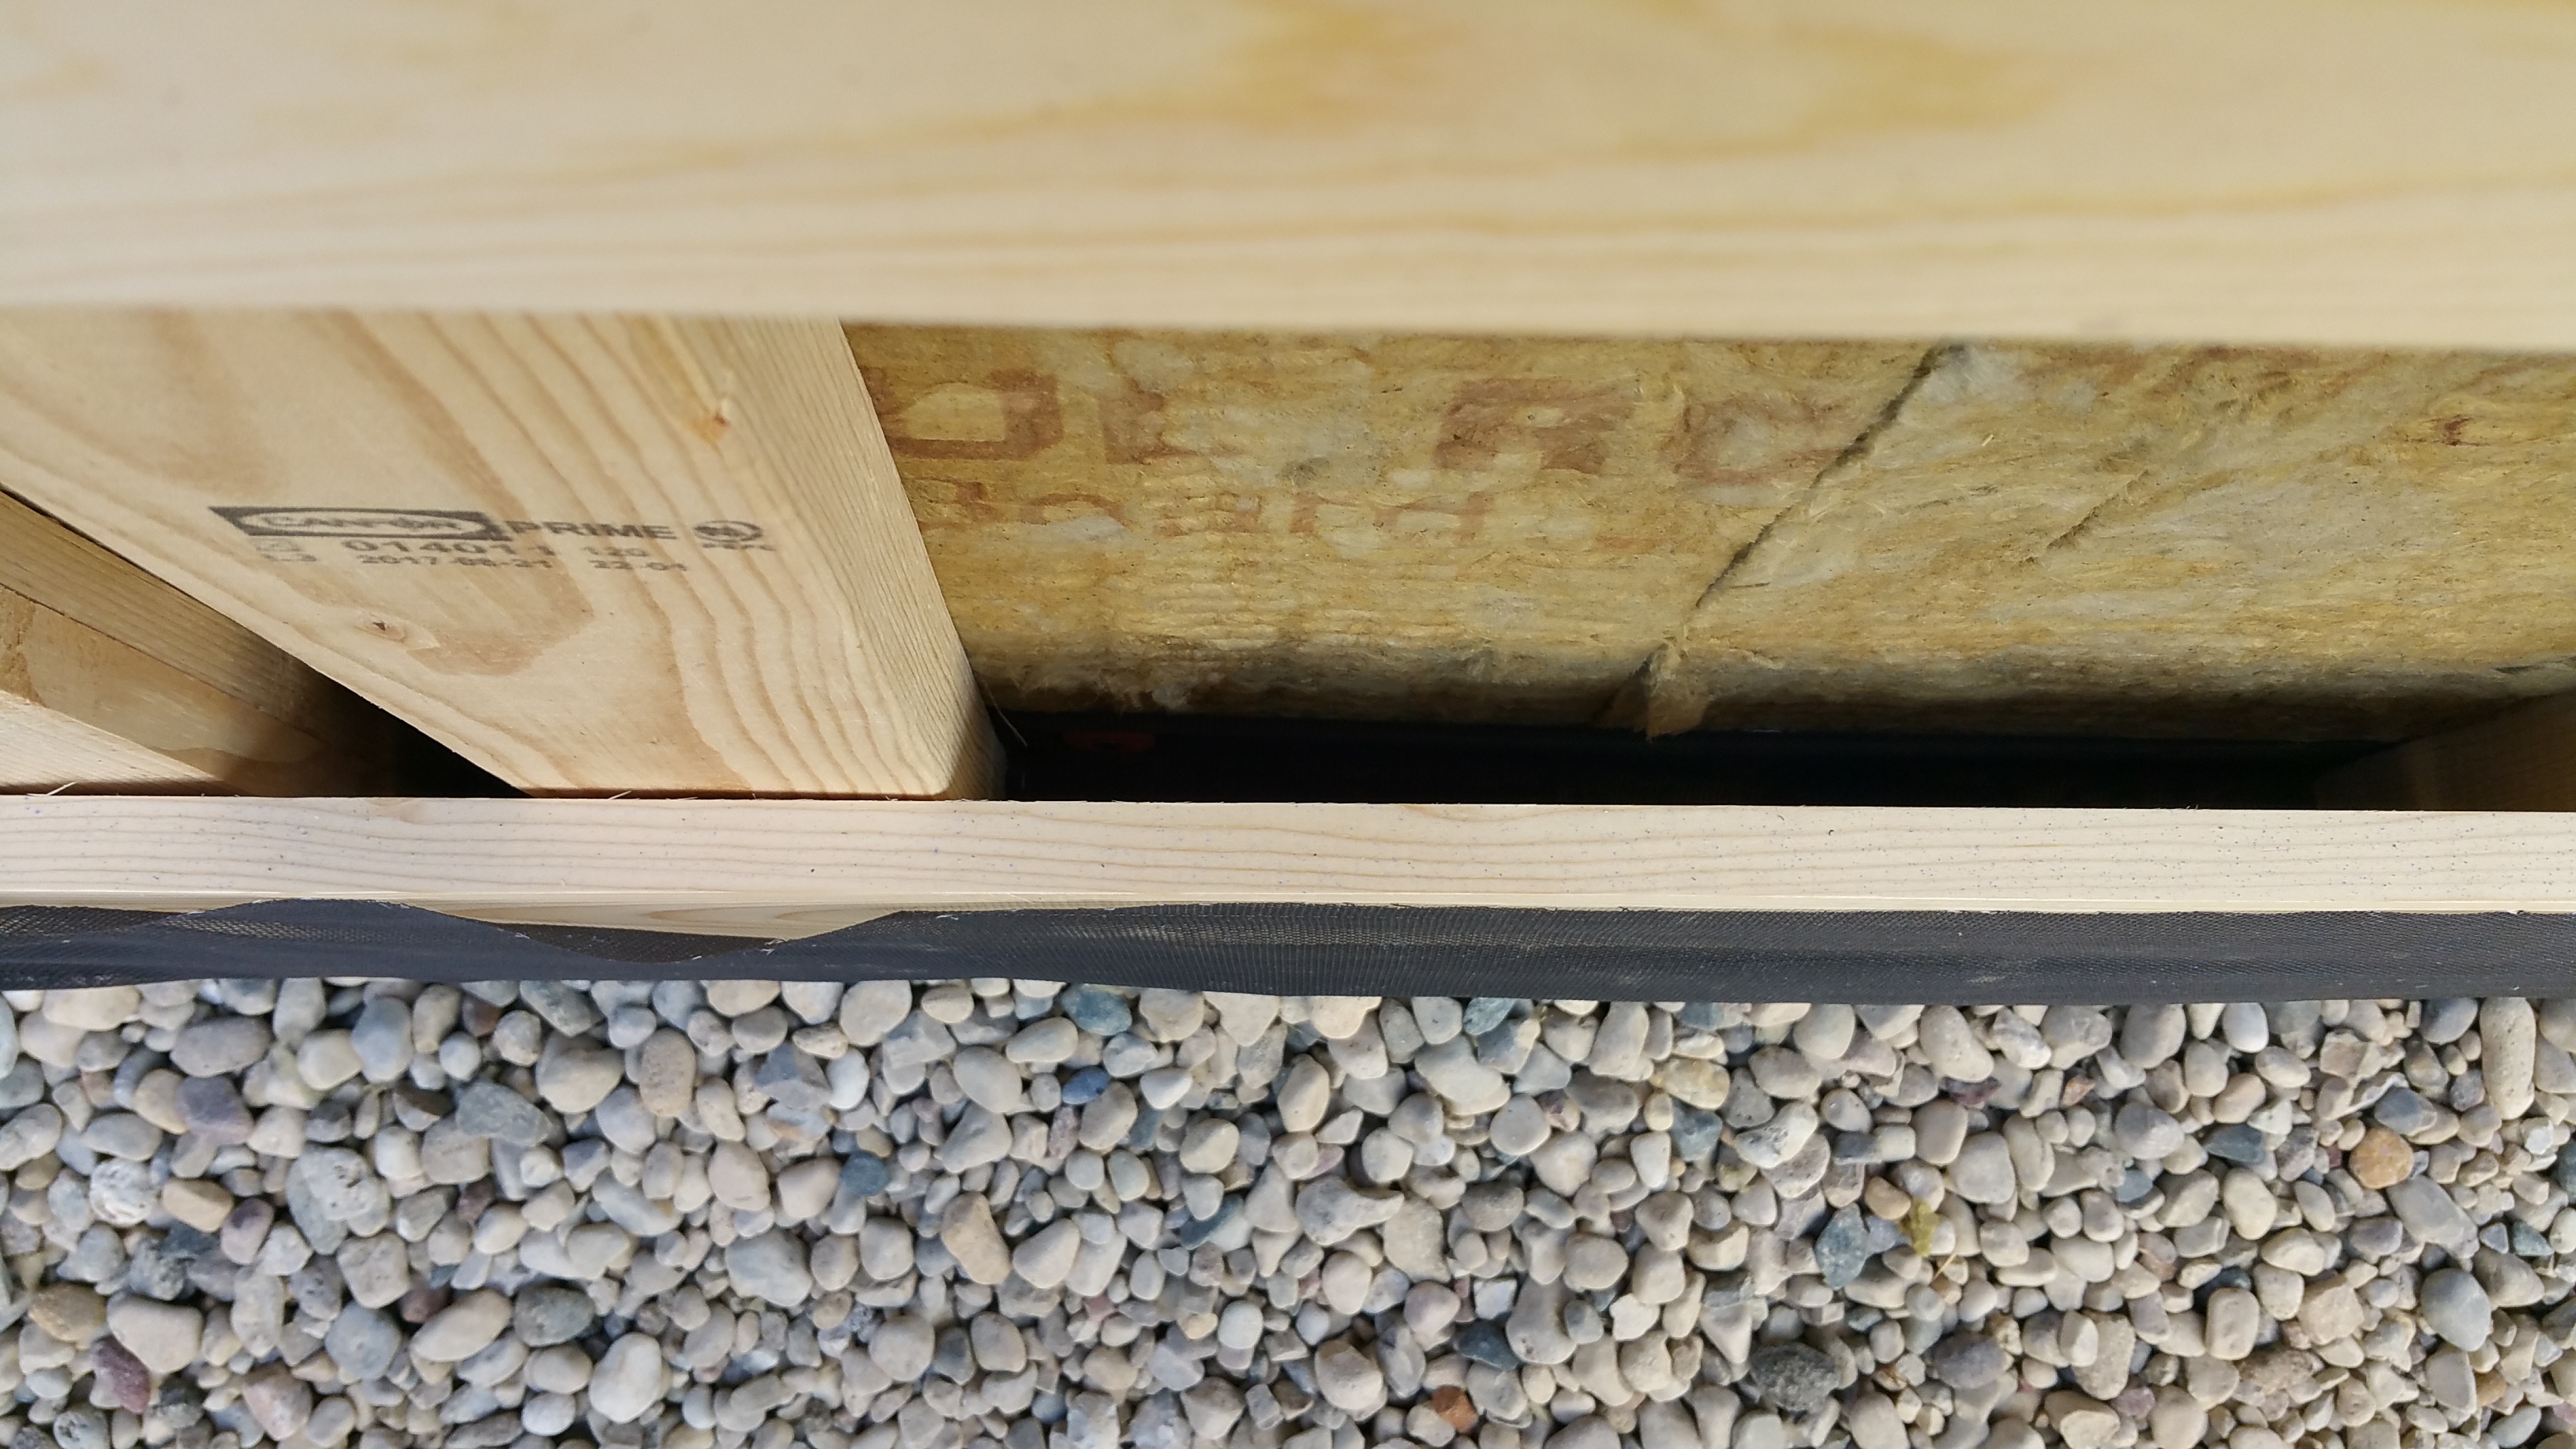
Many of the same details were repeated at the top and bottom of our two doorways. Below is a close up of the kitchen door threshold with Extoseal Encors and Cor-A-Vent again, along with additional metal flashing. Once a dedicated metal sill pan was installed (after most of the siding was installed), it felt like we did everything we could to keep water out.

In the photo below, you can see the many elements we utilized to try and prevent moisture damage around the front porch. For the door buck itself, I applied Prosoco’s Joint and Seam, both at joints in the plywood and the plywood/Zip sheathing connection, but also between the concrete and the door buck, as well as between the Rockwool and the concrete. We also kept the 2×4’s off the concrete, while also using the Cor-A-Vent strips to establish a ventilated rainscreen so that any moisture that does get behind the siding has ample opportunity to dry out in this area before it can cause any rot.


In the next blog post I’ll go through the details for the top of the ventilated rainscreen when discussing how the charred cedar siding was installed.

Even without the siding installed yet, it was especially rewarding to see all the underlying prep work involved in finishing our thermal layer and rainscreen come together so nicely.

Many thanks to Wojtek and Mark for executing all these details with such skill!


Crazy how much work it is for exterior insulation but the continuous effect is very nice. Just wish the process was more straightforward especially around windows.
I’ve opted for a yard butler instead of a hose bib penetration. I always find the hose bibs on the outside of the house cause a tripping hazard for a hose and really an unneeded hole through your building assembly. Putting the hose bib in a location that is more accessible and can be less of an eye sore I hope will be an added benefit.
Love all the details !
LikeLike
It was a lot of work, but nice when complete. In terms of building science, we just felt a lot more comfortable with continuous insulation than with a double stud wall configuration.
What’s a yard butler? I’ve never heard of that before. Is it installed inside your garage? Do you have a link to the product?
Definitely agree about limiting as many penetrations through the structure as possible.
LikeLike
I’ve haven’t bought the yard butler yet. This is one I was looking at on amazon: https://www.amazon.com/Yard-Butler-Extender-Remote-Outdoor/dp/B000RYL2CY/ref=sr_1_25?keywords=yard+butler&qid=1564242486&s=gateway&sr=8-25. Watts makes one called a yard hydrant -http://www.wattscanada.ca/pages/_products_details.asp?pid=7214. I don’t have a garage with my house – climate doesn’t require a garage and my property is small. I still need to do some research around the best one . I have structural insulated panels as my wall system with 4′ on centre thermal bridges and then a 2×4 service wall with a slight air gap that is roxul batted on the interior. Even though The sips use EPS and I am not a huge fan of foam I’ve never been super comfortable with the idea of cellulose insulation.
LikeLike
We considered using dense-packed cellulose inside our 2×6 framed exterior walls, but we worried about potential settling and finding an installer we could trust.
I ended up installing Roxul batts instead.
LikeLiked by 1 person
Try next time;? https://www.google.com/search?q=concealed+hose+bibs&ie=UTF-8&oe=UTF-8&hl=en-us&client=safari#sbfbu=1&pi=concealed%20hose%20bibs
They work great
LikeLike
Still way inferior to the yard hydrants. With the yard hydrant I have
– zero penetration through the building envelope
– no tripping hazard when a hose is attached
– convenient location and shorter hoses for where I’ll actually use the water
– no potential for a fixture to break in my exterior wall and cause flooding or water damage to my structure
I went with a YHP-02 from Boshart. It was quite a bit more affordable than the watts solution.
LikeLike
I am trying to figure out what kind of interior stain to use for wood doors. Since the house is close to passive with the zehnder I am not sure what to use. There are some products that are rated 275 voc grams per litre – have you done any research on clear coating wood for interior trim / doors?
LikeLike
I’ve had good luck with low or no-VOC products purchased from Green Building Supply out of Iowa.
I just order online and they ship to me:
https://www.greenbuildingsupply.com/All-Products/Paints-Coatings-Wood-Stains-Sealers
I’ve used a couple of the Safecoat clear sealers for various small projects, and I’ve been happy with how they turn out.
They also carry a couple of other clear sealer brands.
I would buy a couple of different ones and try them out on some scrap wood so you can see how they apply and what level of sheen you like.
I haven’t tried any of the stains, but they also carry those in a low or no-VOC version. I think they carry more than one brand for the stains as well.
LikeLike
Great comment great site with very healthy products like I used to sell at Green Depot last through out the country.. if any ones reading this from the west, see Green Home Solutions in Seattle @ ; https://www.ghsproducts.com/
Great look!
LikeLike
Also for future ideas; Osmo a German product are higher VOC at first, but after off-gassing in few days will be non noticeable for those that are sensitive and is the only coating that gets the highest certification from the “south coast air quality management district” see; https://osmocolorusa.com/
LikeLike
Funny you should mention Osmo — in a future blog post I’ll talk about the various interior design elements that I utilized the Osmo as the finish coat.
LikeLike
Hi Eric, Read your article in Fine Homebuilding and then searched for you, and ended up here. Lot’s of helpful information, so thanks for documenting your experiences.
I’m building a house for my wife and I, after building for others. I’m in Northwest Montana and not much going on the building of net zero or passive house spectrum. Fun to read your blog, as our projects are similar in some aspects.
I’m curious on your window details? Specifically how you applied flashing/drip edge to the header of the window openings.
I am installing “innie” windows, (Glo, tilt and turn, triple glazing). I have 3″ of exterior Rockwool insulation, window bucks, and vertical strapping. I’ll be installing some fiber cement panels with a /track clip attachment system.
Thanks in advance for any insights, Brad
LikeLike
Hi Brad,
Thanks for checking out the blog!
Have you heard about the Beartooth Passive House project in Red Lodge? I know the owner, Tully, received Passive House training from Emu — you can check out the details here:
https://emu.systems/systems/pilot/beartooth/
If you have time and the budget allows, you may want to try their certified passive house tradesperson training course — it would help ensure you get all of your air sealing details right, along with confirming you have enough insulation in all of your assemblies. Might be worth the peace of mind, even if you’re not planning on Passive House certification.
I also wouldn’t hesitate to contact either of them with questions; my guess is both would love to help you out. I realize your location, even though it’s in Montana, might still be 6-8 hours away from Red Lodge, but a trip down there to look at his project and ask him questions may prove invaluable, if he’s up for it — Passive House people are usually pretty good about sharing valuable info.
For our flashing above windows, because we went with innie windows, the flashing runs from Zip sheathing down over the top of the window buck, just beyond the siding material. If the window is properly air/water sealed, there’s no need for any additional flashing on the interior side of the top of the window buck where it meets the window. And rather than attach the flashing with fasteners, we put it in a bead of Prosoco Fast Flash, before counter flashing it again with more Fast Flash.
Hammer and Hand doesn’t take their head flashing all the way back to the Zip, instead they put it in-between 2 layers of Rockwool, thereby reducing thermal bridging.
This being our first build, I wasn’t comfortable doing that. I preferred the added insurance of going back to the Zip so water, if it reaches the Zip above a window or door, can easily get out.
I have their video showing their mock-up wall assembly details posted in the body of the post for Siding Part 1. I can’t tell you how many times I played that video over and over, trying to make sure I got all of the details right for our windows 🙂
We really love our ‘innie’ windows. In fact, it’s one of my favorite things about the house. Not only should they perform better, but the shadow lines on the exterior look really nice. And I like the look of having a substantial sill on the interior and the exterior side of the windows.
And just for some context, 4″ of Rockwool on a 2×6 wall has allowed us to meet all of the Passive House numbers here in climate zone 5. I’m assuming you’re probably in zone 6, so you may need more than 3″ to reach Passive House, if that’s your goal. Again, this is something Tully or Emu could give you feedback on for your specific region.
Hope all of this makes sense. Let me know if you have more questions.
Good luck with your build!
Eric
LikeLike
Hey Eric,
Thanks for the reply, link and additional info, very helpful.
I’m most likely super close to passive house standards from the research I have done. I’ve done most of the work my self, as I’ve tried to funnel some of the saved “labor cost” to better house building material.
I have tried to use as much recycled products as possible. And I was lucky enough to come across someone who had miss ordered Comfort Board 80 and traded work plus some $$ for the 9 pallets. All though not “green” I saved a couple hundred sheets of Dow XPS from going to the land fill for my under slab insulation.
I went with Siga products for interior and exterior water and moisture management, along with Siga sealing tapes for window openings/bucks and other penetrations, air sealing needs.
Your method of the head flashing on the windows looks to be the way to go. I have some of the Prosoco products on hand and may also add a strip of Siga Wigluv tape.
I’m essentially just trying to build a living structure that will last a long time and will use less resources both in new materials and heating cooling cost. I’m on a budget though.
Locally, there is little to no interest in Net Zero, Energy Smart and Passive House building. It’s been great to find blogs such as yours, to help with information along the way.
On example I have is that I had a heating cooling contractor come out to work up a HRV and Ductless Mini Split system. When I received the quote and system specs, I was amazed to say the least. The system quoted was about 400% greater than the actual needs of the 2100 square foot living space which only consisted of two bedrooms and on larger living/kitchen area. they said they did a Manual J calc, but that’s doubtful.
Any way, thanks for documenting your project. I finished up reading the rest of your post information, it’s been very helpful and insightful.
LikeLiked by 1 person
Nice job on recycling the rigid foam. And congrats on nabbing that mis-ordered Rockwool!
Not much interest in the Chicago area for Passive House, or “green” building generally, either from homeowners or the trades.
Not surprised to hear about the issues with your HVAC contractor. The HVAC guy our second builder (who we had to fire for gross incompetence) was going to use was also clueless about Passive House, or even Pretty Good House:
https://www.greenbuildingadvisor.com/question/is-it-better-to-combine-an-erv-with-an-air-handler-or-ductless-mini-splits
On GBA and elsewhere, I keep reading that it’s important to get an actual engineer to do the Manual J rather than the HVAC contractor. If nothing else, it’s a second set of eyes to go over the numbers. Also, too many HVAC contractors are still using “rules of thumb” rather than actually digging into the numbers and coming up with something close to actual energy demand.
Let me know if questions come up during your build — I’d be happy to help if I can.
Would also love to see photos of your place when complete. It’s always fun to see the design choices people come up.
Thanks again for checking out the blog — and good luck with your build!
LikeLike
Regarding the manual j? Did they base it on a blower door test? If not they would be, and the manual j, would be incorrect! They always upsize HVAC.. that’s inherited in the HVAC world…
My recommendation would be always check with an energy efficiency company, even if they’re far away…I use company’s from Portland Oregon to do work in Seattle, about 300 miles.. just a thought !
LikeLike
Where things have gotten interesting is that the International Code Council has been taking a different path. The 2018 ( just adopted here in WA State in February) International Residential Code adopted a ventilation rate requirement that’s essentially the same as the 2010 version of the 62.2 standard:
(7.5 cfm/person) + (1 cfm/100 sf)
The 2021 version goes a step further in the direction of Lstiburek’s BSC-01. They’ve agreed to allow balanced ventilation systems (where the amount of air exhausted and the amount of air introduced balance each other out) to operate at 30% lower than the rate you’d get from the equation above.
LikeLike
Agreed. I had a Manual J done by an independent HVAC engineer (based off of the construction drawings; e.g., ceiling, walls, and foundation assemblies, along with window performance and layout), which I used to get estimates from local HVAC companies.
LikeLike
This is a great entrance into how buildings are built, the right way ! Especially by newbies so to speak to a pretty good house!! Question: how’d you come to using “zip system” ? I thought this was a great idea until I discovered all the little mistakes that builders create when shimmers, embedded Mail heads which cause leaking, not tapping correctly, using non pourous zip tapes, which don’t allow moisture to escape…, etc. so kudos to you and your Crew for using pourous tspes from 475 !! Was that you, or your crew who made that decision? Nonce job!
LikeLike
Sorry, big thumbs and spelling mistakes
LikeLike
I debated whether to use the Zip or to go with plywood combined with either a peel-and-stick WRB or a liquid applied membrane. In the end, because my framing crew was new to Passive House details (and it would be my first time air sealing everything), I opted for the simplicity of the Zip system. As with any air or water barrier, if it’s poorly detailed, it’s definitely not going to work as intended (with potentially devastating consequences).
I chose the 475 tapes because they’re supposed to be more vapor-open than the black Zip tape (at least the Tescon Vana anyway). They also have a longer track record of performance in Europe, which gave me more confidence as well.
I’ve subsequently had the chance to use the black Zip tape, and while I’m sure it works fine when properly installed, it definitely felt less substantial than the Tescon Vana.
LikeLike