This project began for us back in the summer of 2014 — nearly three years ago — when we first sat down with Brandon Weiss in what was then his new office in Geneva, Illinois. As detailed here…
PHIUS (Passive House Institute US) did not seem like a resource we could utilize — the Passive House world is small, smaller still when you reduce it to a single geographical area like Chicago and its surrounding suburbs. And the thought of interviewing conventional builders, and trying to convince one to take on the detail required in a Passive House level build, seemed overwhelming.
As a result, we decided to go with two guys close to home who have conventional building experience.
The logic underlying the relationship was that they would GC the build, taking care of all the conventional building details, while I took care of all the Passive House details.
Unfortunately, this proved fruitless.
Events revealed they didn’t have the requisite skill set necessary to complete the job, and we have subsequently taken over the project ourselves. It’s taken weeks to get things back on track, hence the delay in posting anything new regarding the progress of the build.
When the build is complete, I’ll return to this matter, offering more details that will hopefully help other consumers who want to build a new house avoid our unfortunate experience.
New beginnings.
The really sad thing is there are quality people who make a living as general contractors, but unfortunately it remains a minefield out there for consumers without meaningful connections. If you don’t already know the answer to the question ‘Who should build our new house?’ before you start the process, then it’s truly a case of caveat emptor. And if things should go poorly, you will feel like you’re on a very lonely island.
In a conventionally built home, mudsills are typically an area of significant air leakage (if you’ve ever seen sill sealer — a thin layer of foam normally used to address this lumber-concrete connection — under an actual mudsill, you can visibly see just how poorly it performs).
In contrast, after reading about various strategies employed to reach the Passive House standard of 0.6 ACH@50 for air tightness, I decided to use the approach developed by architect Steve Baczek specifically for mudsills. There is an excellent article in Fine Homebuilding magazine that describes the details, and there is a companion series of videos available on Green Building Advisor(after the first video, membership is required, but it’s well worth it for this series of videos, as well as all the other information available on GBA).
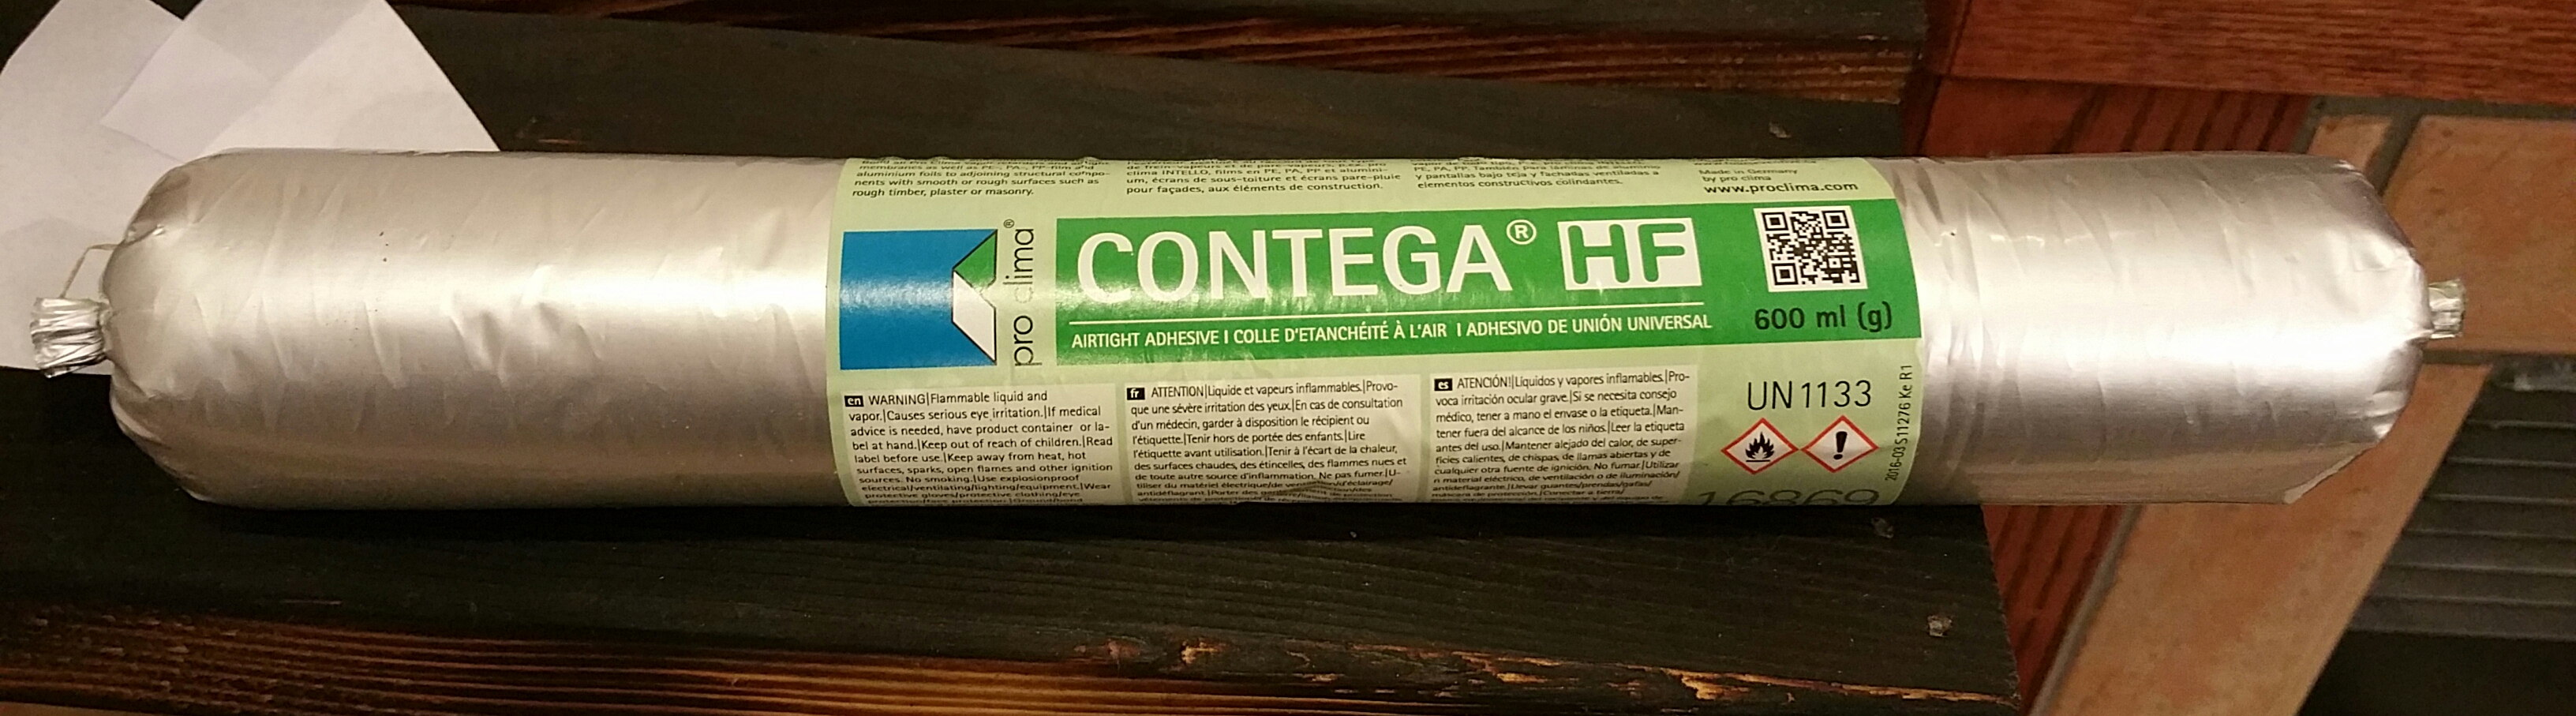
We didn’t use the layer of poly, or the termite shield, but the remaining details we followed fairly closely. And we did make one product substitution — instead of using the Tremco acoustical sealant, we decided to go with the Contega HF sealant (less messy, lower VOC’s, and skins over and firms up enough to apply the Pro Clima tapes, all while remaining permanently flexible like the Tremco product — these products are available at foursevenfive.com).
Billy and Phil setting up chalk lines for the mudsills.
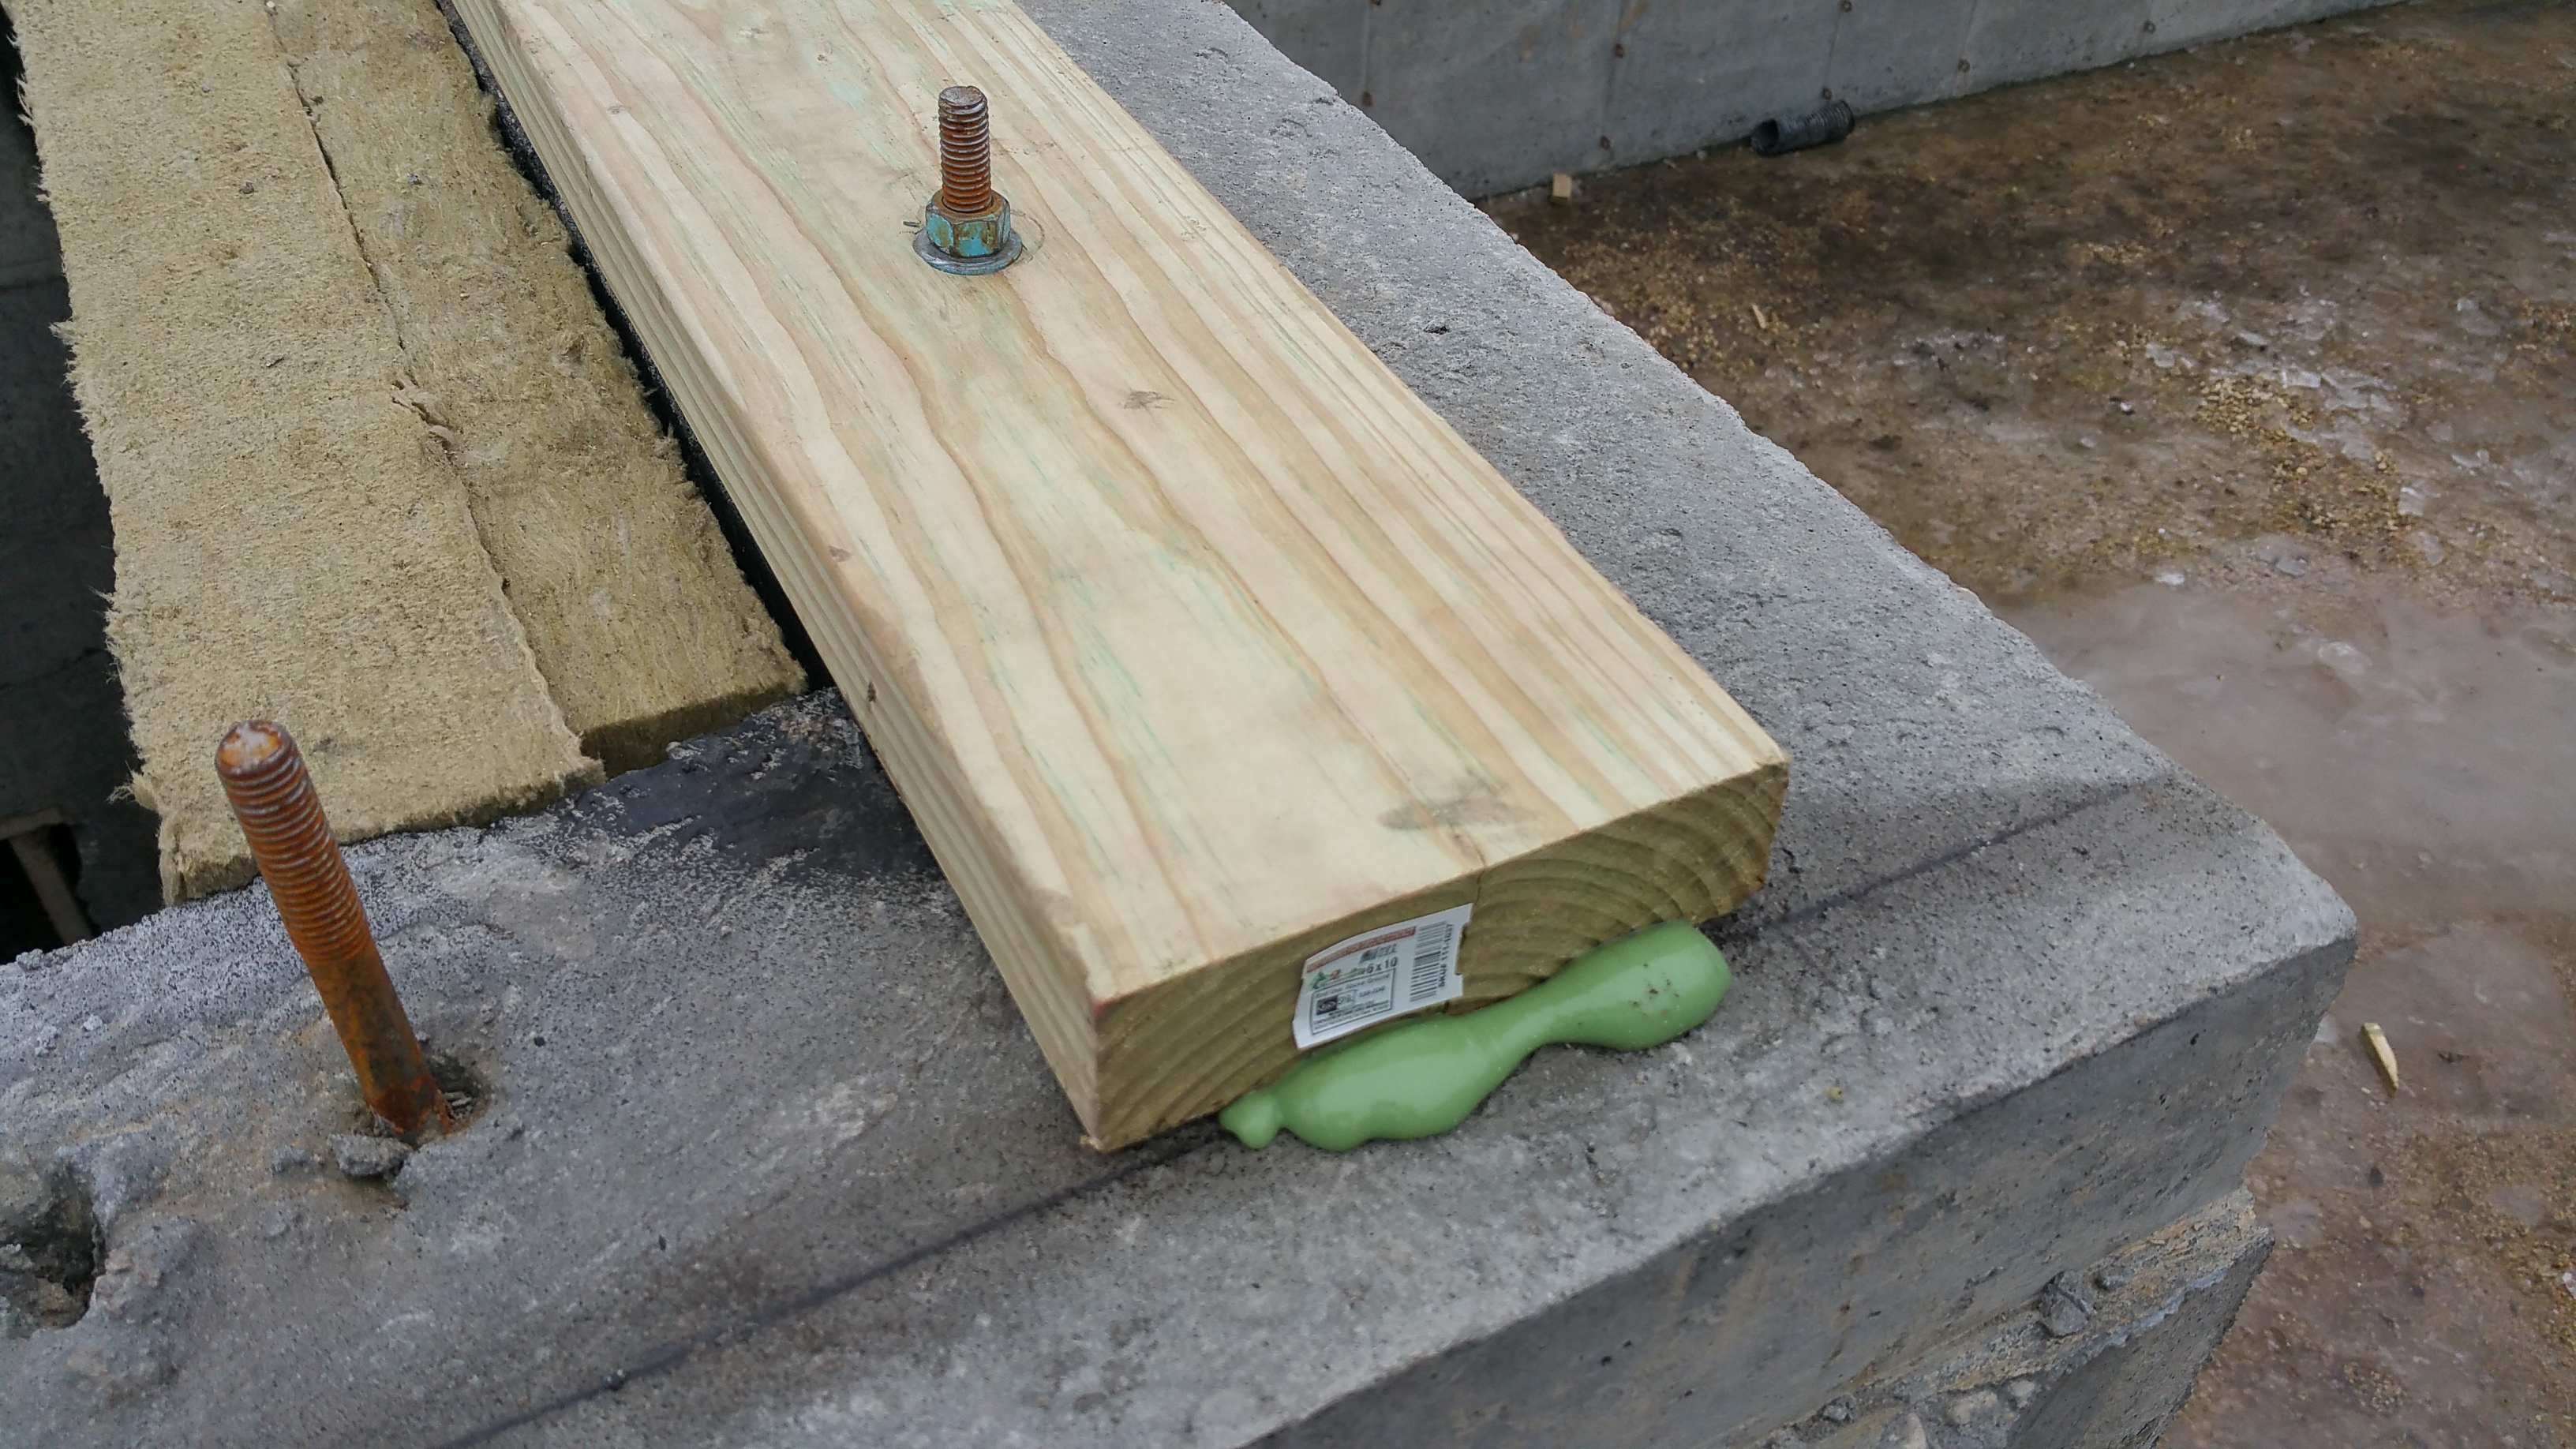
Nils applying a thick, continuous bead of Contega HF sealant, including around the bolts, before the 2×6 pressure treated sill plate gets installed with a BG65 gasket underneath.
BG65 gasket from Conservation Technology stapled to the bottom of a scrap piece of sill plate.
BG65 gasket rolled up in the box it shipped in.
Sammy and Billy stapling the BG65 gasket to the sill plates before installation.
Mudsill installed with some squeeze out of the sealant.
Installing the sealant on the mudsill (interior/exterior edges, seams, and bolts/nuts/washers) required some gymnastics:
In theory, she’s helping me.
Mudsill after installation: sealant covering sill plate – BG65 gasket – concrete connection, with seams filled.
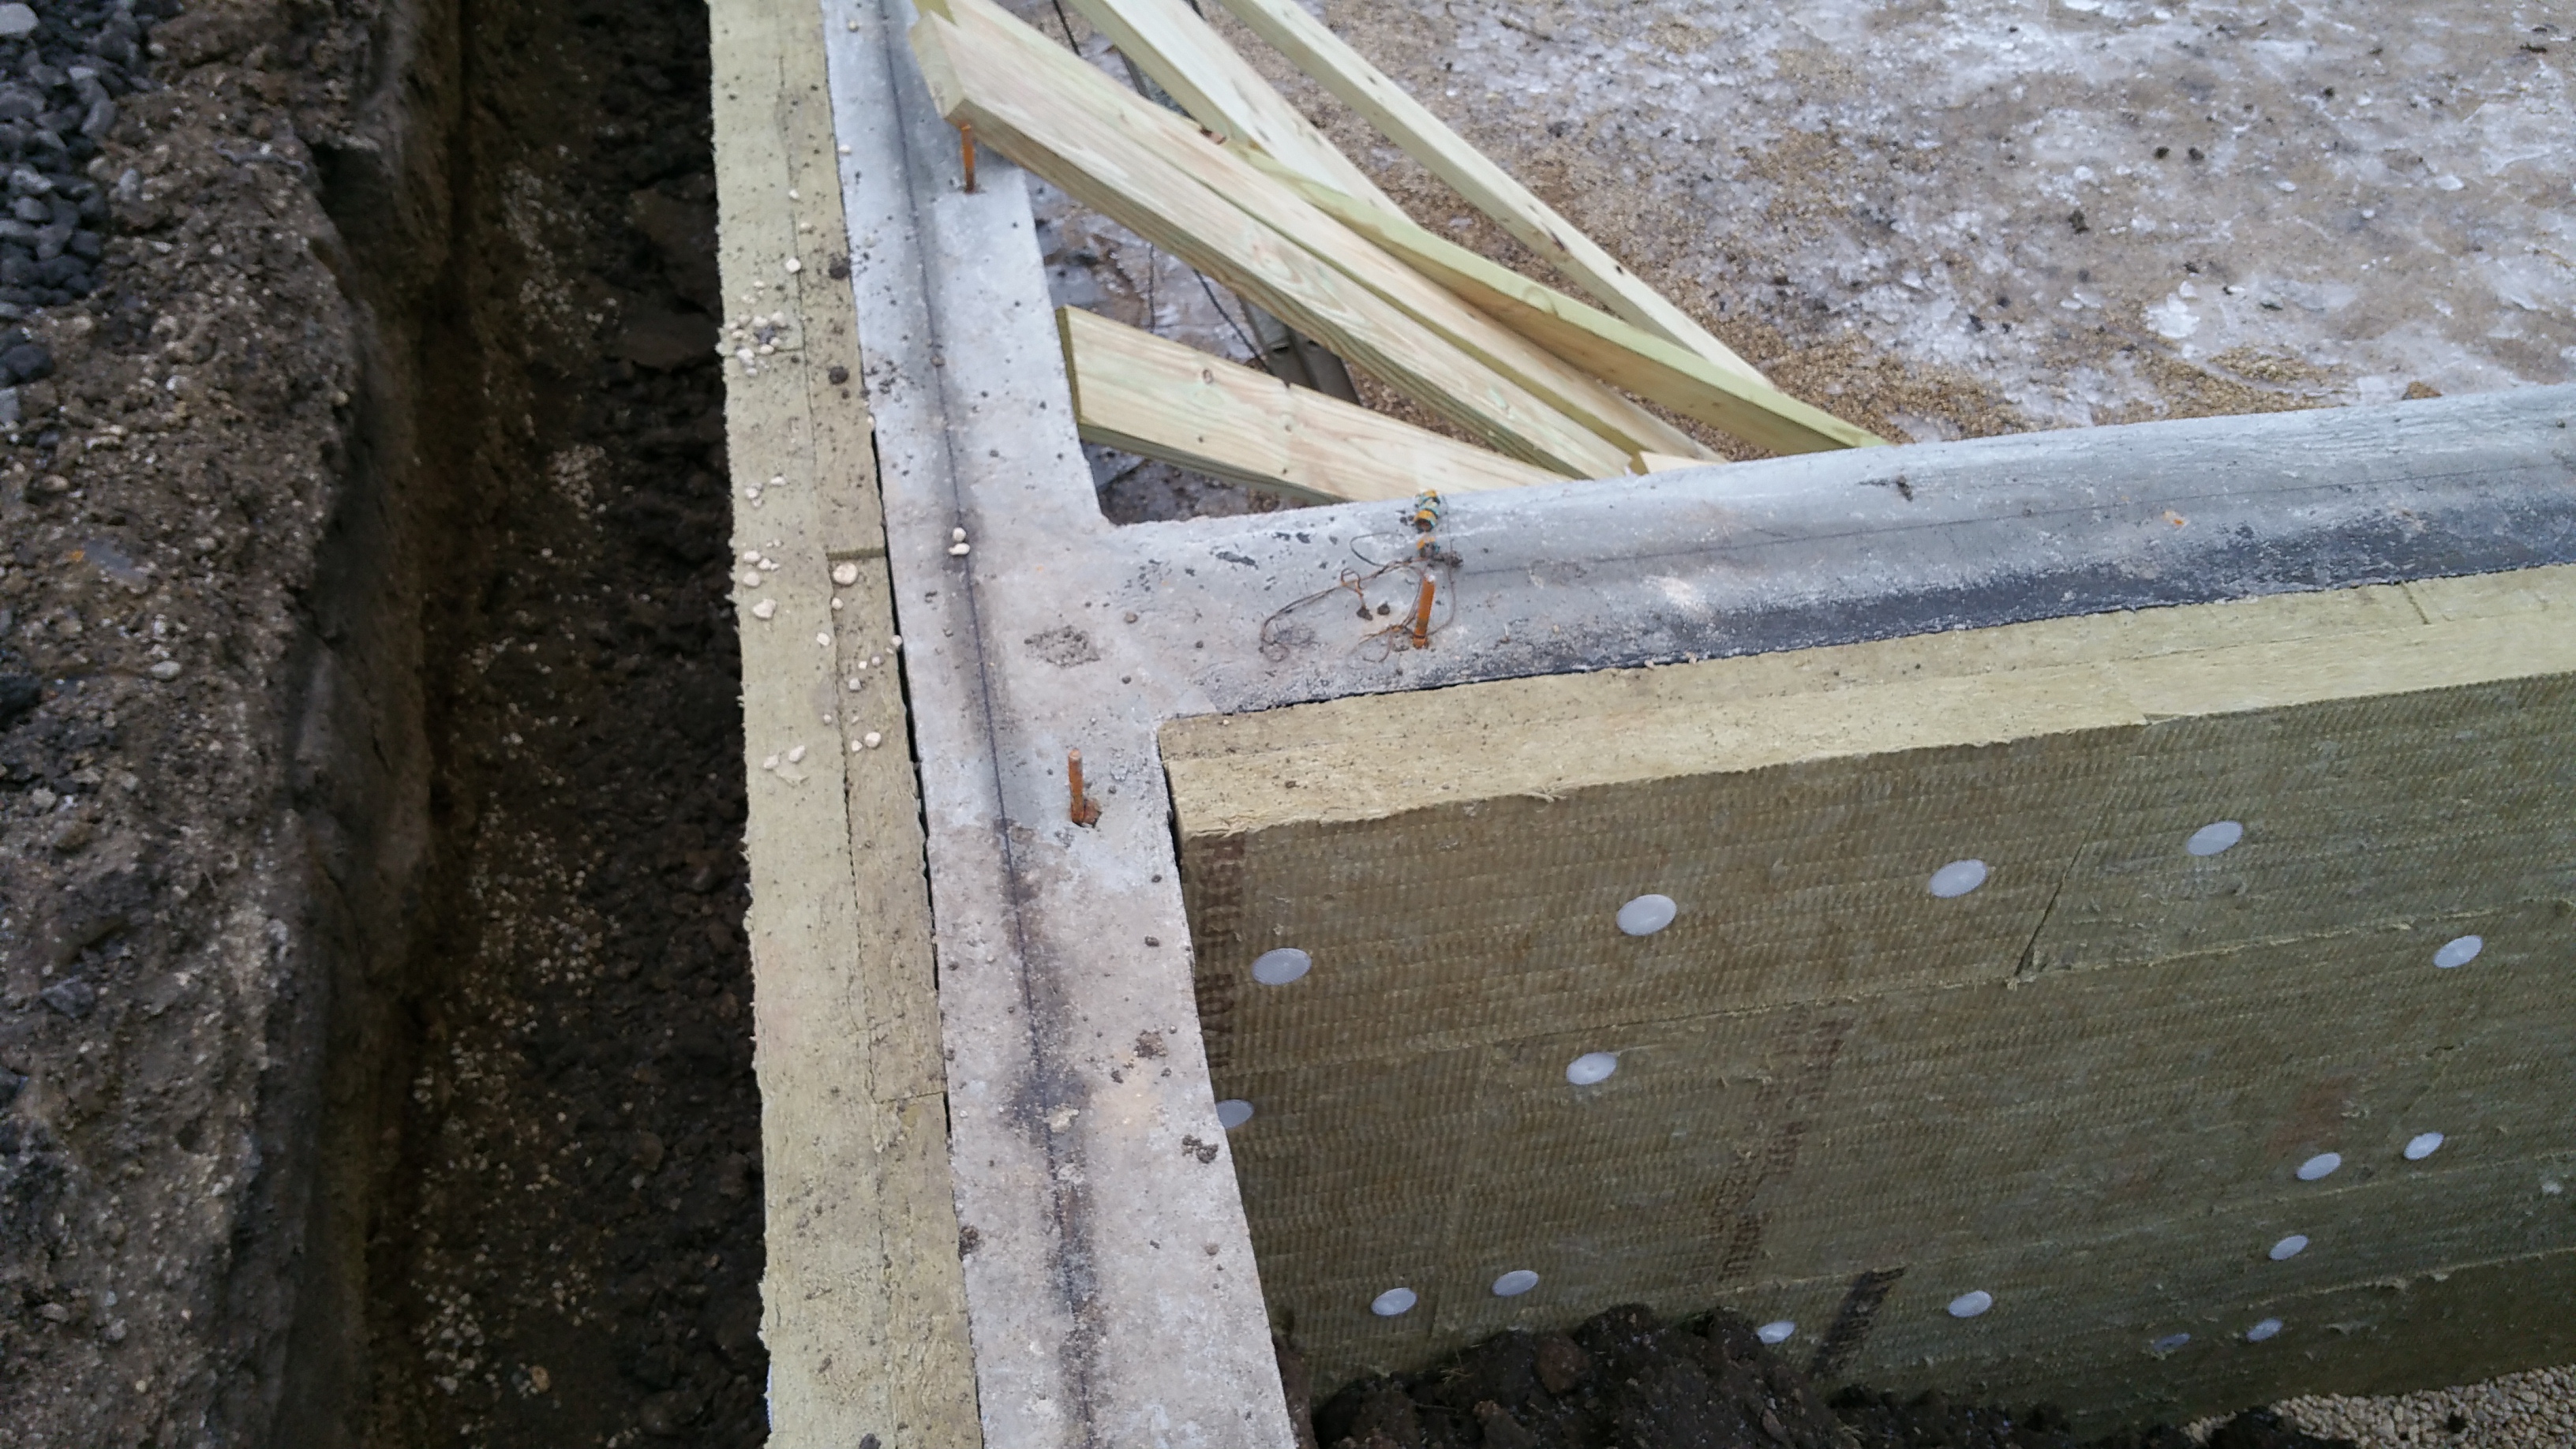
Once again, based on Steve Baczek’s design — going from exterior to interior — here is our Mudsill Air Sealing Approach:
Bead of sealant on the exterior side of the 2×6/foundation connection
BG65 gasket under the sill plate — along with a thick bead of sealant under the gasket and sill plate (including around bolts)
Bead of sealant on the interior side of the 2×6/foundation connection
And then, finally, a taped connection on the interior side of the 2×6/foundation connection as a last line of defense against air infiltration (which I’ll complete once all the trades go through the interior of the house).
The approach assumes I will make mistakes at certain points with each layer of air sealing, so I’m counting on these layers of redundancy to protect me from myself. Again, this is the first time I’ve ever done this, so the theory is that even if I make a mistake in one area, it’s unlikely that I will make a mistake in exactly the same spot with successive layers of air sealing.
Obviously I’m trying to do my best with each layer, but I like the idea of added layers of protection (a Passive House obsession), especially when accounting for the long-term life of the structure. Even if each layer could be installed perfectly, presumably each layer will fail eventually at different times and in different places (hopefully 50-100 years from now if the accelerated aging studies are accurate), so hopefully these layers of redundancy will help maintain significant air tightness far longer than if I chose to use fewer layers. Plus, I’m enjoying sealing everything up, so I don’t mind the process, which always helps.
For larger gaps (not just for mudsills, but anywhere in the building envelope), roughly 3/8″ inch or larger, I am utilizing backer rod to help fill the gap before applying sealant.
This is what it looks like:
The backer rod (readily available at any hardware store) makes life easier for caulks and sealants — less stress on the connection between materials as the inevitable expansion and contraction occurs in the gap.
Hammer and Hand’sBest Practices Manualhas the best explanation for their use that I’ve come across:
“While the humble sealant joint may be uncelebrated, it is vital to building durability and longevity. Proper installation is key to sealant joint integrity and function throughout a life of expansion and compression, wetting and drying, exposure, and temperature fluctuation.
Note: Because sealants are just as good at keeping moisture in as they are in keeping it out, placing a bead of caulk in the wrong location can result in moisture accumulation, mold and rot, envelope failure, and hundreds of thousands of dollars in repair and remediation. If we know anything, we know that building envelopes will get wet – the question is, “where will the water go?” Make sure you know the answer throughout construction, especially as you seal joints…
Diagram courtesy of Hammer and Hand’s Best Practices Manual.
… Joint Rule of Thumb: Sealant should be hourglass-shaped and width should be twice depth (shown in diagram). Backer rod diameter should be 25% larger than the joint to be filled. Joint size should be 4x the expected amount of movement (usually about 1/2” of space on all sides of the window casement). Ideal joints are within a range of 1/4” at minimum and 1/2” at maximum. Joints outside this range require special design and installation. Always use the right tool: sealant is not caulk and should never be tooled with a finger (saliva interferes with bond). Substrates need to be clean, dry, and properly prepared (primer if necessary). When dealing with thermally sensitive materials, apply sealant under average temperature conditions because joints expand and contract with changes in temperature…”
Example: Piece of backer rod being inserted into gap between header and 2×6.
It’s not visible, but the wood-concrete connection at the side wall has a piece of backer rod embedded between the two materials, making it easier for the sealant to bridge the gap over the long term.
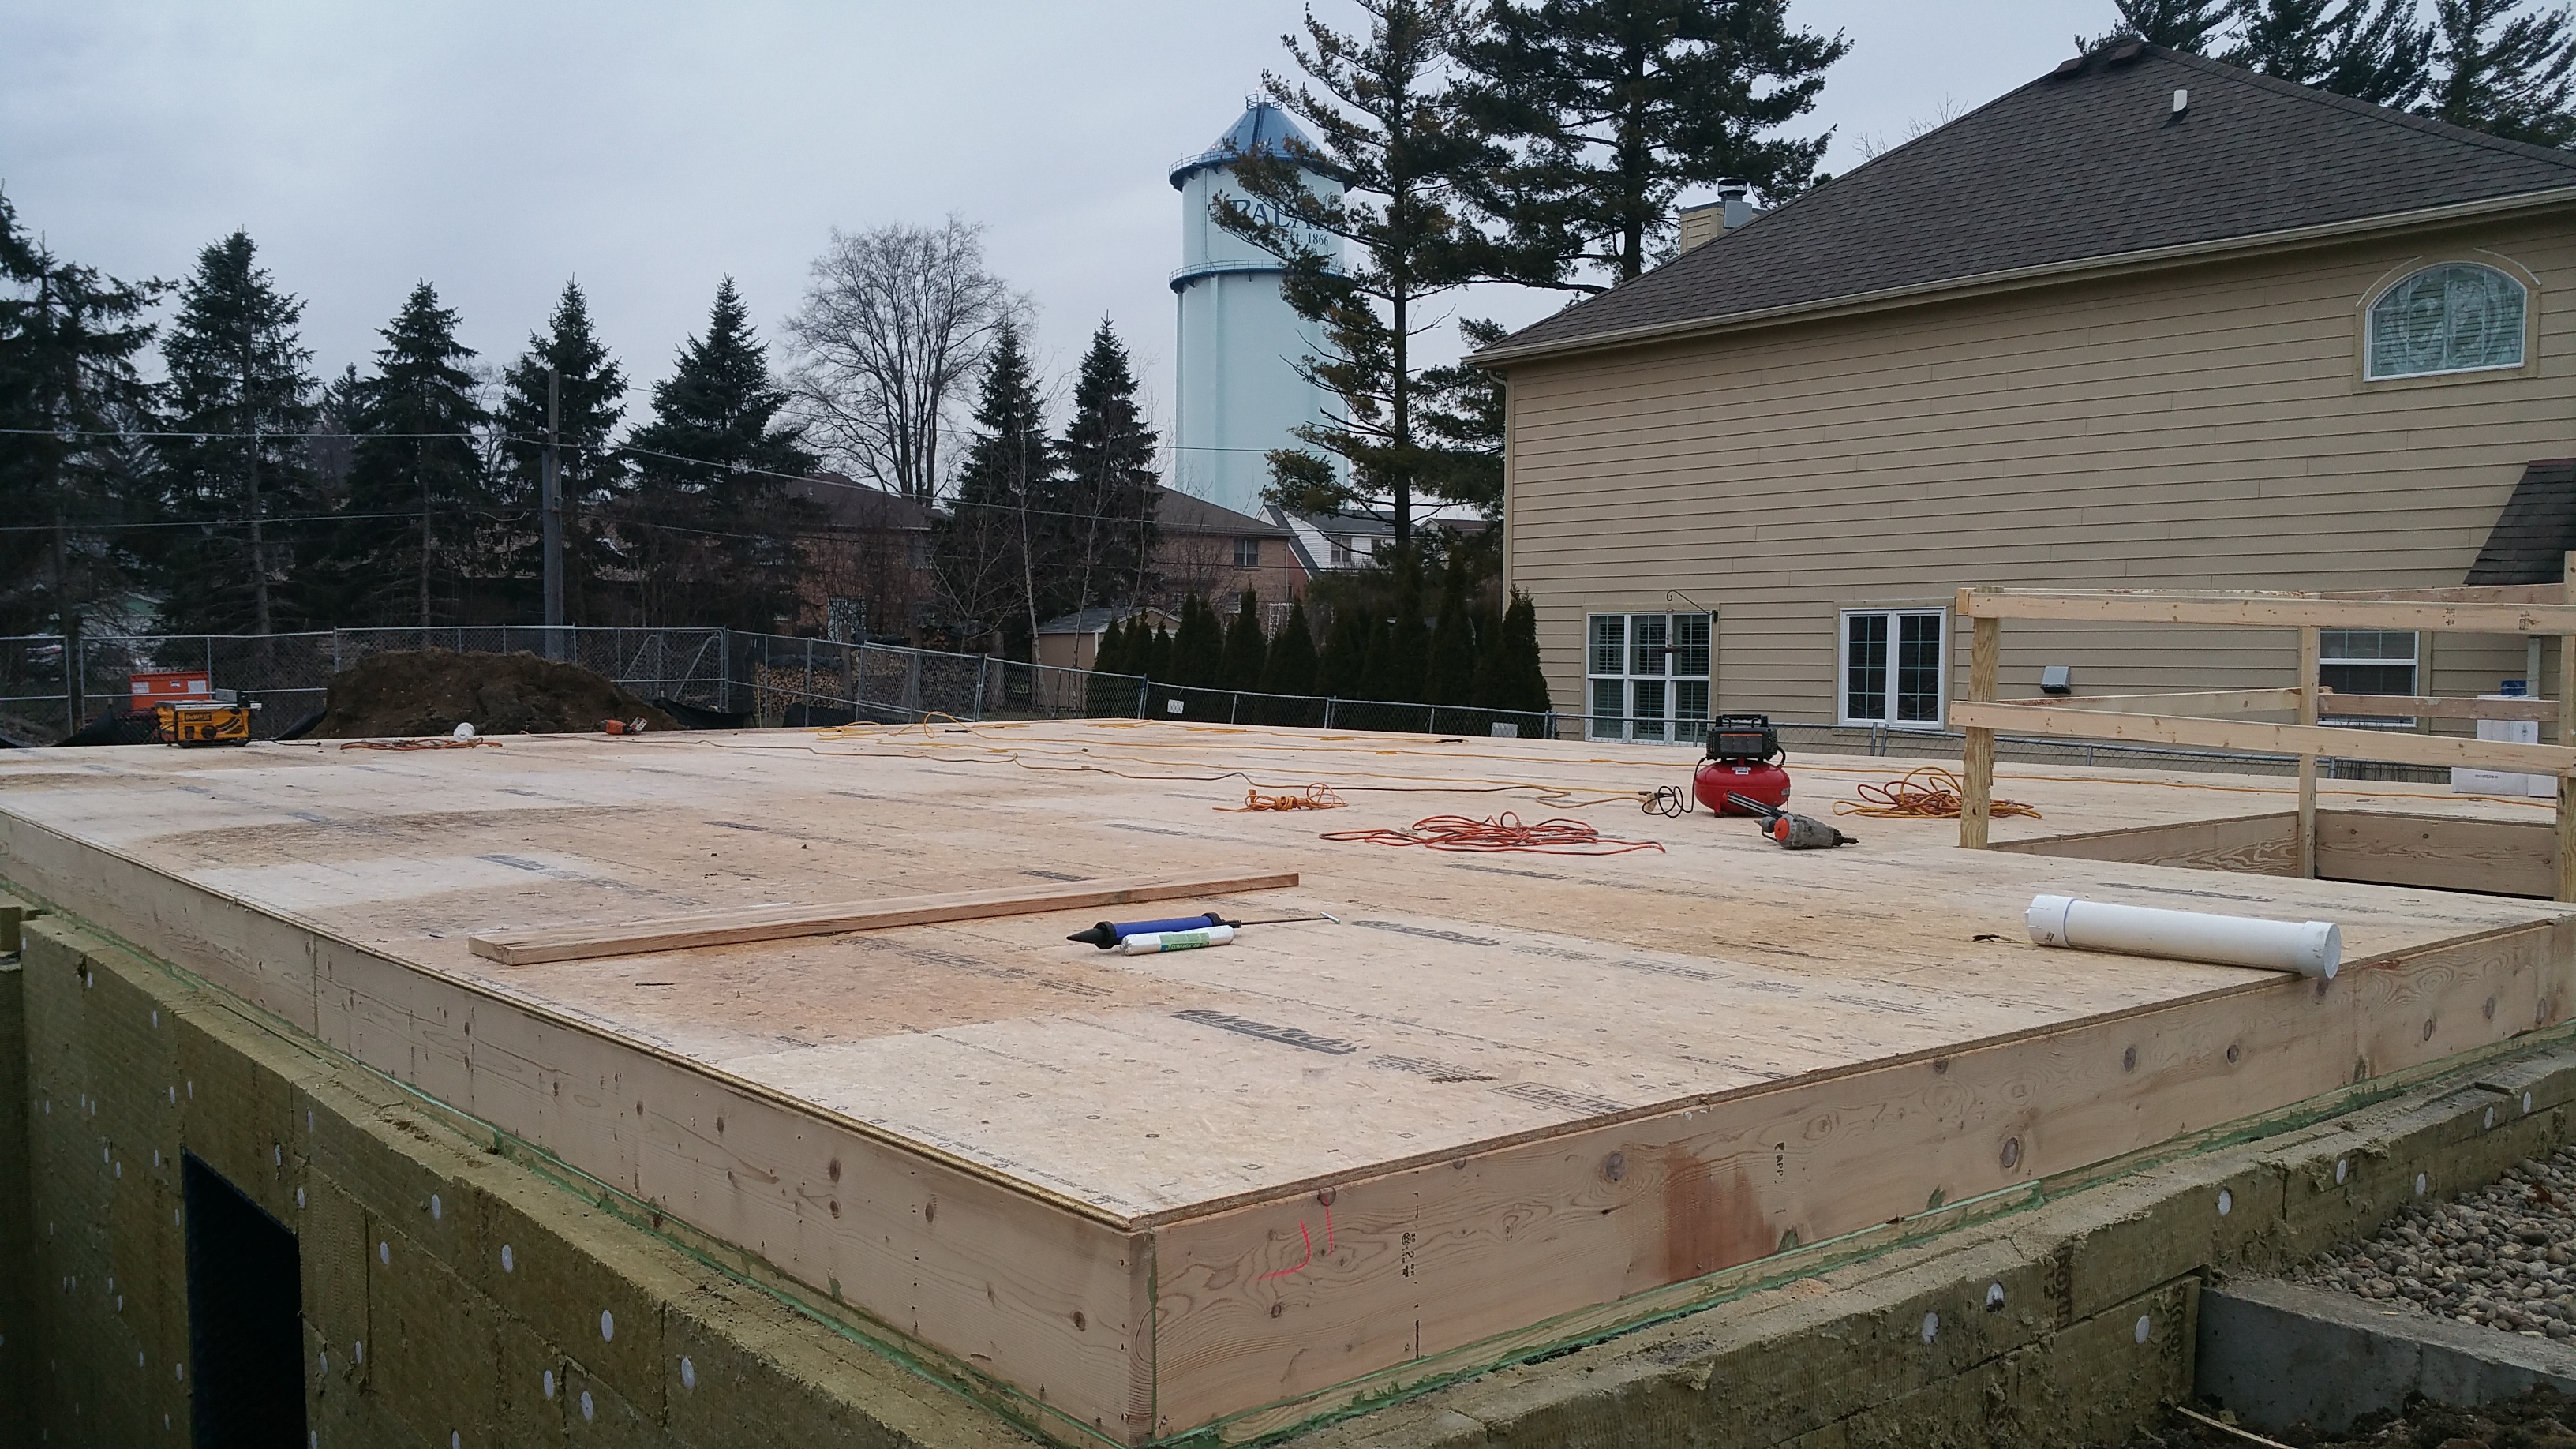
Air Sealing: Rim Joist – Floor Joist – Mudsill Connections
Since there was time between completion of the rim joist/floor joist installation and the installation of the sub flooring (a weekend), I took the opportunity to seal up all the visible connections.
Billy and Johnny installing the floor joists.
Once the subfloor goes in, these connections are still accessible from inside the basement, but the space to work in would be really cramped and uncomfortable (at least I thought so).
Rim joist – floor joist – mudsill connections prior to sealant being applied.
The same areas after applying the sealant:
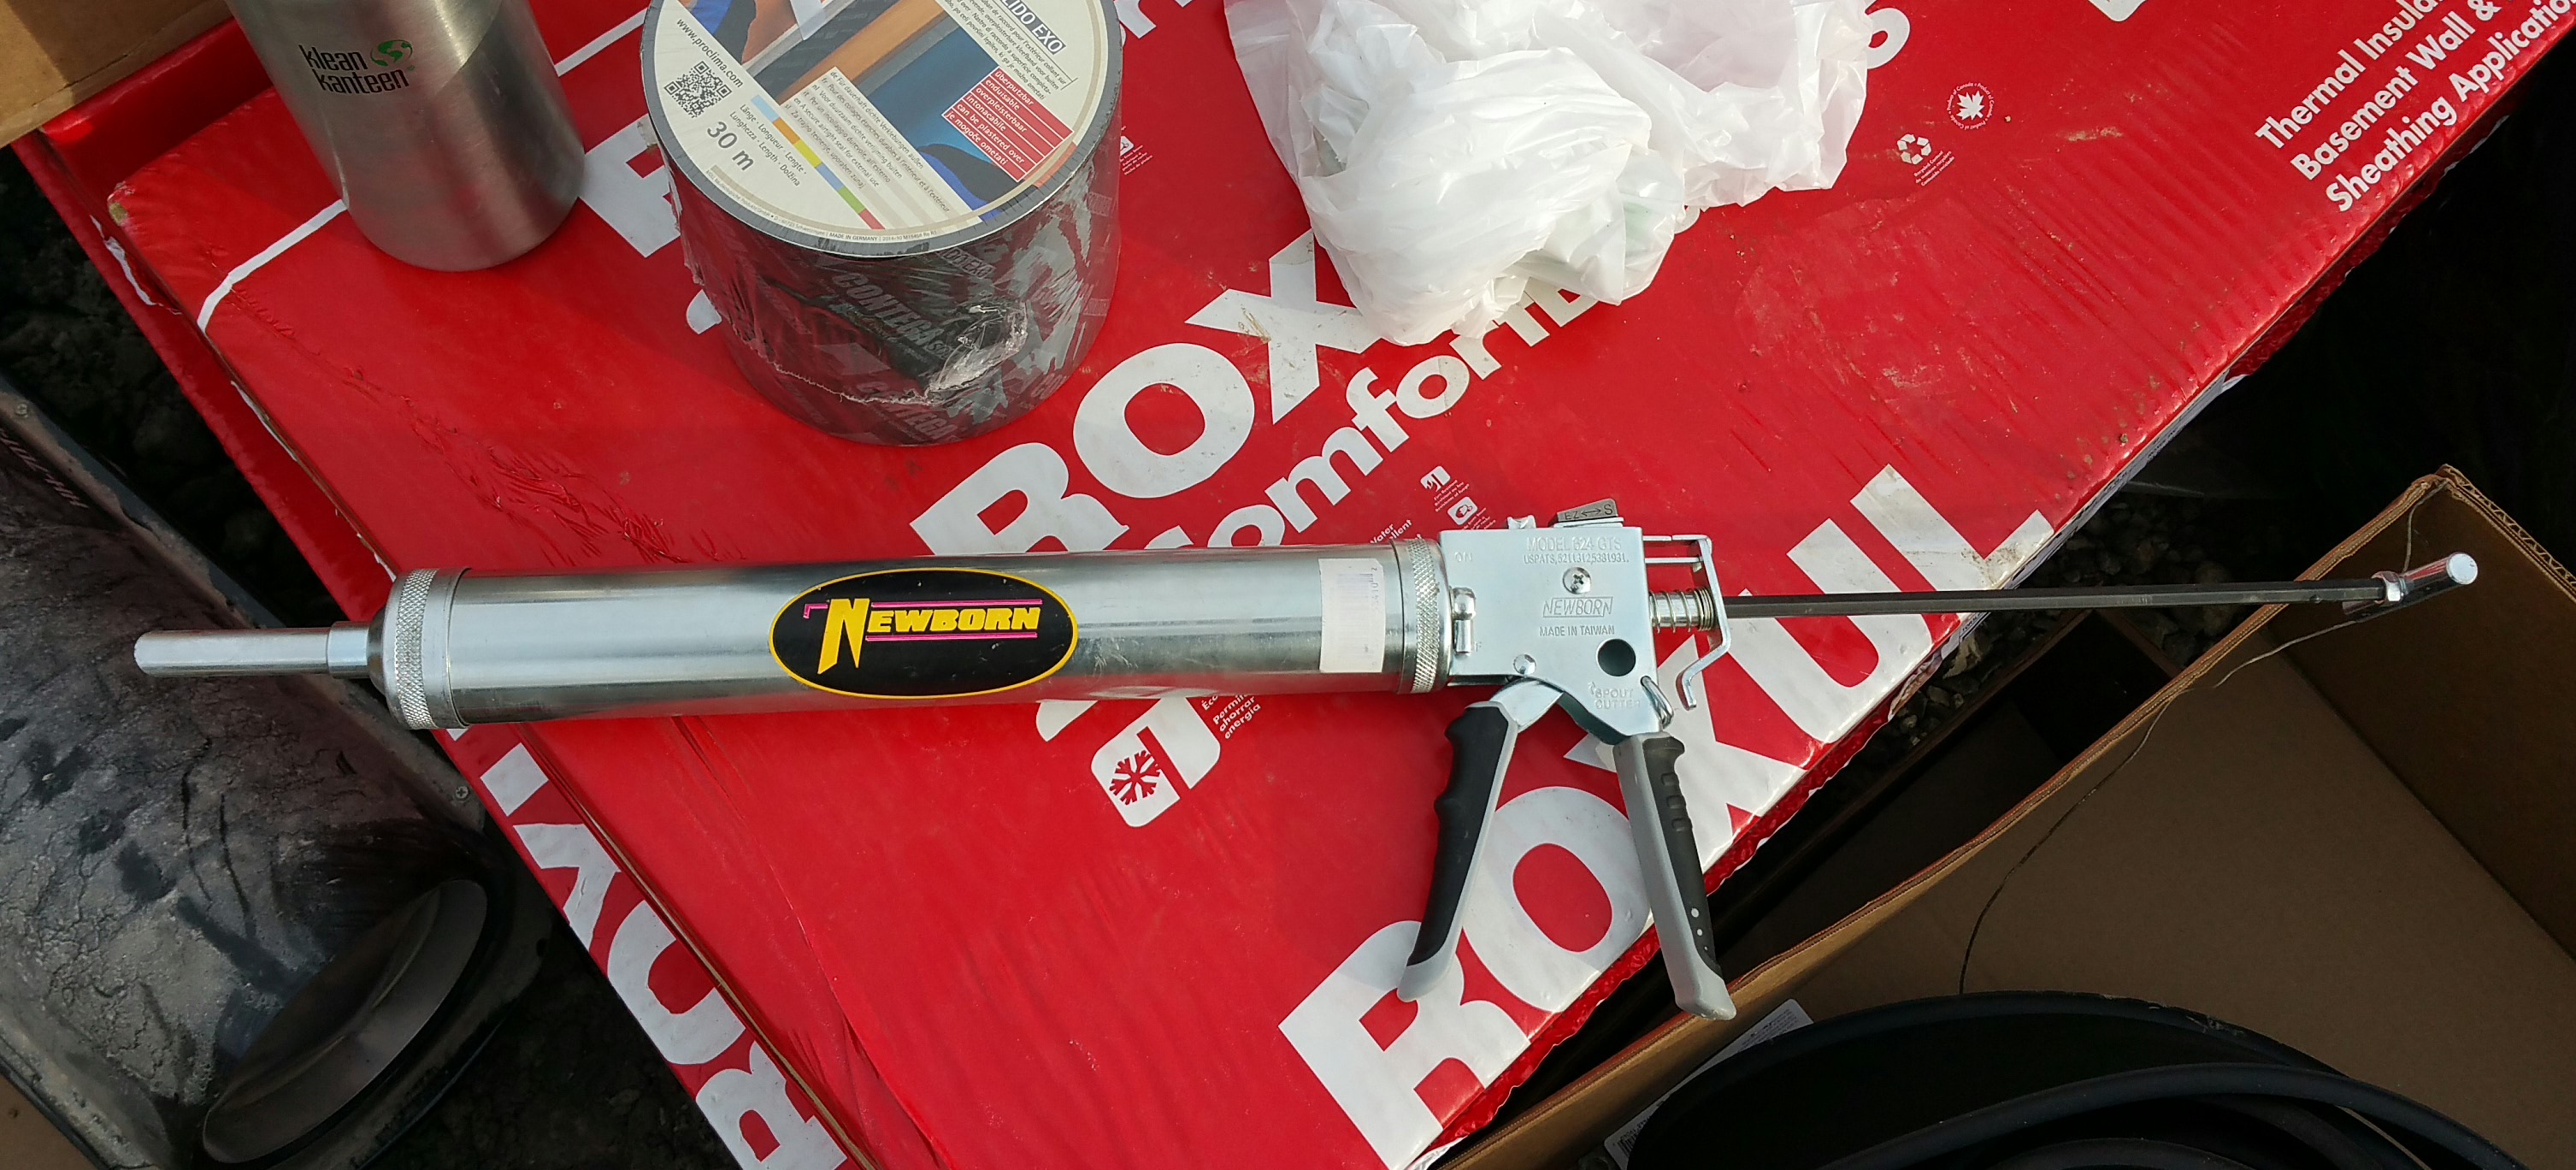
I found the silver Newborn sausage gun (photo below) worked great for thick beads under the mudsills, but the blue gun worked even better for all other seams. Because the blue gun utilizes disposable tips, it was easy to cut the tip to exactly the size I needed, thus using (wasting?) less material (and hopefully saving a little bit of money).
An added benefit of the disposable tips is less time required for clean up at the end of the day (always a good thing). Both guns work great, and appear to be really well-made, although I would probably only buy the silver one again if I consistently needed a fat bead of sealant.
Newborn sausage guns I found on Amazon. The blue one works great for thin beads, the silver for thicker beads (e.g., under mudsills).
In the photo below, I filled larger gaps with either backer rod, or in the case of the largest gap, bits of pulled apart Roxul Comfortboard 80, before applying the sealant. Since this is the first time I’ve done this, these are the kind of connections that I failed to anticipate beforehand. They are definitely worth planning for.
The temptation is to just fill these kinds of voids with sealant, but for the long-term durability of the connection backer rod or some kind of insulation stuffed into the gap is a better solution. Filling the voids before sealing doesn’t take much additional effort, so it’s definitely worth taking the time to do it right.
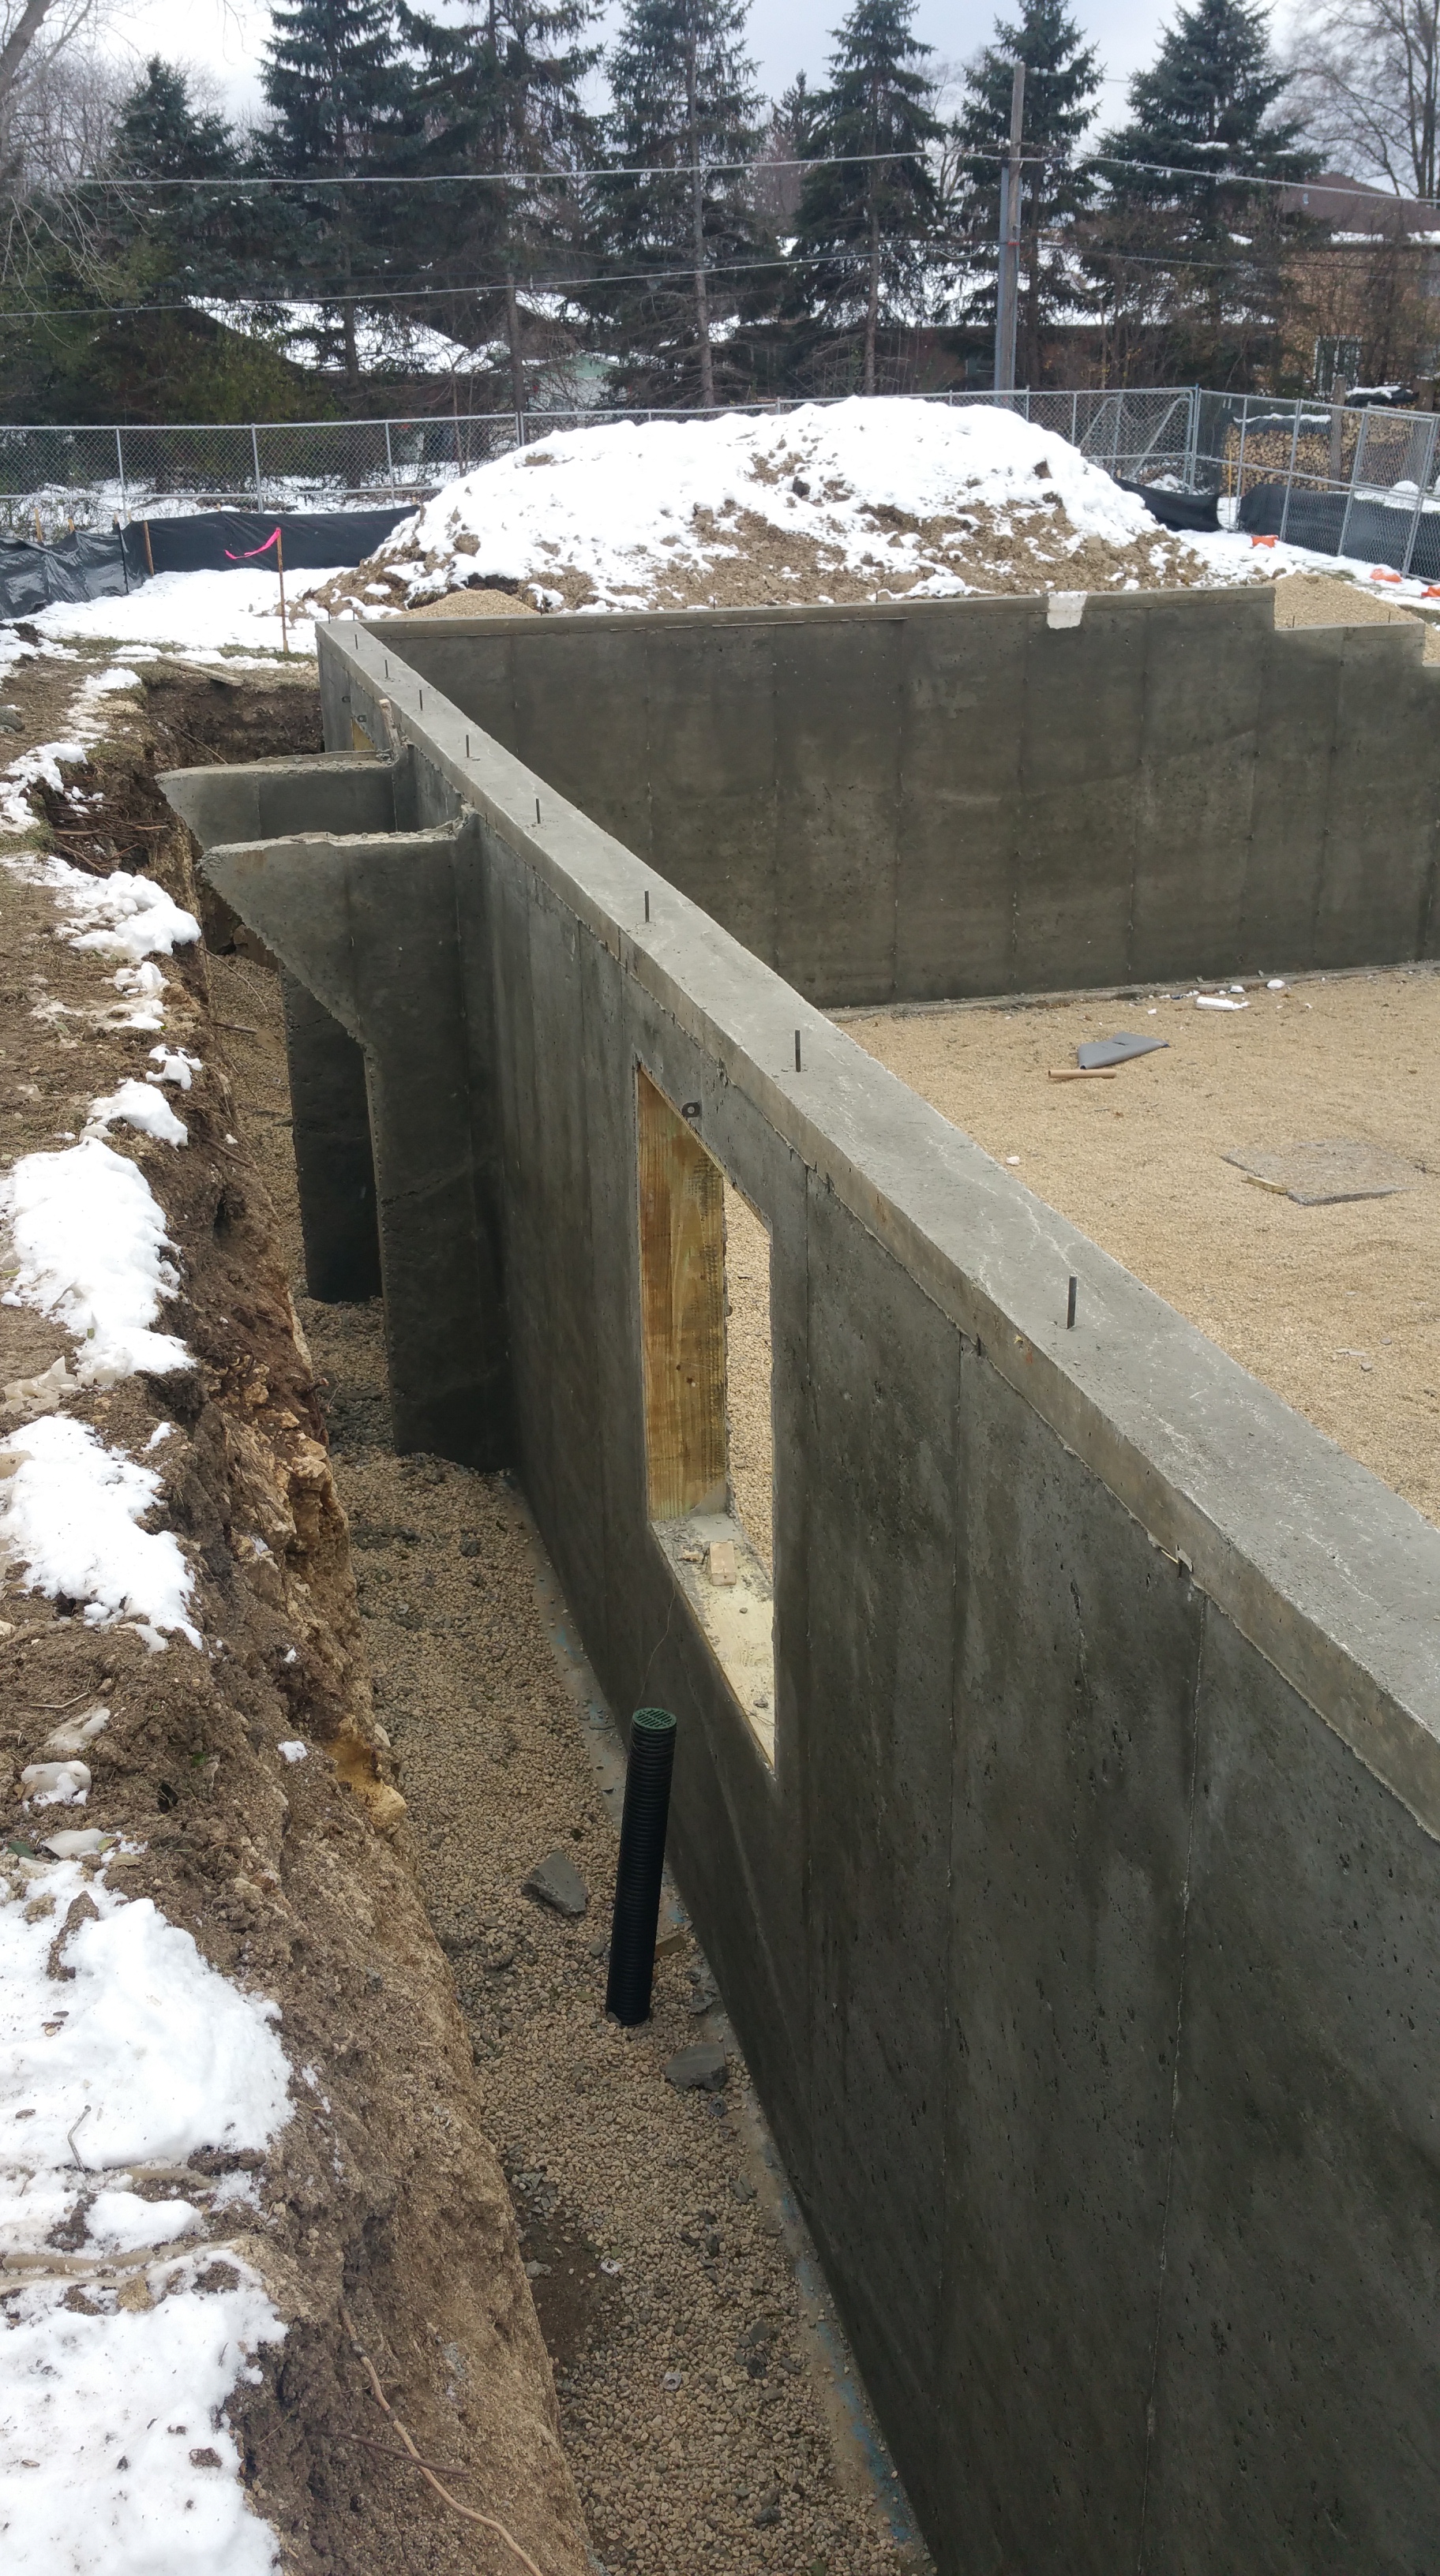
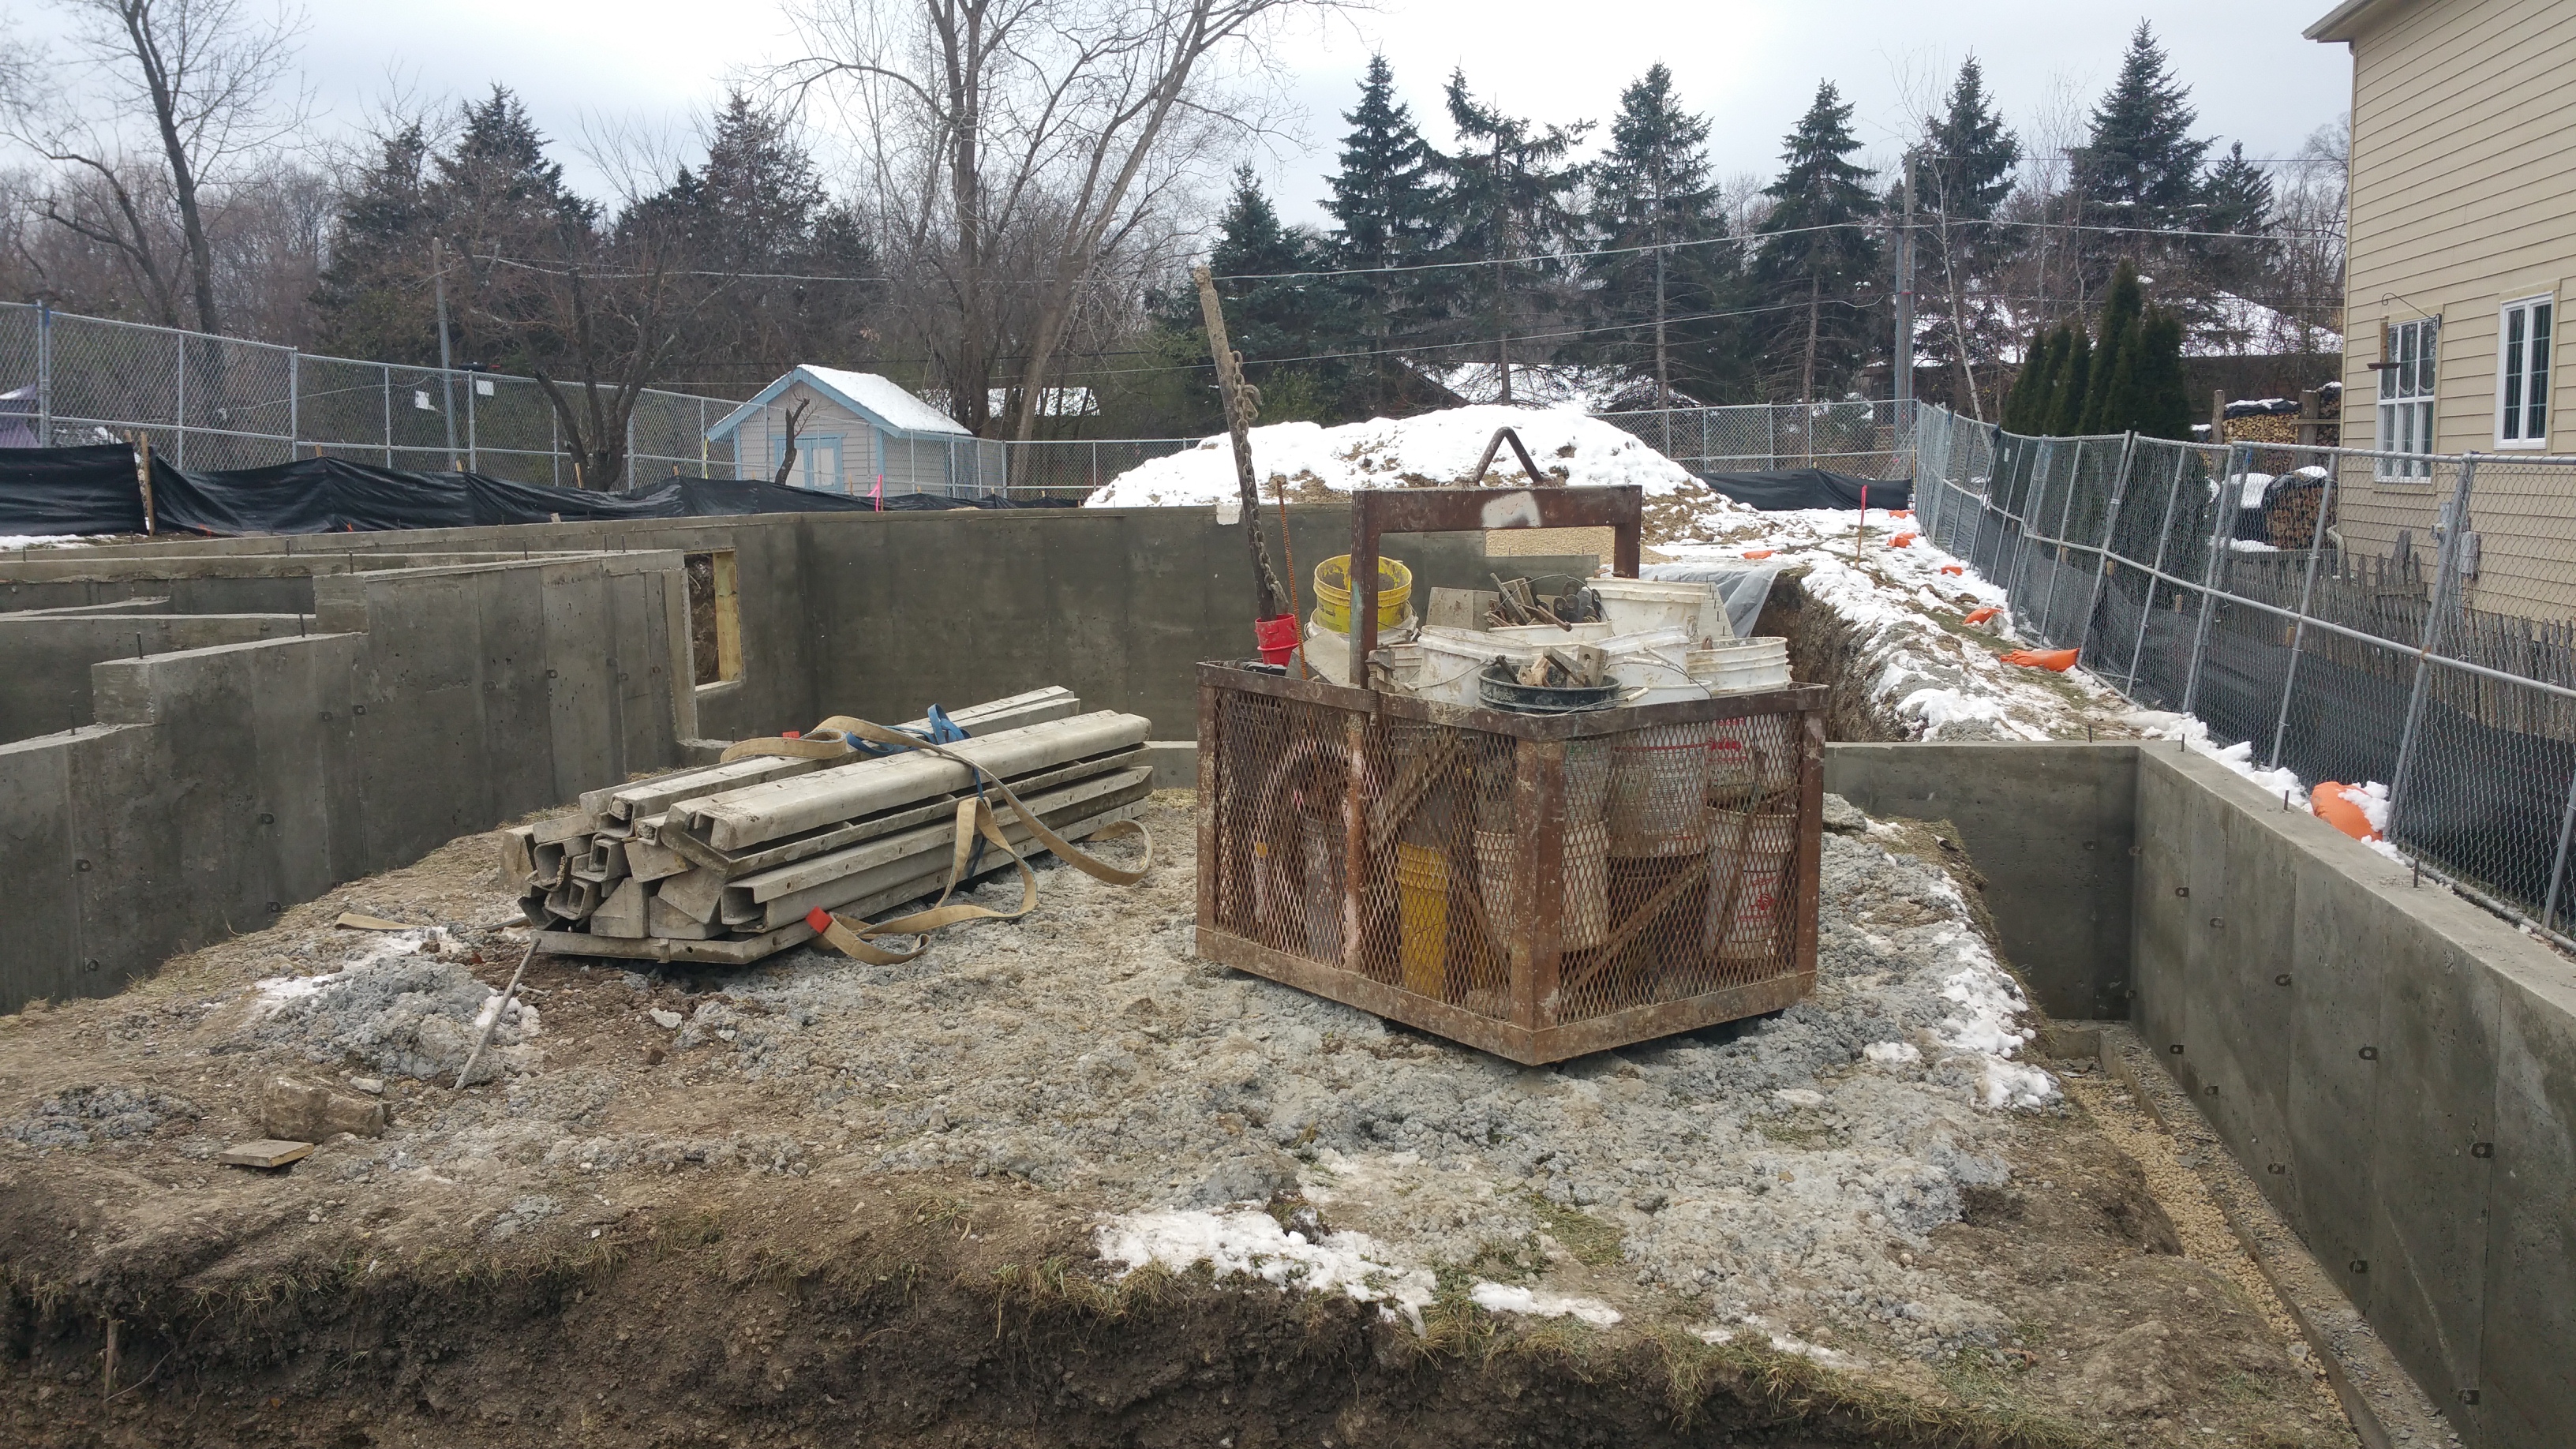
Knee Walls Installed
Because our lot is sloped, the plans called for a series of knee walls:
The guys installing the knee walls (left to right: Johnny, Nils, Sammy, and Billy).
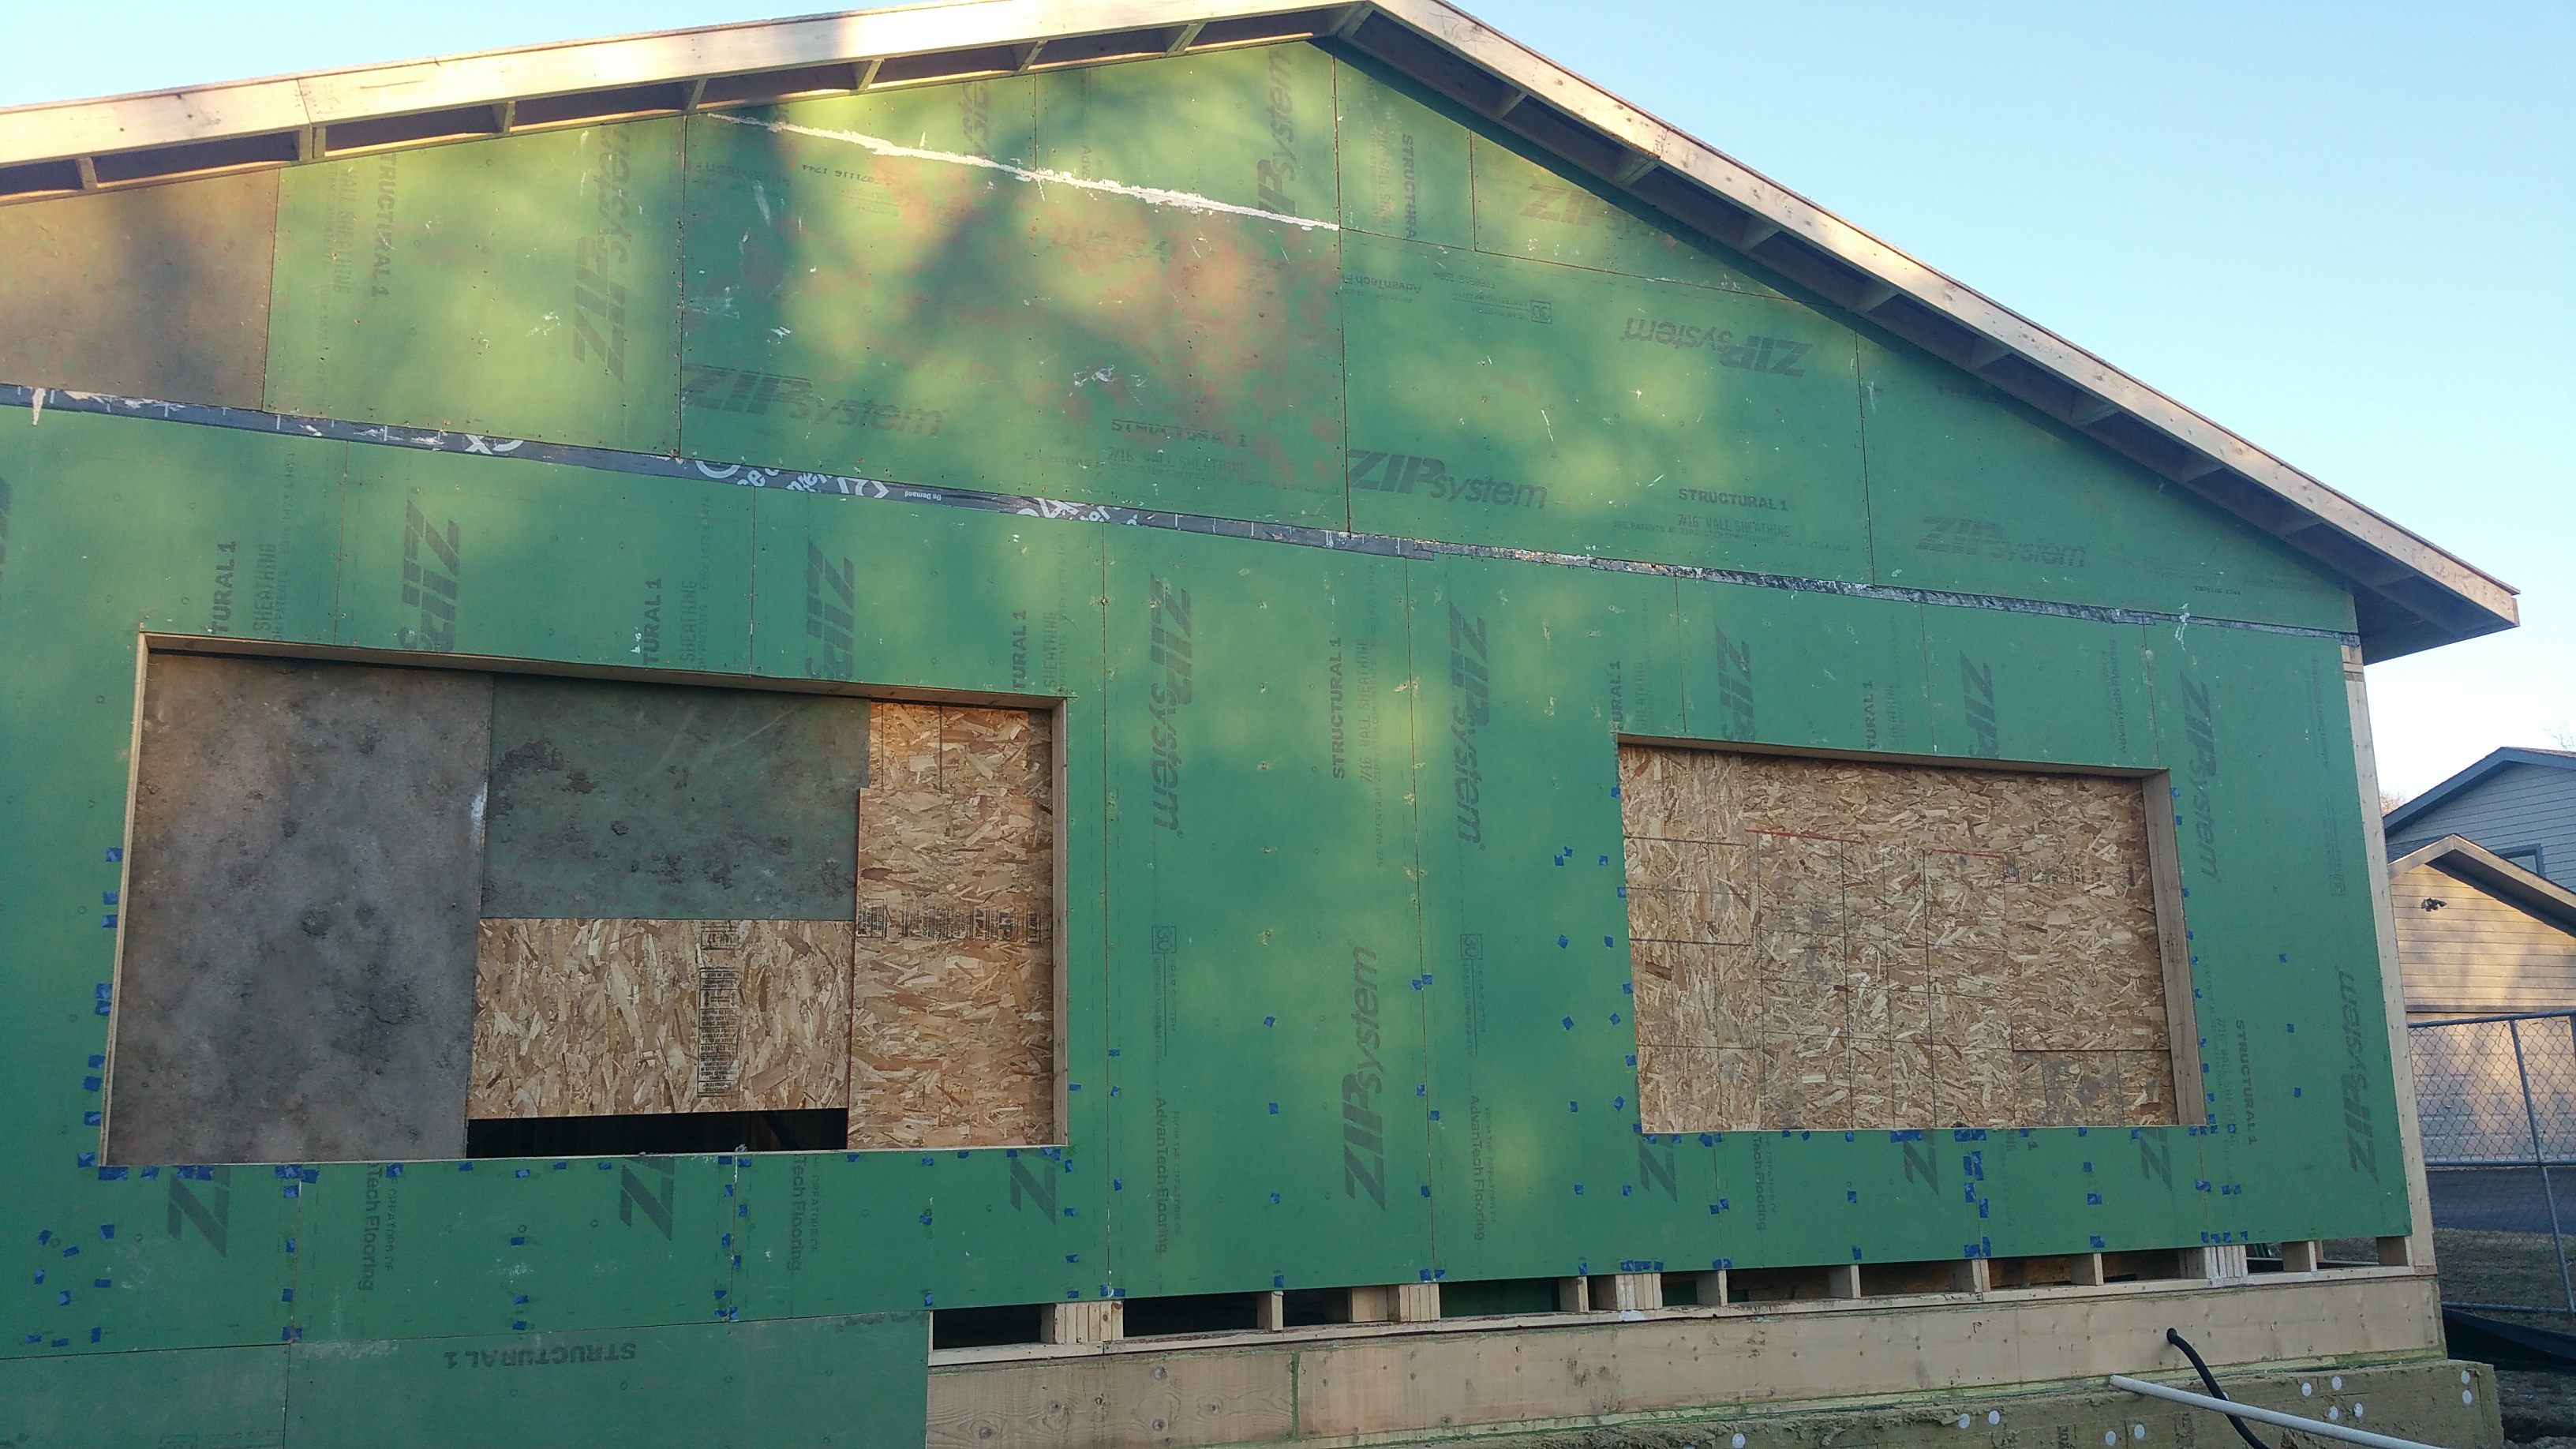
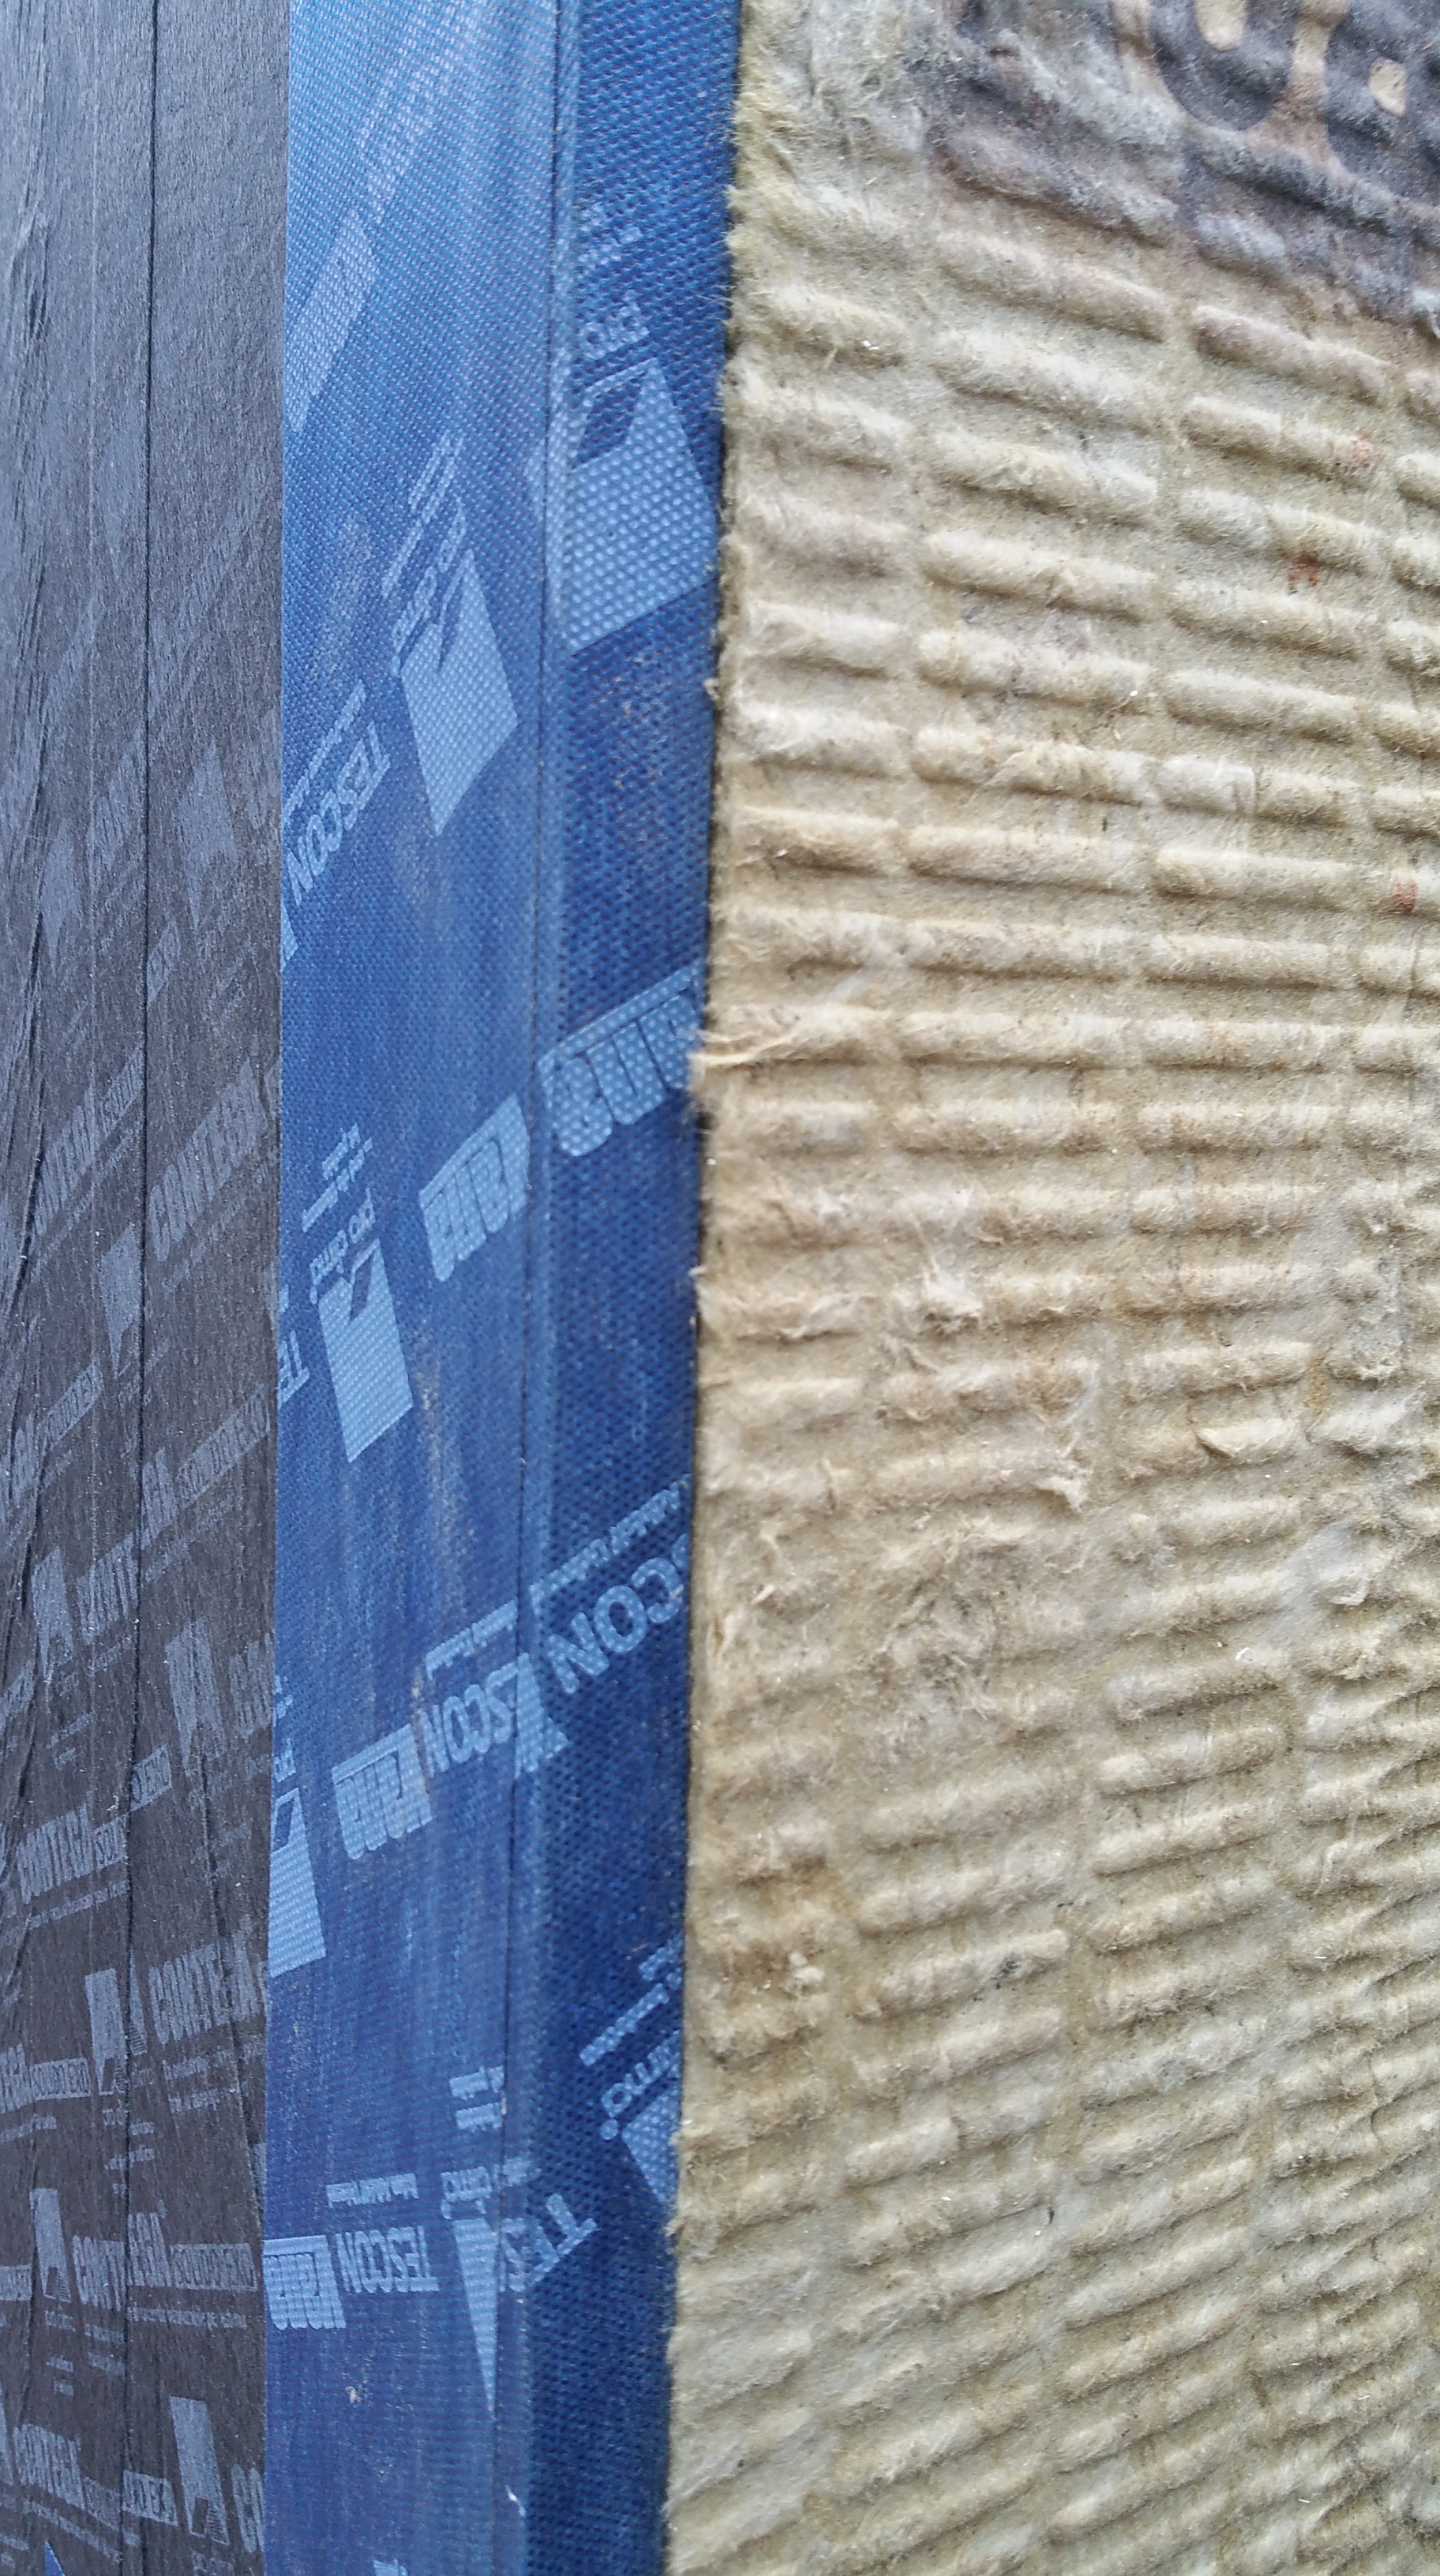
When I saw the first piece of Zip about to be installed, I realized the bottom edge, which is exposed OSB, would be sitting directly on top of the Roxul on the foundation. While it’s unlikely that water will find its way to this edge (the flashing for the wall assembly will be installed over the exterior face of the Zip at the bottom of the wall), it seemed like a good idea to tape this edge with the Tescon Vana for added protection and peace of mind (even if it only protects this exposed edge until the rest of the wall assembly is installed).
First piece of 7/16″ Zip wall sheathing installed.
Knee wall pictured below had all exposed seams in the framing lumber filled with the Contega HF sealant before also applying the Tescon Vana tape, all of which was done prior to the Zip sheathing being installed. The sealant takes about 48 hours to cure enough before you can effectively cover it with the Pro Clima tapes (something to consider when setting up scheduling goals).
Knee wall being covered in Zip sheathing.
Close-up of knee wall with Zip sheathing and sealed seams.
For the bottom, exposed edge of the Zip sheathing, I cut the Tescon Vana tape like I was wrapping a present…
Taped bottom edge of Zip sheathing over face of mudsill.
Once the Zip sheathing was installed on the knee walls, I could move into the basement and seal up the connections between the Zip and the framing members, in addition to hitting any seams in the framing itself.
Once the house gets closed in, I will go back and tape the connection between the top of the foundation and the mudsill for one last layer of protection against air infiltration.
Knee wall with Zip sheathing after sealing up all the connections.
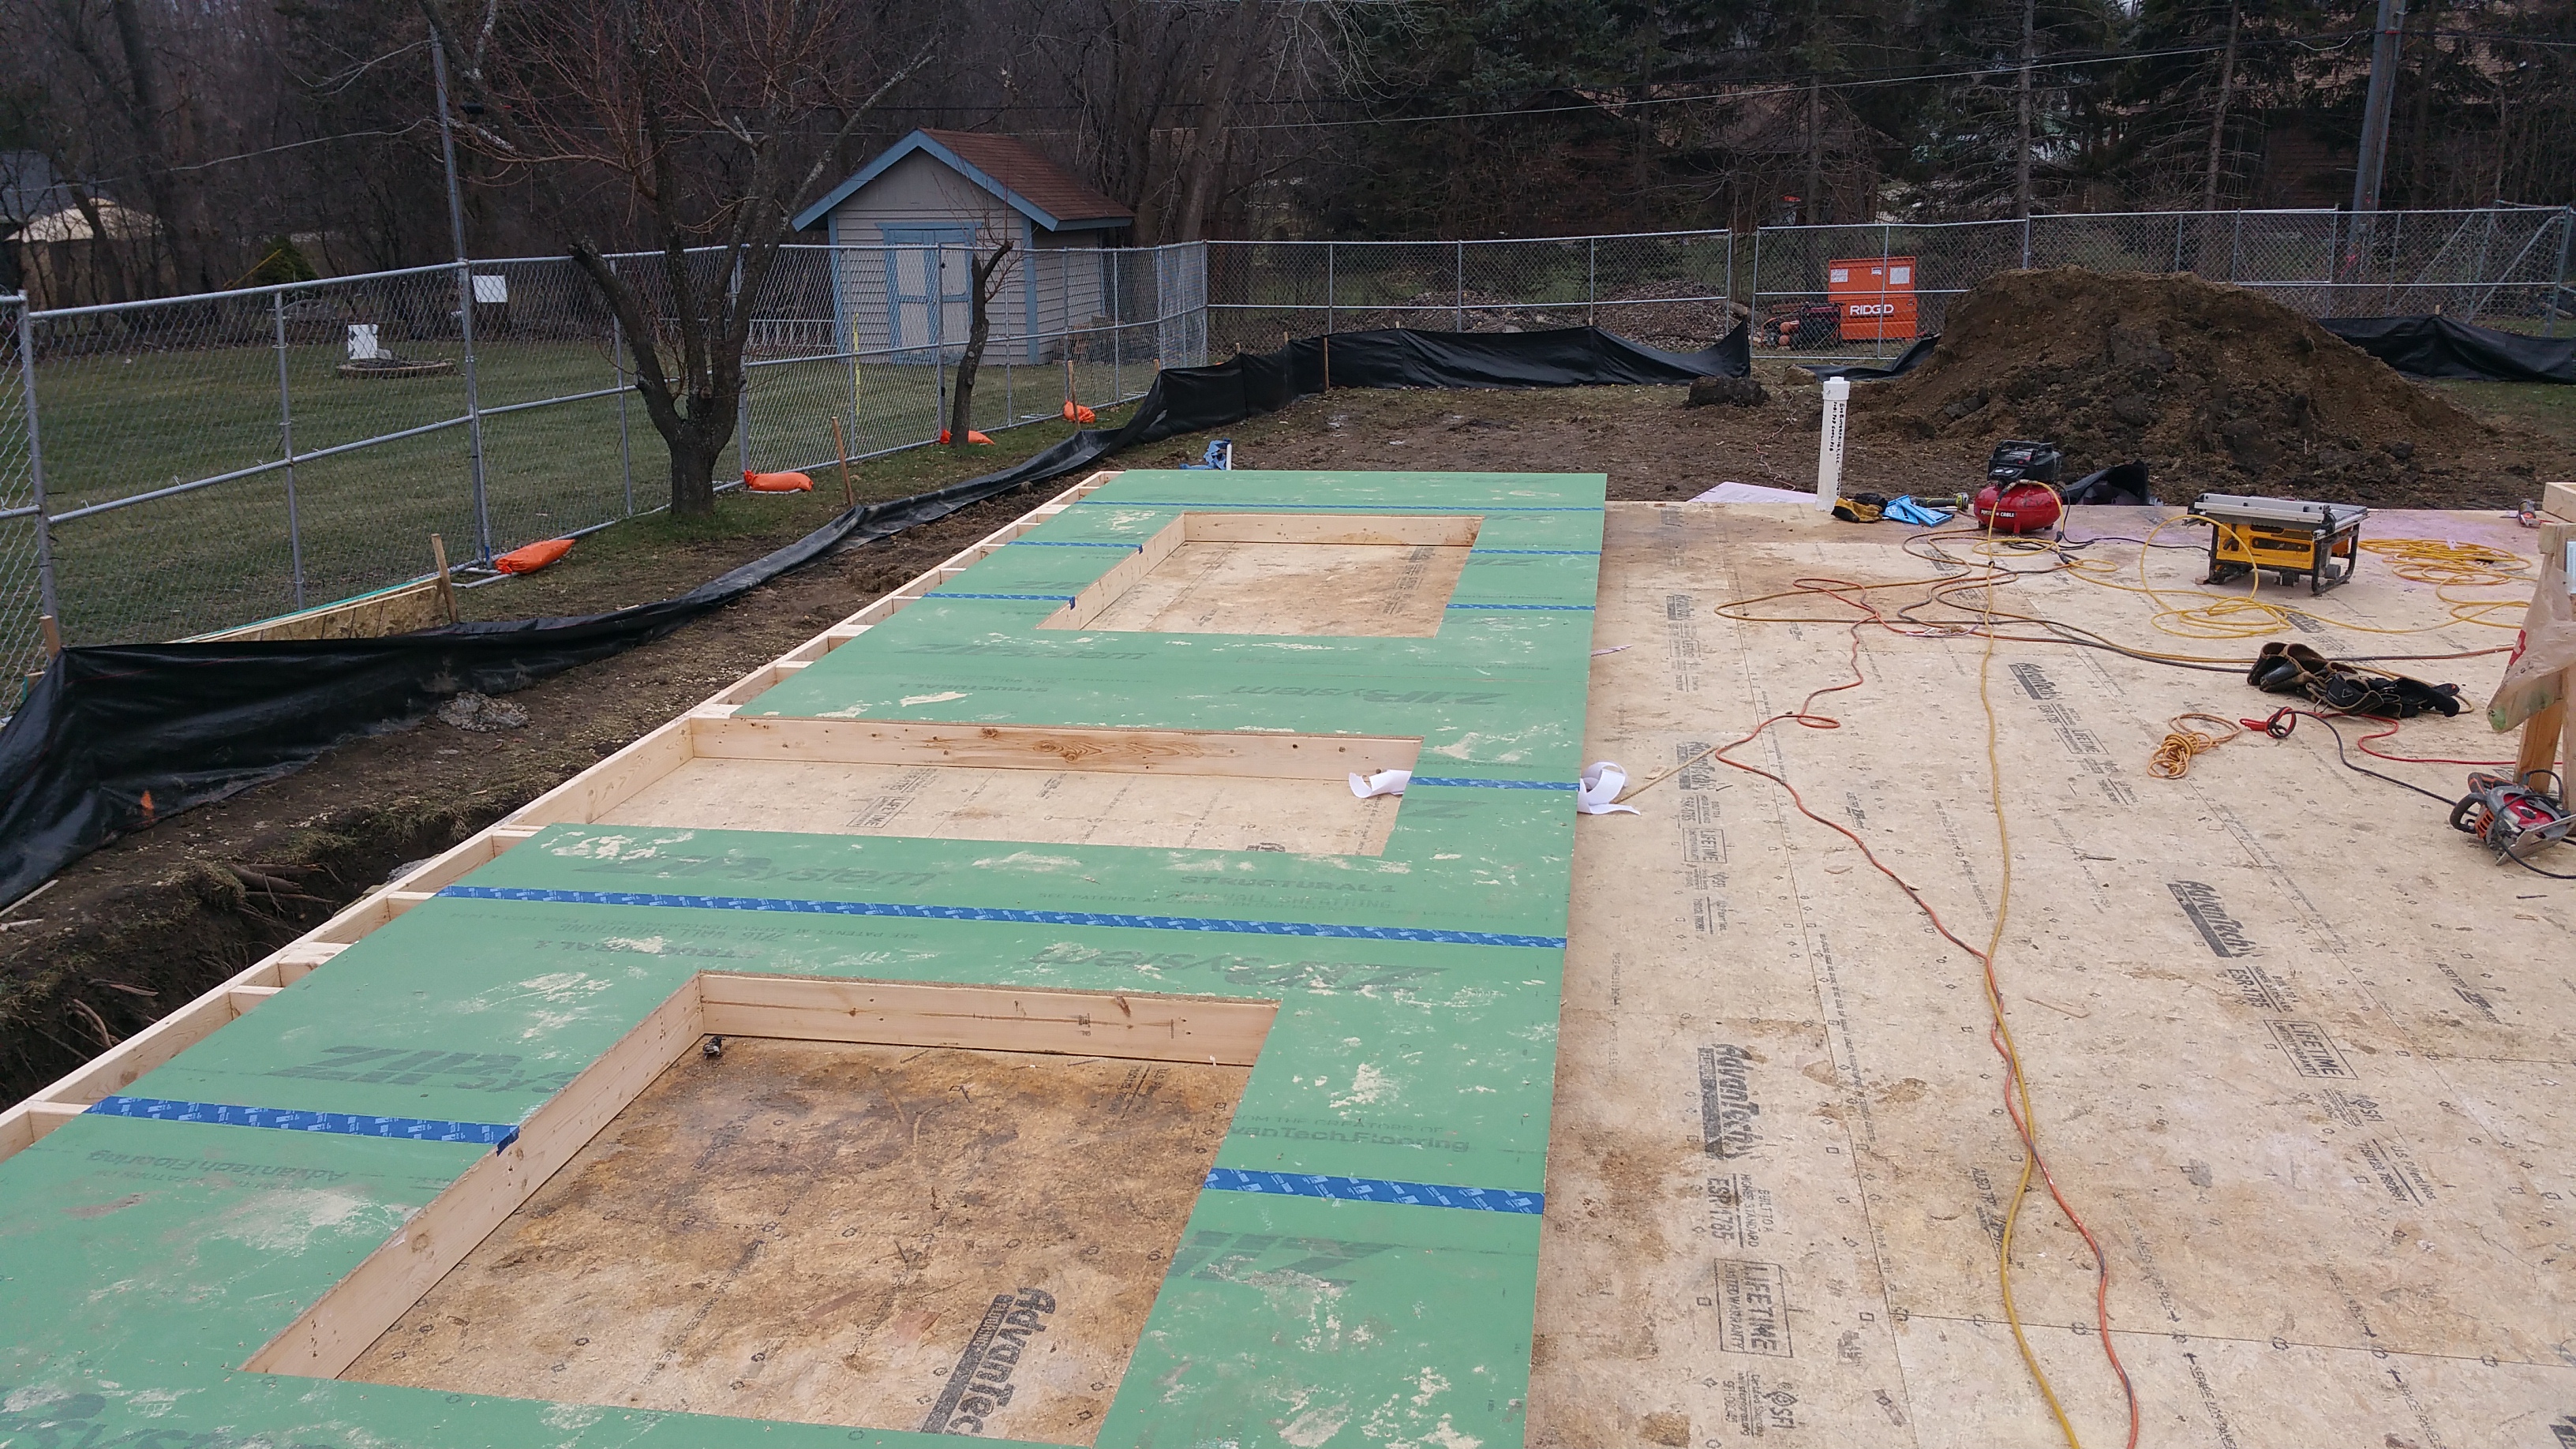
Subflooring
We decided to use Huber’s Advantech Subflooring after years of reading about it in Fine Homebuilding magazine, and based on the online comments from installers who see the added benefits that come with what is an admittedly higher price point. For instance, it’s more resistant to moisture, so it should produce more stable, flatter flooring (e.g. hardwood or tile) when the house is complete, in addition to preventing annoying floor squeaks.
First sheets of subflooring being installed by Billy, Phil, and Nils.
In order to maintain a high level of indoor air quality (IAQ), we’ve been seeking outlow or no VOC products. So, in addition to the Advantech subflooring, which is formaldehyde-free, we chose the Liquid Nails brand of subfloor adhesive (LN-902/LNP-902) because it is Greenguard certified. Another great resource for anyone trying to build or maintain a “clean” structure is available at the InternationalLiving Future Institute website: The Red List
The product takes much longer to dry when it’s cold and wet outside — at least 2-3 days in our experience (sometimes even longer). It’s nice to see more “green” products showing up in the big box stores, rather than having to always special order them.
Standing by what will be the kitchen door. The subflooring was installed with nails and Liquid Nails subfloor adhesive.
Corner of our slowly growing wall assembly. The connection between the subflooring and the top of the rim joists was eventually sealed with the Contega HF sealant.
Basement slowly being covered by subflooring:
Walls Go Up
Our wall assembly is almost entirely based on Hammer and Hand’s Madrona House project, which I discuss here: Wall Assembly
Our blank canvas.
In preparation for construction, I built a mock wall assembly in order to easily explain to anyone on site how the various components should go together. It also gave me a chance to practice using the Contega HF sealant, along with the various Pro Clima tapes from 475 High Performance Building Supply.
It’s been exciting to see the walls go up, incorporating the many details in the mock wall assembly.
Men at work: Zach, Phil, and Sammy laying out the walls.
Zach and Phil installing the Zip sheathing over the framing.
Phil laying down a consistent and continuous bead of construction adhesive (trying to avoid a bead that runs back and forth between fat and thin), before the Zip sheathing is installed.
We were fighting the rain, ice, and mud, but I was able to get the Tescon Vana tape over some of the seams in the Zip sheathing before the walls went up.
Sammy and Billy help me apply the Contega HF sealant to each nail hole, and then make it lie flat with a swipe of the spatula, so the Tescon Vana tape that will be applied later will also lie flat.
Section of wall nailed, taped, and nail holes caulked — ready to be raised up.
The final step before the walls were raised was to staple the B75 gasket to the bottom of each sill plate.
First section of wall going up: Billy, Zach, and Sammy doing the heavy lifting.
Zach establishes plumb, while Phil readies to make the wall secure.
The guys continue with the south walls.
View from south-east corner of the house with the guys framing in the shadow of the water tower:
The only section of wall where the B75 gasket rolled up on itself is shown below — no doubt because this was the most difficult section to get into place because of the stair opening. Otherwise, the guys had no issues with the gasket.
Even on this wall where the gasket did roll up on itself, I will cut off the excess that ended up on the interior side before sealing the connection with the subflooring, and then spend some time filling the void on the exterior side with backer rod and sealant as well.
Zach is the only dedicated, full-time framing carpenter on the crew (the other guys do a variety of carpentry-related work). He has a production background, and it shows with the energy and ease with which he works. He clearly enjoys what he does for a living (In photo: Zach, Sammy, and Billy). Sammy and Billy may not realize it yet, but they’re learning a lot from him (even if he does razz them all day long).
Below you can see some of the junctions where different materials meet, and the effort that’s going into air sealing these inevitable gaps: sealant at rim joist corners, rim joist – subfloor connection, and gasket under the wall sill plate:
Wall is up.
Same corner as above, but now looking down the exterior side of the wall.
We’ve tried very hard to keep foam out of the wall assembly and the overall structure itself (based on environmental concerns), however, one place where it did find its way in was the insulated headers for above our windows and doors:
Billy and Sammy putting the insulated headers together.
End of the day. The fourth wall awaits.
First look at what will become our front facade.
Once the perimeter walls were up, I went around with an impact driver and decking screws to tighten the connection between the Zip and the framing members, especially at the top of the walls. Although the Liquid Nails adhesive helps a lot, it still makes for an imperfect connection between the sheathing and the framing members:
Looking down at the top plate. The visible gap is between the side of the top plate and the Zip sheathing. I was able to close gaps like this one at the top of the walls using decking screws. The decking screws also closed similar gaps around window and door rough openings. This should make sealing these areas easier, and the connection more durable.
Leaning over the top of the wall to install the decking screws.
Having seen construction adhesive and nails in action, I would recommend a glue-and-screw approach if you’re trying to fully maximize the tightness of the connection between the sheathing and the framing.
Nice view as I apply the sealant.
My wife giving our Zip sheathing blue chicken pox with the Tescon Vana tape in order to seal all the nail holes.
It’s difficult to see, but this tape is embedded inside a sheet of ice. It rained overnight, before turning to ice. We’re asking a lot of these tapes and sealants. This piece of tape looks like fingertips holding on for dear life.
The Beast gets a first glimpse of the view from her bedroom window.
I was wondering why I would ever need more than one of these. Now I know — bent, scratched, and cracked, the Pressfix from475 HPBS did its job well.
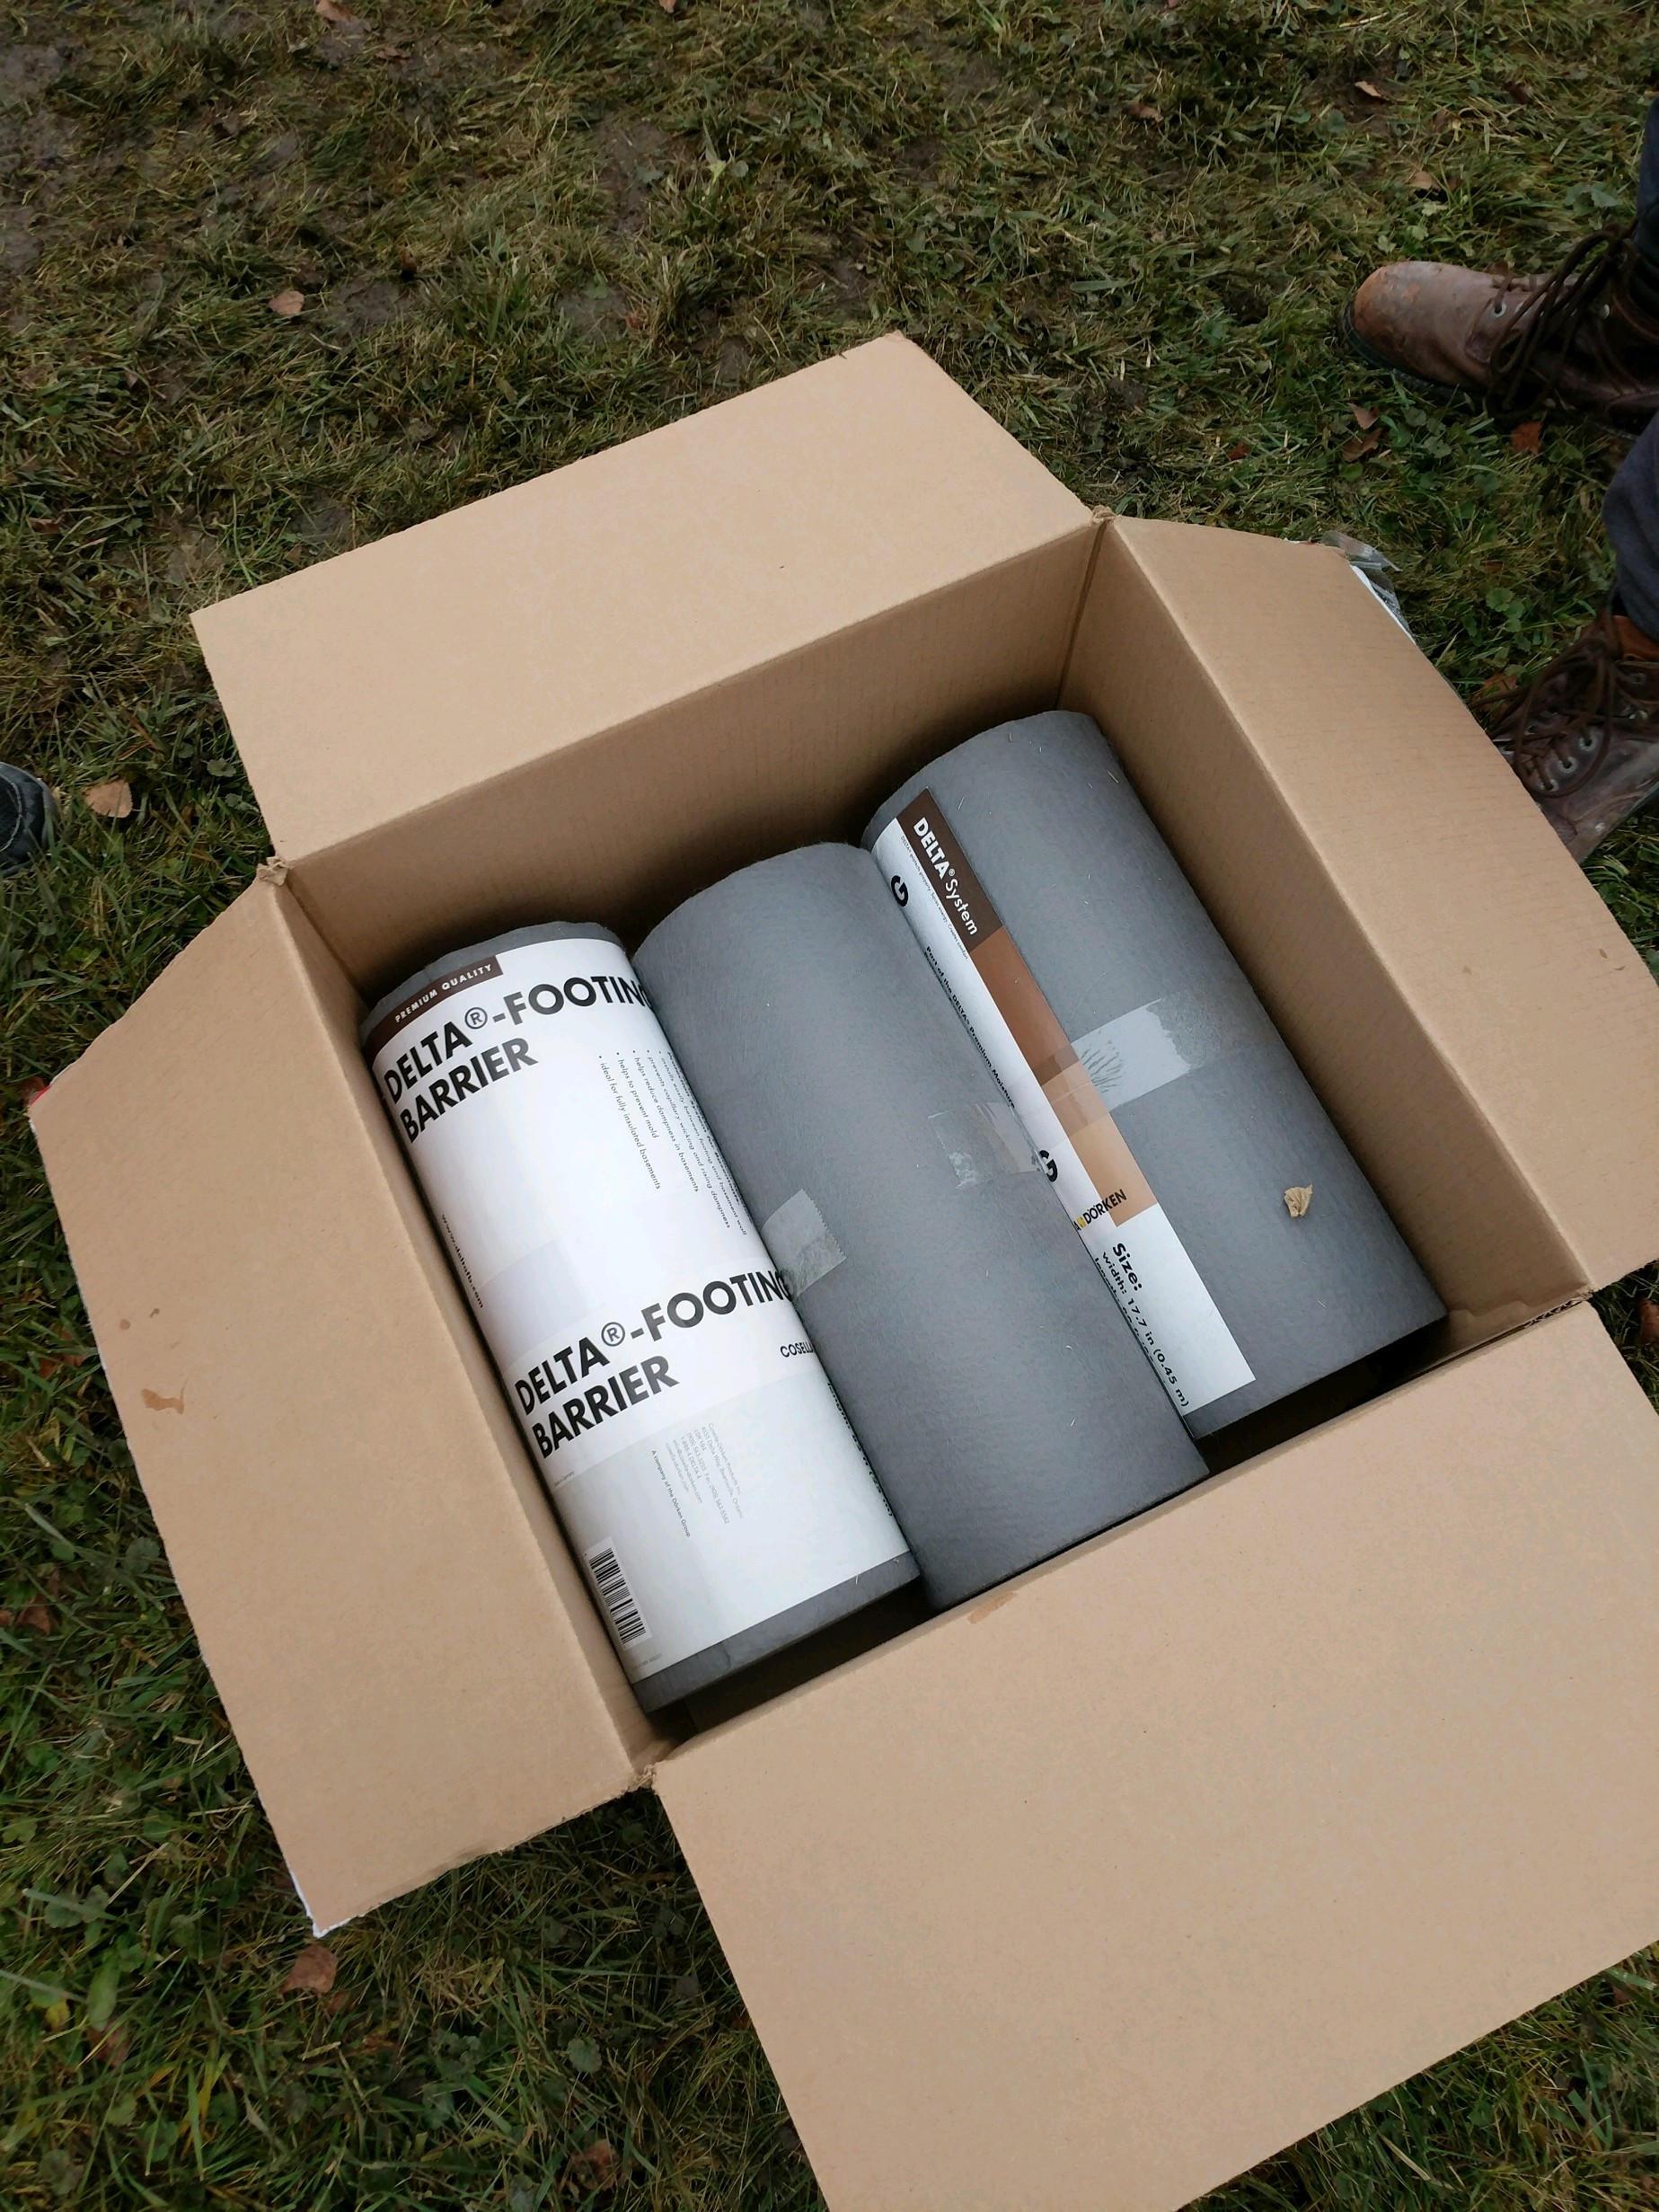
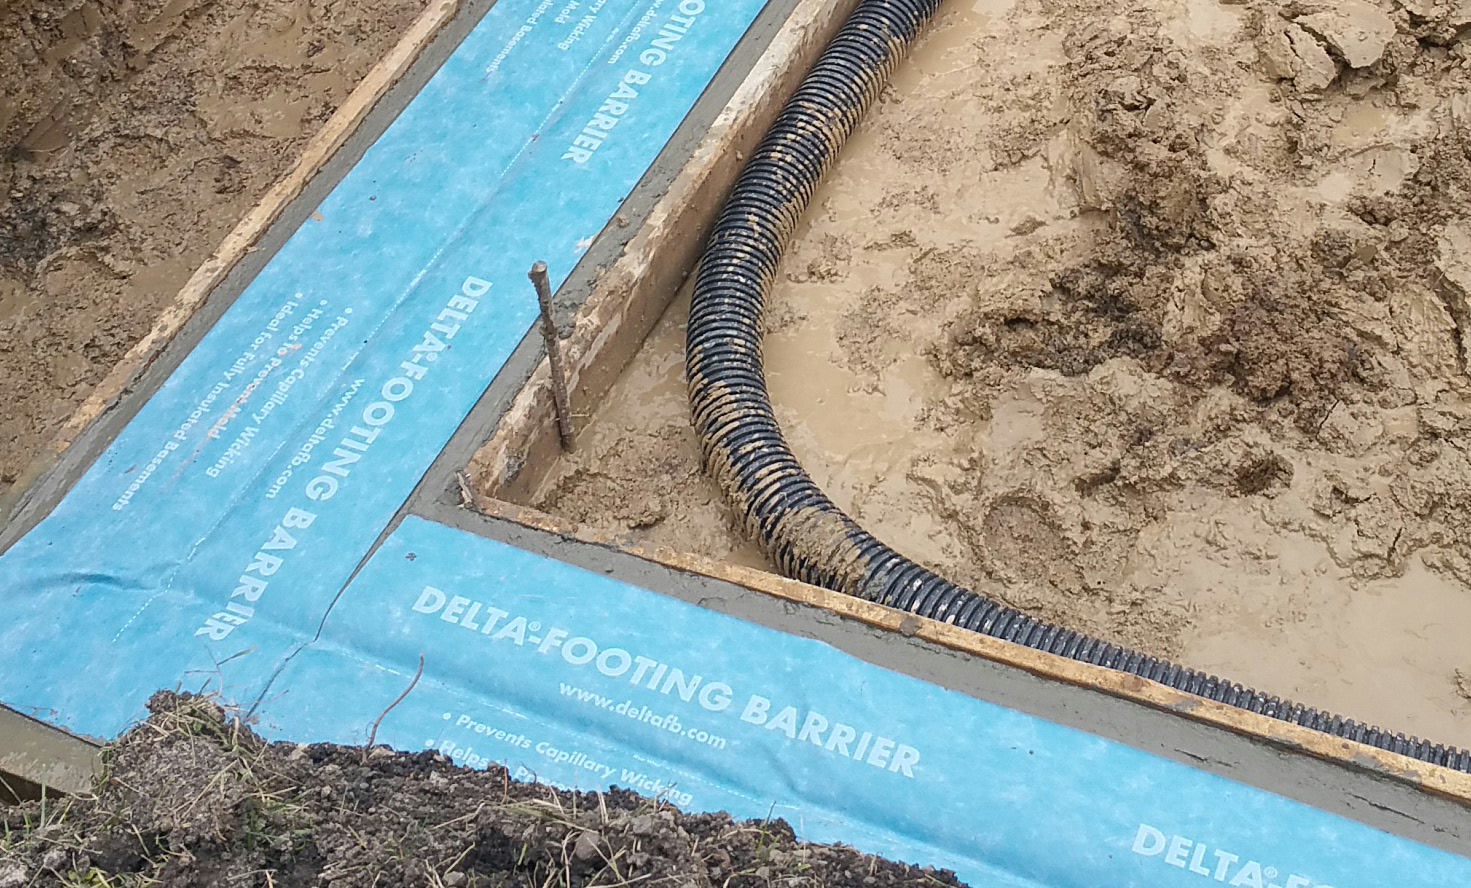
For the top of the footings we used a product from Cosella Dörken called Delta Footing Barrier. Acting as a capillary break, the membrane is supposed to help prevent moisture from wicking up from below the footing, where it could then migrate into the foundation wall and into the basement, or even the wall assembly above (worst case scenario), causing mold or other moisture related damage. It should contribute to making the basement a very livable space (especially when combined with significant amounts of insulation on the exterior walls and under the slab).
Here’s a detail from the construction drawings:
Red arrow shows thermal bridge and gap in the vapor barrier up through the footing from surrounding soil if Delta membrane were not present.
In other words, this junction represents a weak point in our thermal envelope and vapor barrier. Passive House proponents often talk about using a red pen on a construction drawing to follow the air barrier and thermal envelope (the goal: no gaps in air sealing or the layers of insulation) . In theory, you should be able to do this all the way around the structure without once lifting your pen. If you can lift your pen (meaning there’s a gap in your air barrier or thermal envelope — which would be the case without the Delta membrane on top of our footing), then it’s a weak point that should be addressed (if at all possible).
Even with significant insulation on the exterior wall of the foundation (Roxul Comfortboard 80: 2″ + 3″), along with a sprayed-on waterproofing membrane, as well as a vapor barrier (Stego Wrap) and insulation (Roxul Comfortboard 80: 2″ + 2″) under the basement slab, this junction where the three elements meet — slab, footing, wall — is a weak point. Although it doesn’t address the weakness in R-value, at least it should keep the moisture at bay (probably the biggest complaint associated with basements).
With a 9′ basement, we’re hoping the temperatures at this depth are consistently mild enough to avoid any kind of significant energy penalty. I’m confident this will be the case because in our last home, a typical suburban tract house without much insulation, the basement always stayed cool in the summer and warm in the winter, even though the ducts to the basement had been closed off so the space never saw any direct benefit from the HVAC system.
For minimal cost in materials, the Delta membrane seems well worth it for the added peace of mind.
Rolls of Delta Footing Barrier on site and ready to go.
Here is a video and some photos from our job site:
The guys from Tynis Concrete didn’t seem to mind trying something new, and the membrane went on without any issues.
A corner of the footing with the Delta membrane “keyed” into the footing.
I couldn’t find any local suppliers who carried the Delta membrane, so I ordered online from: spycorbuilding.com
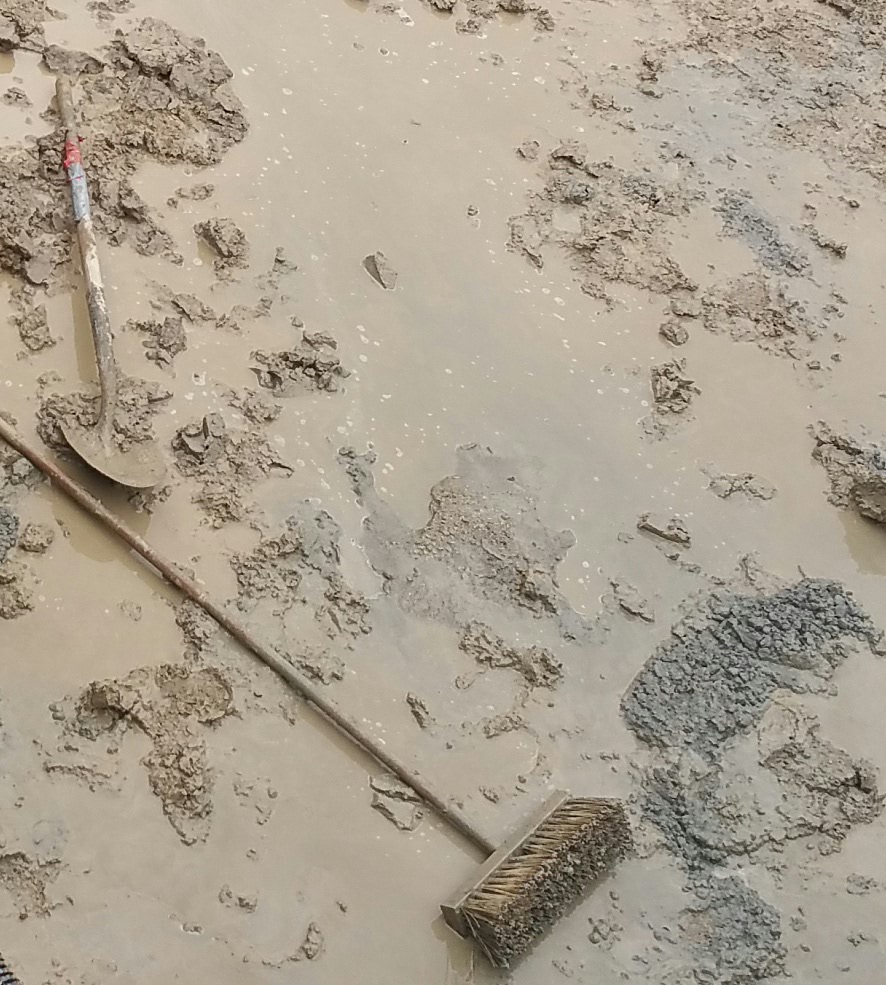
Detail of the bottom of our hole, being prepped for the footings.
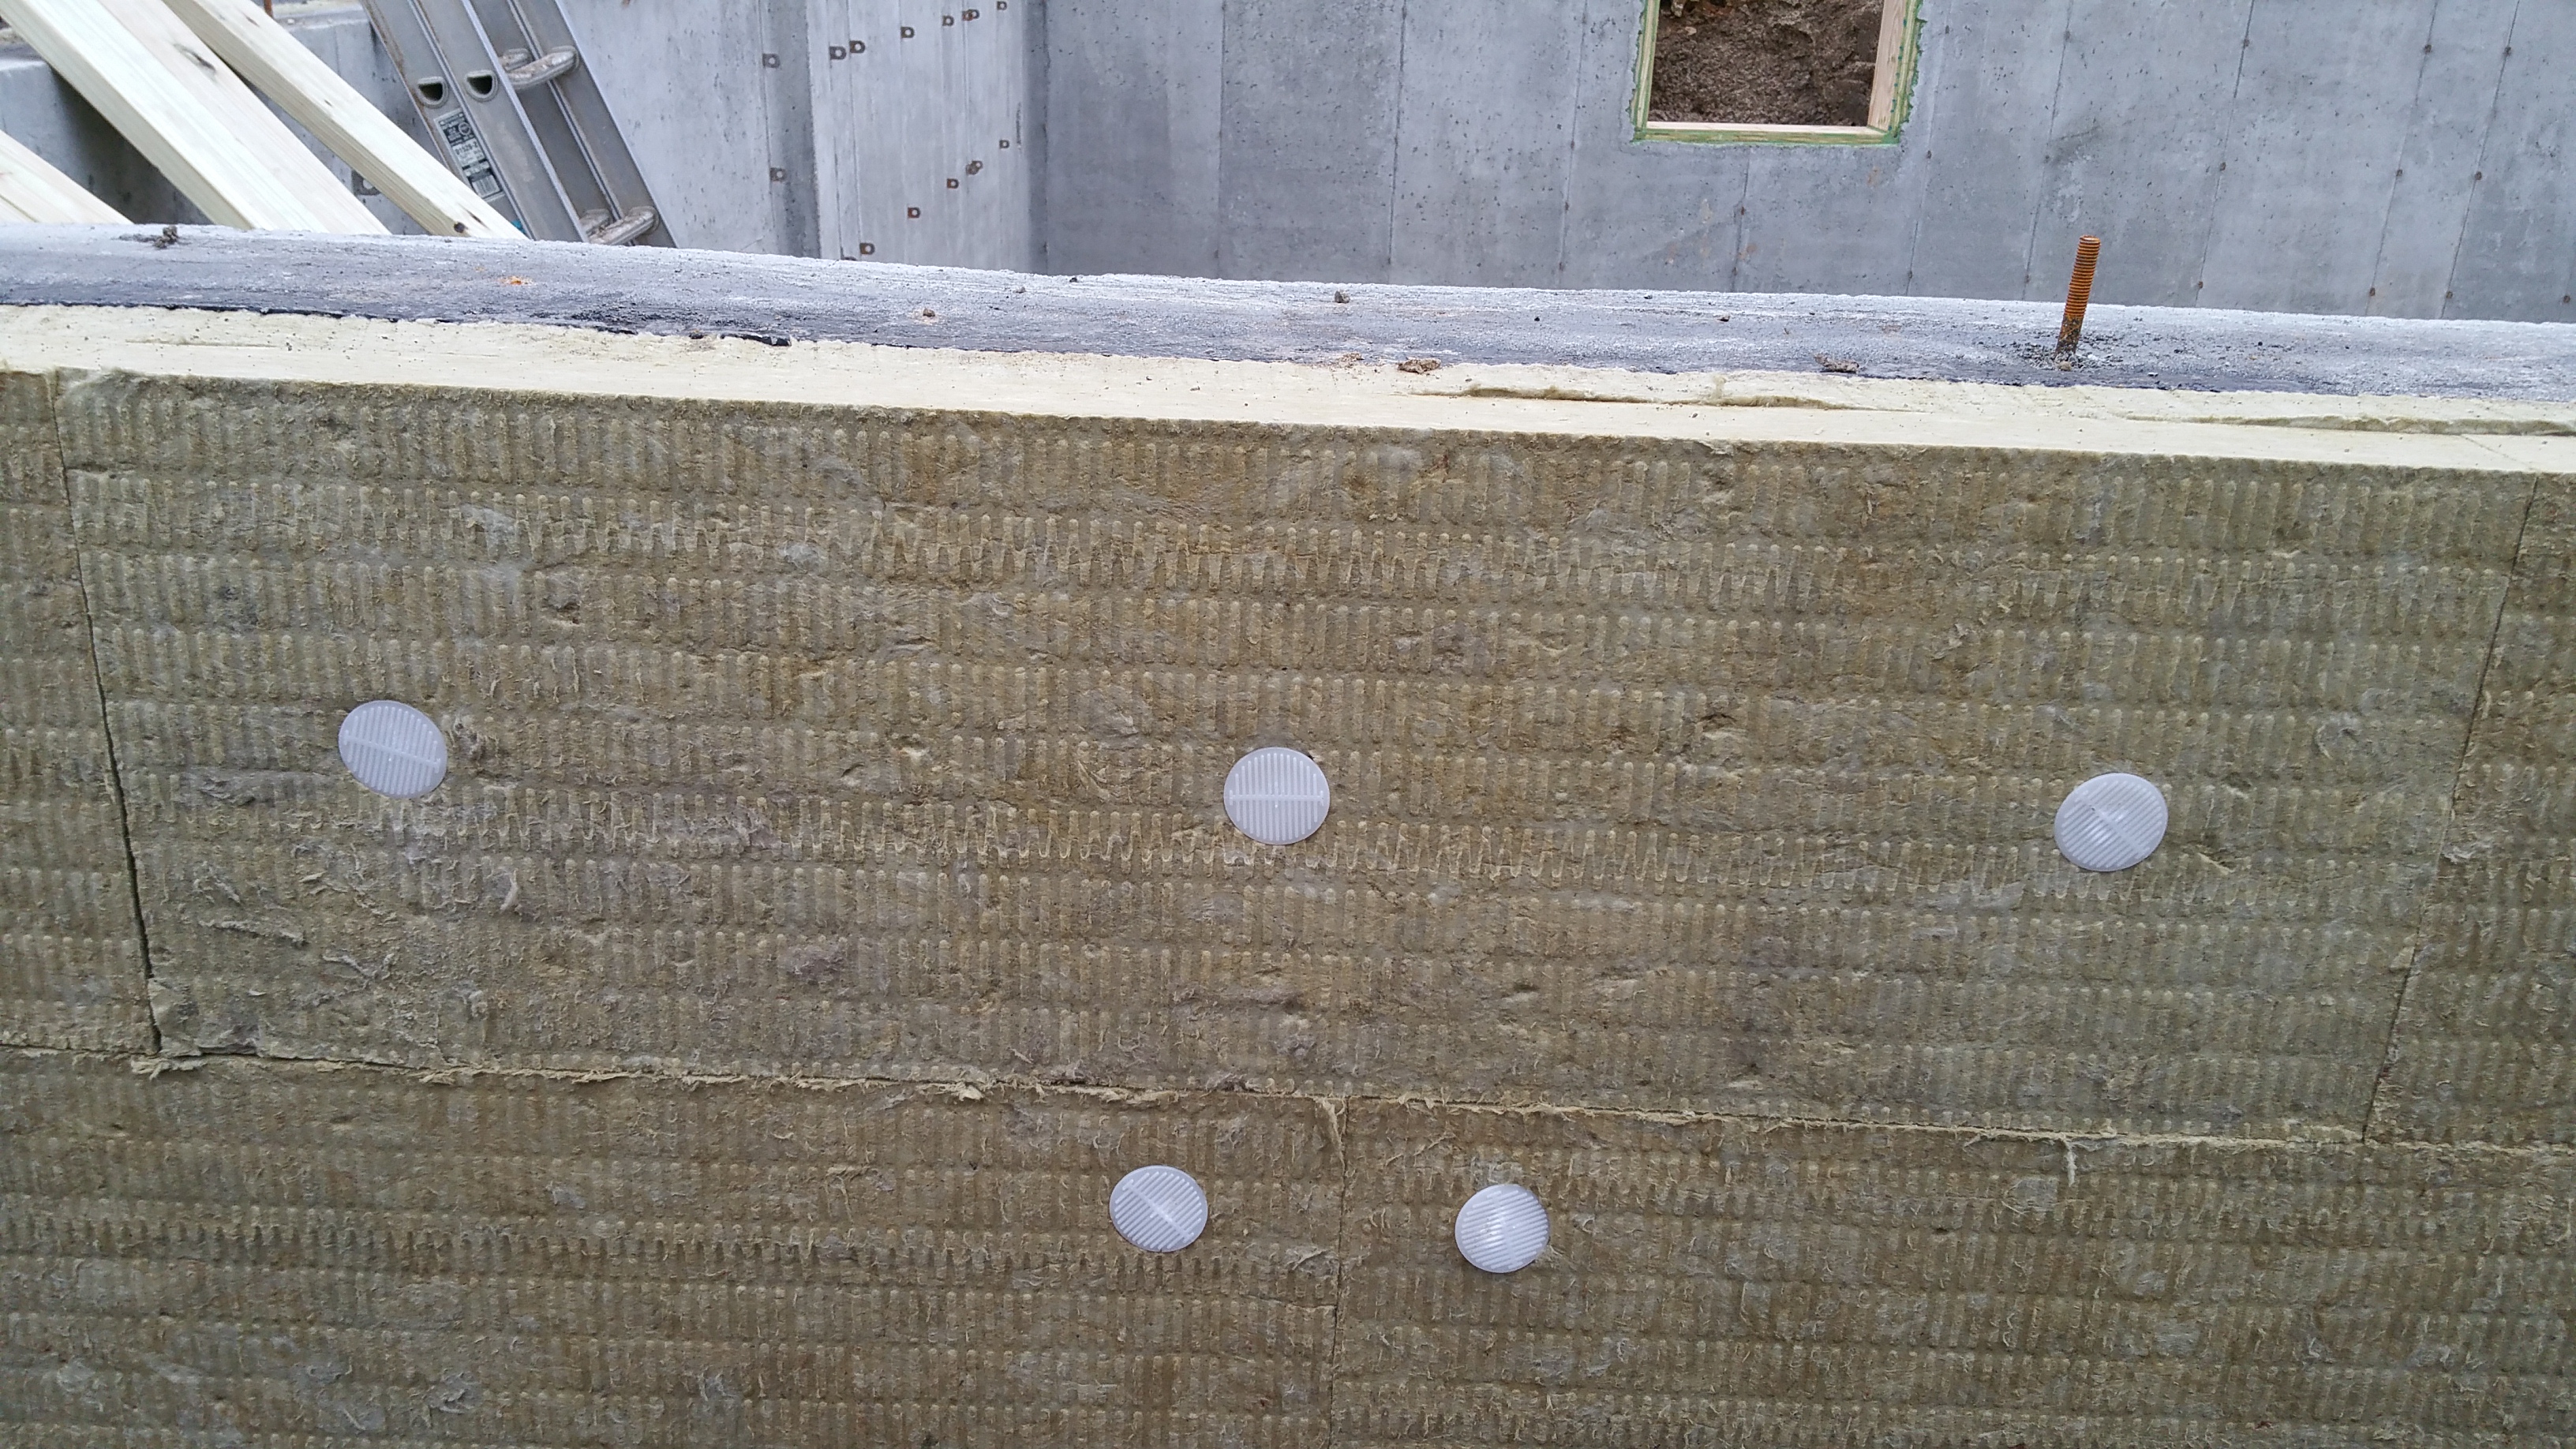
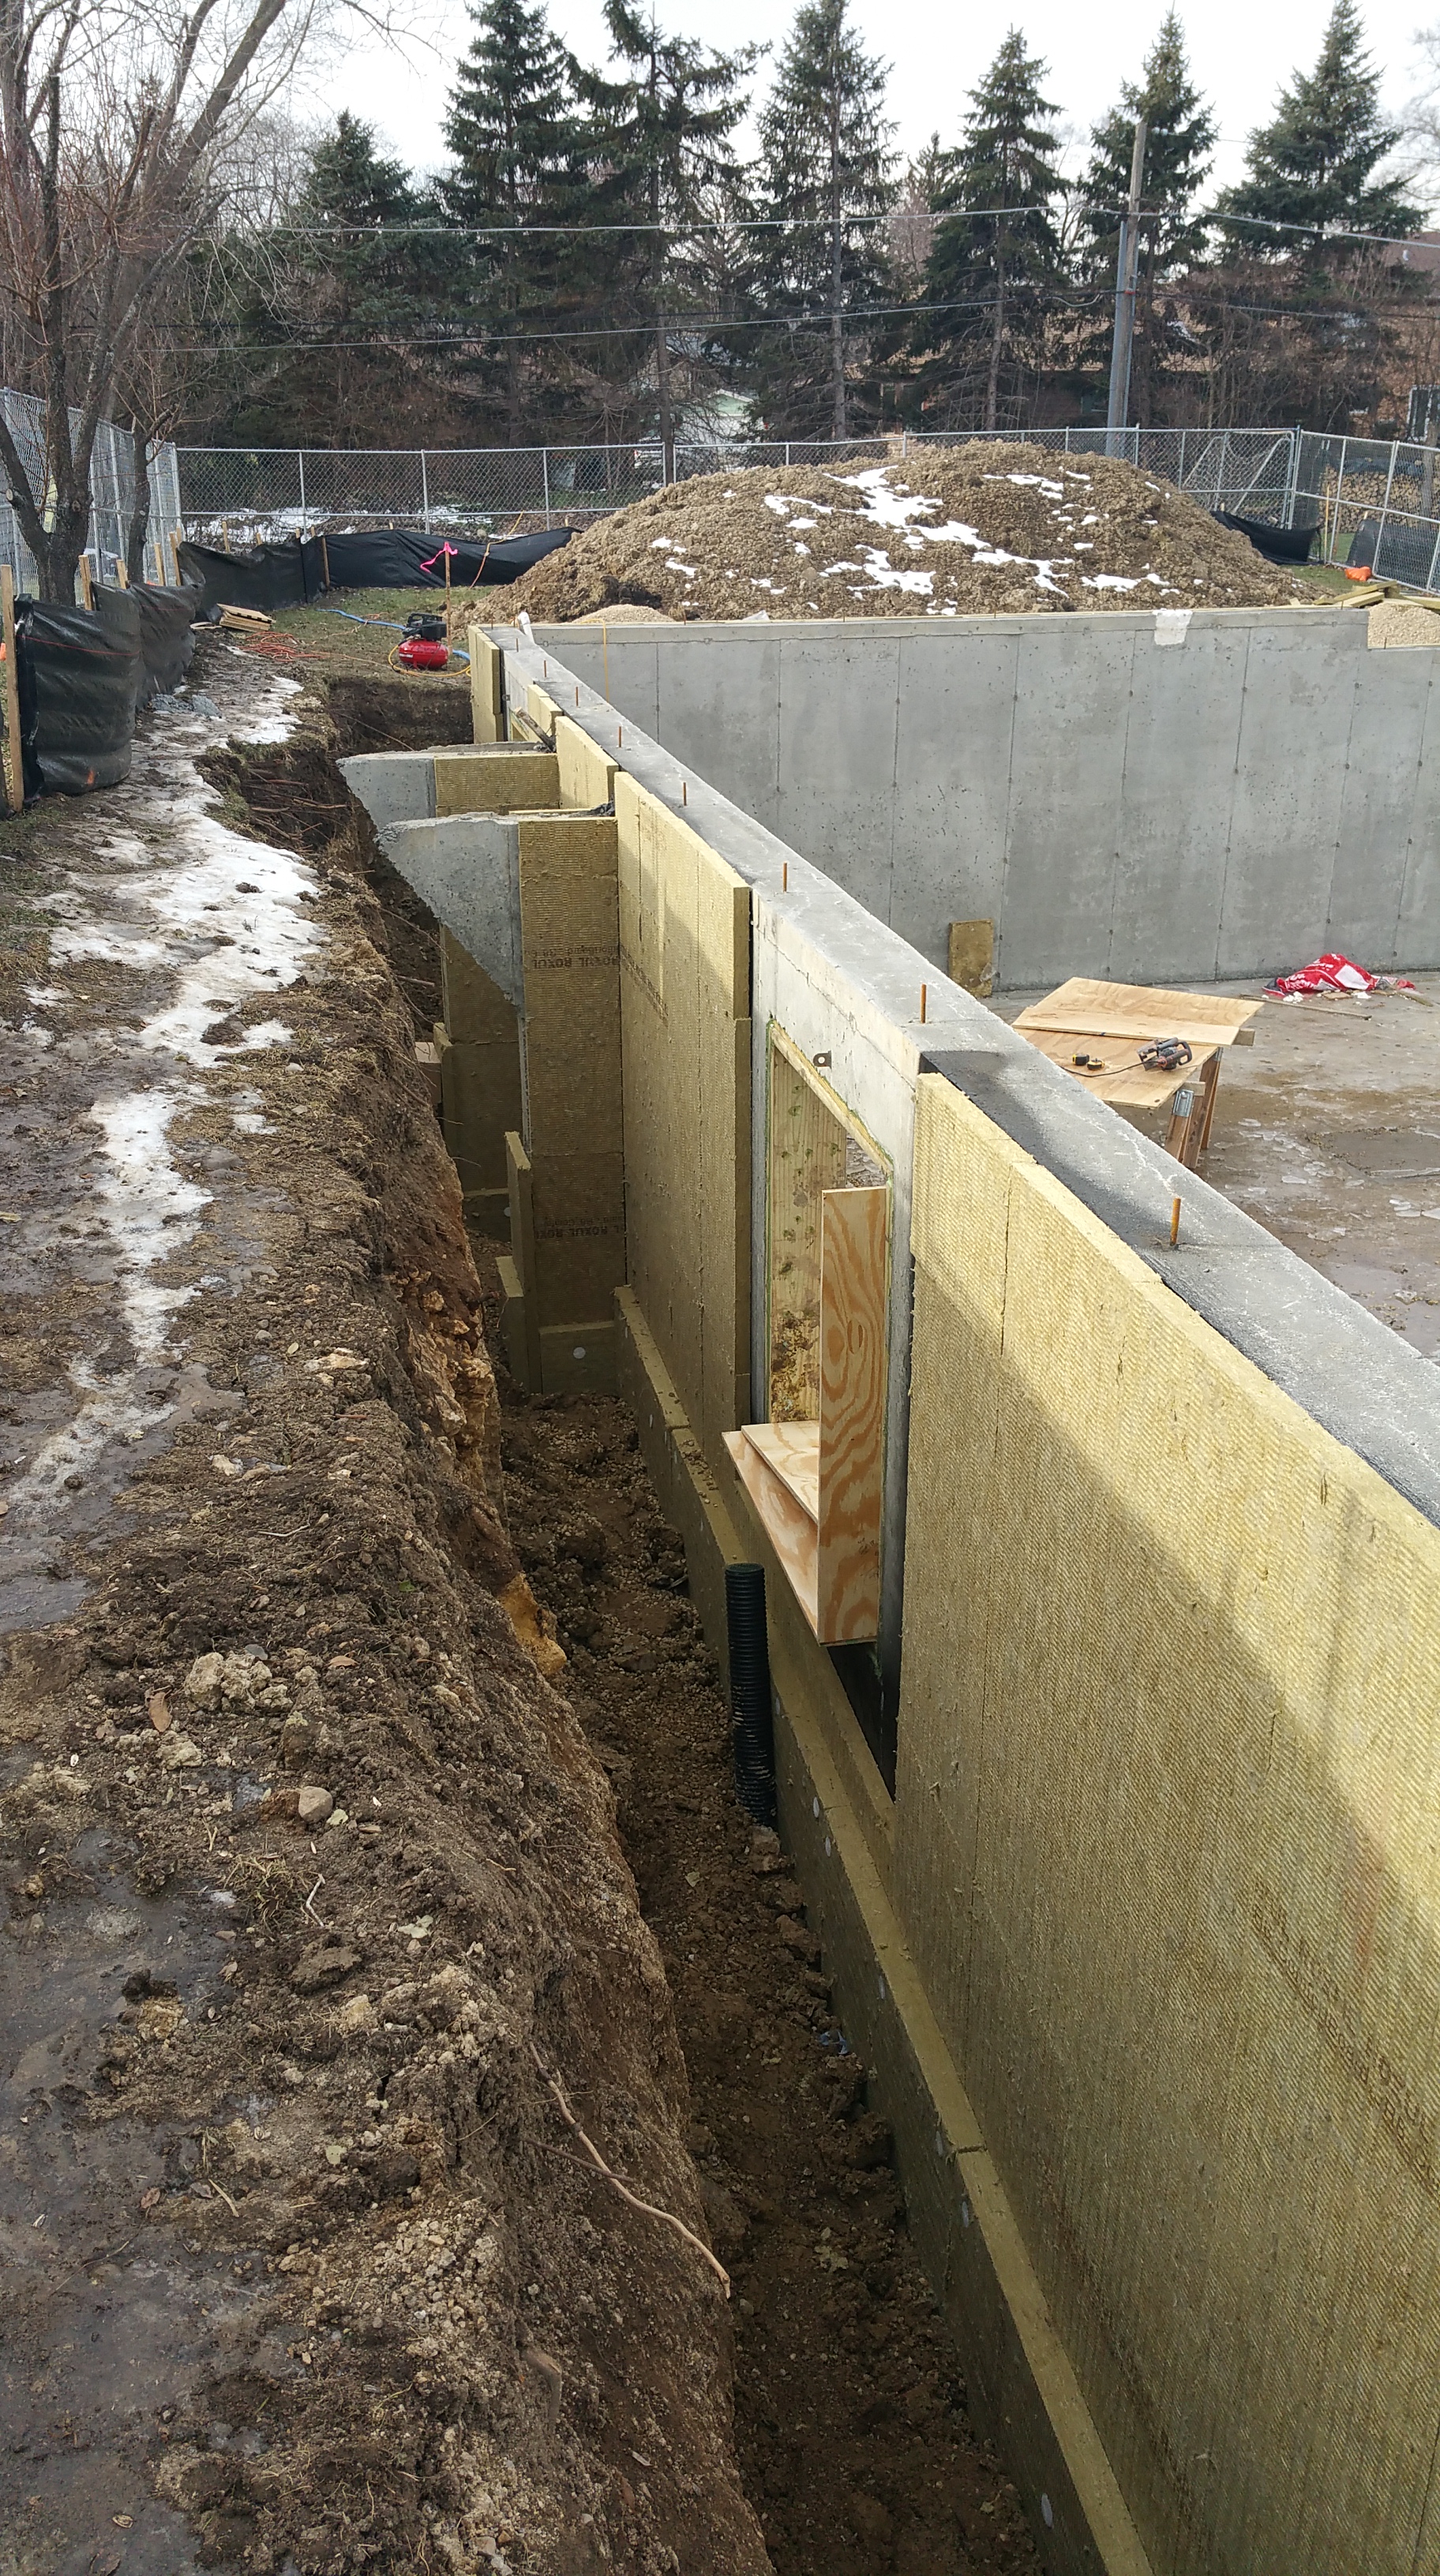
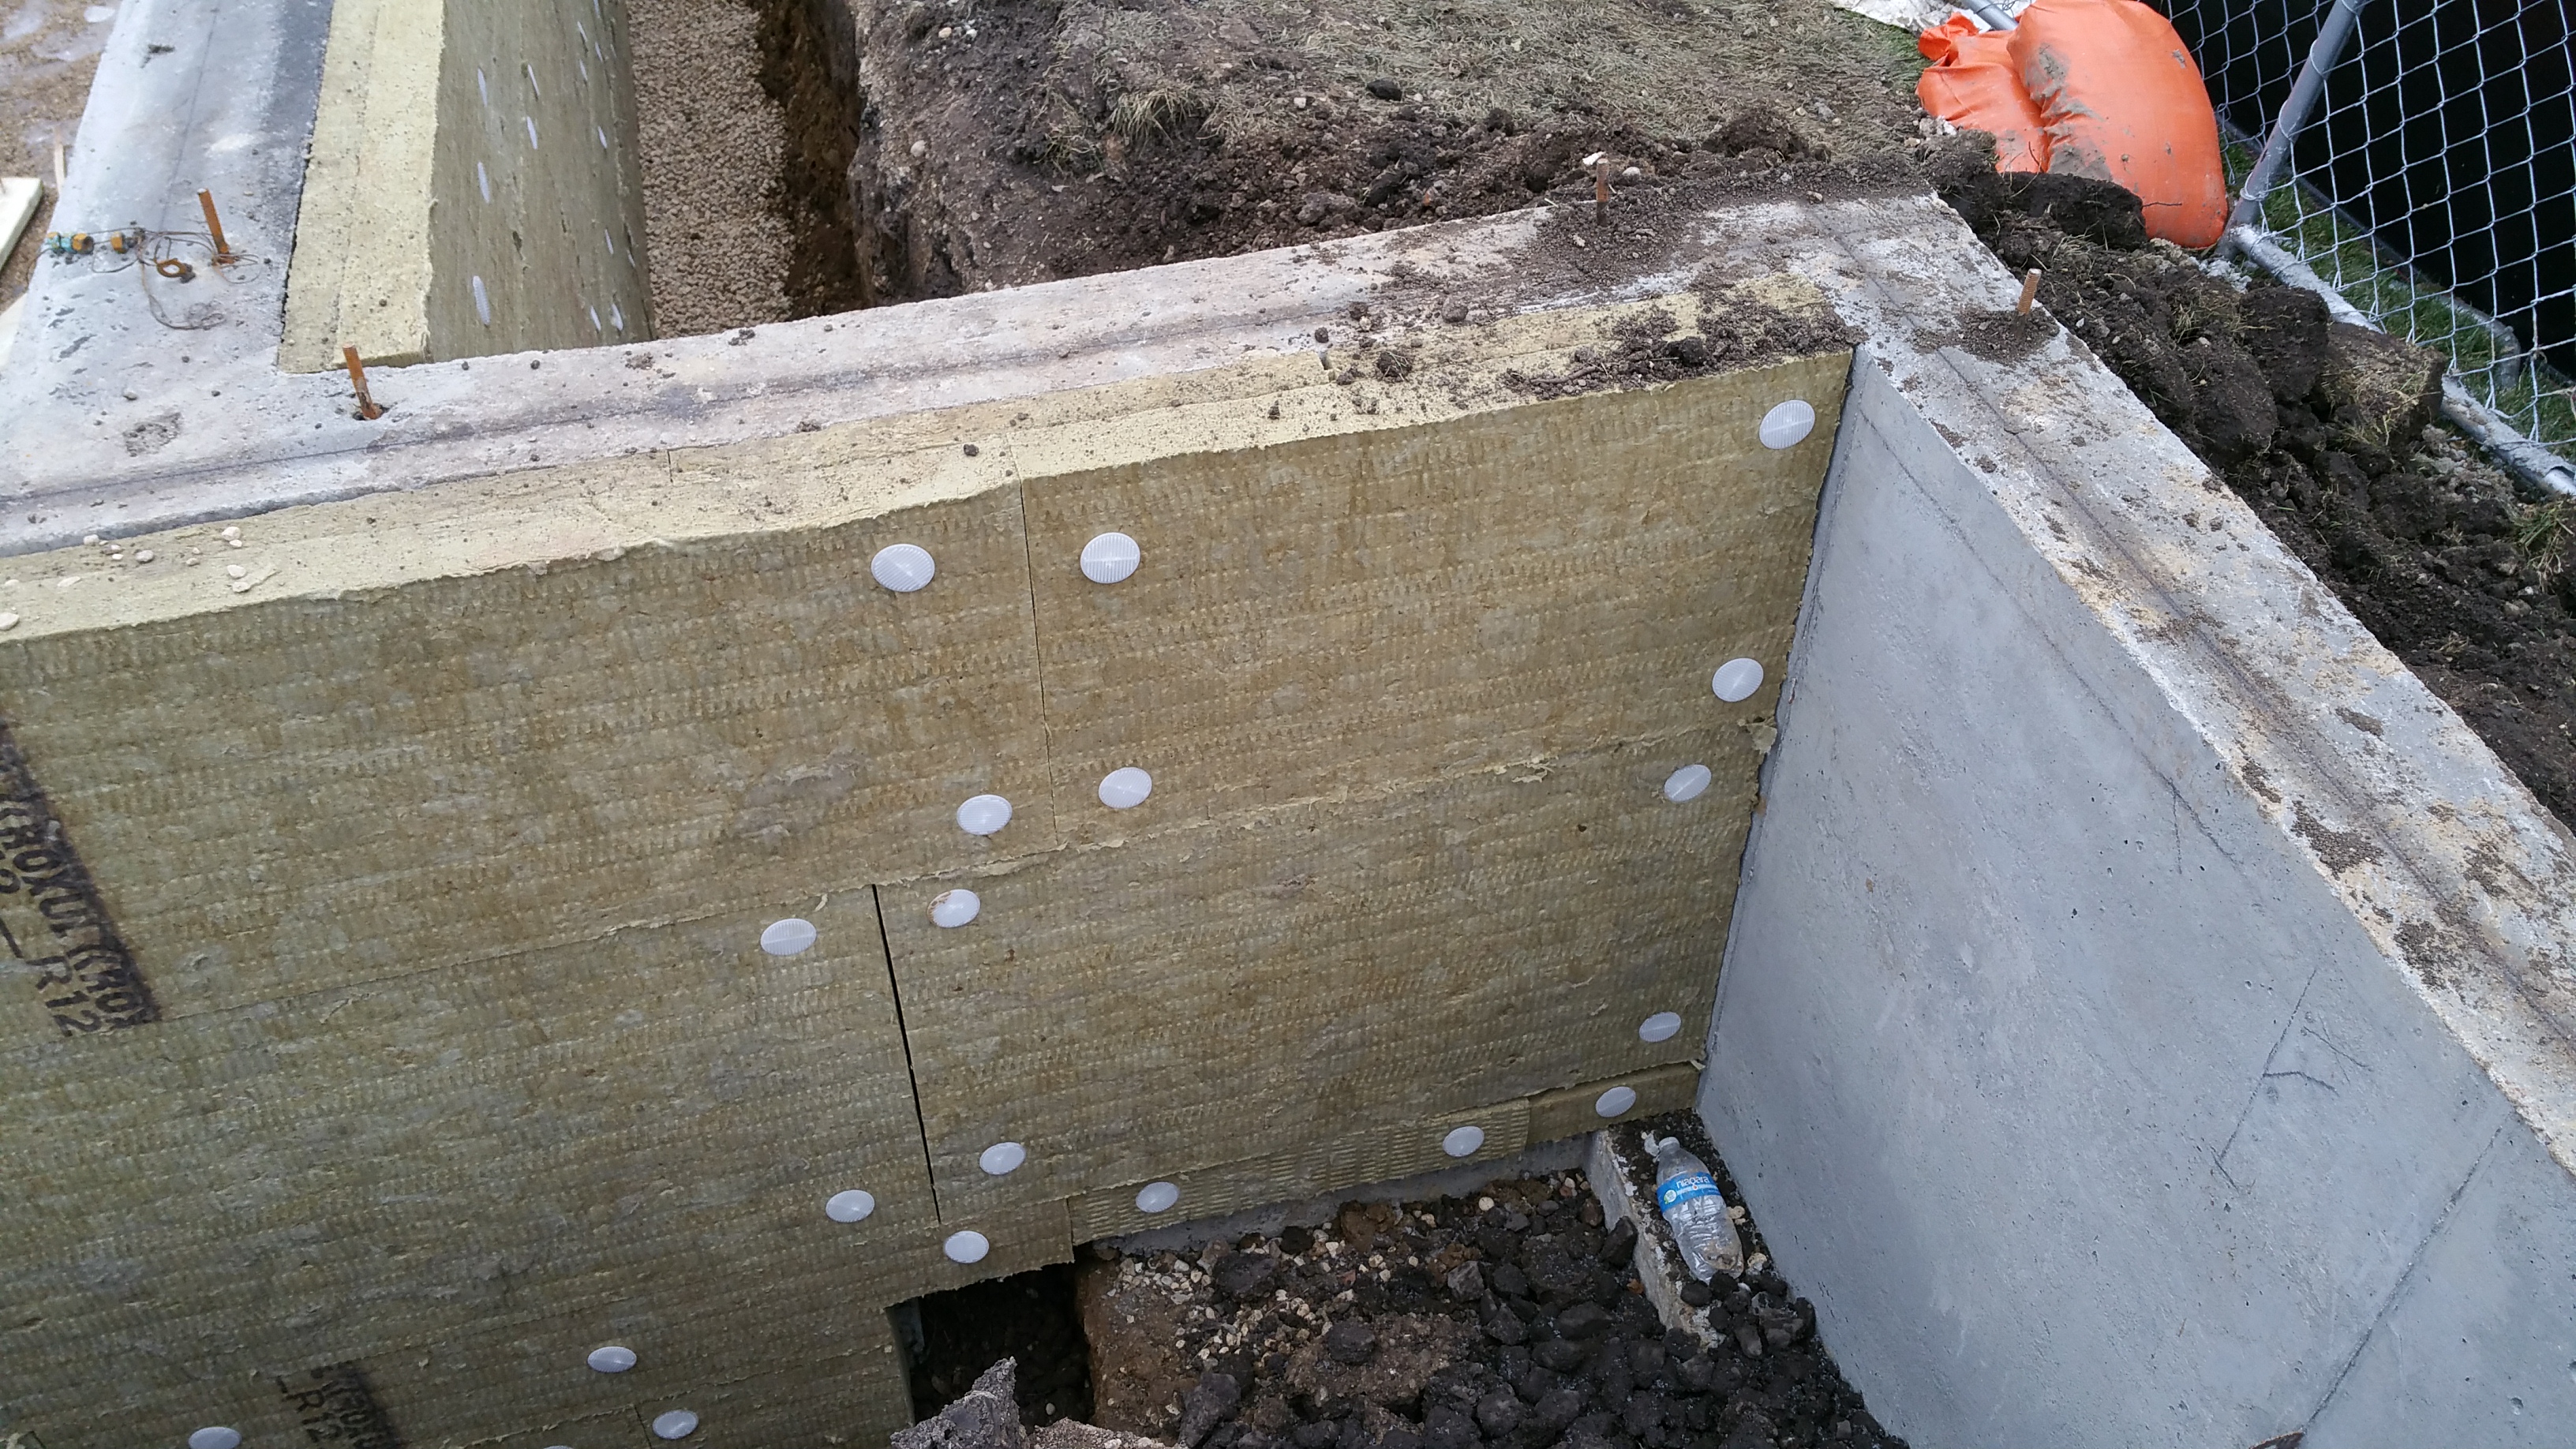
Foundation Walls with Roxul Comfortboard 80
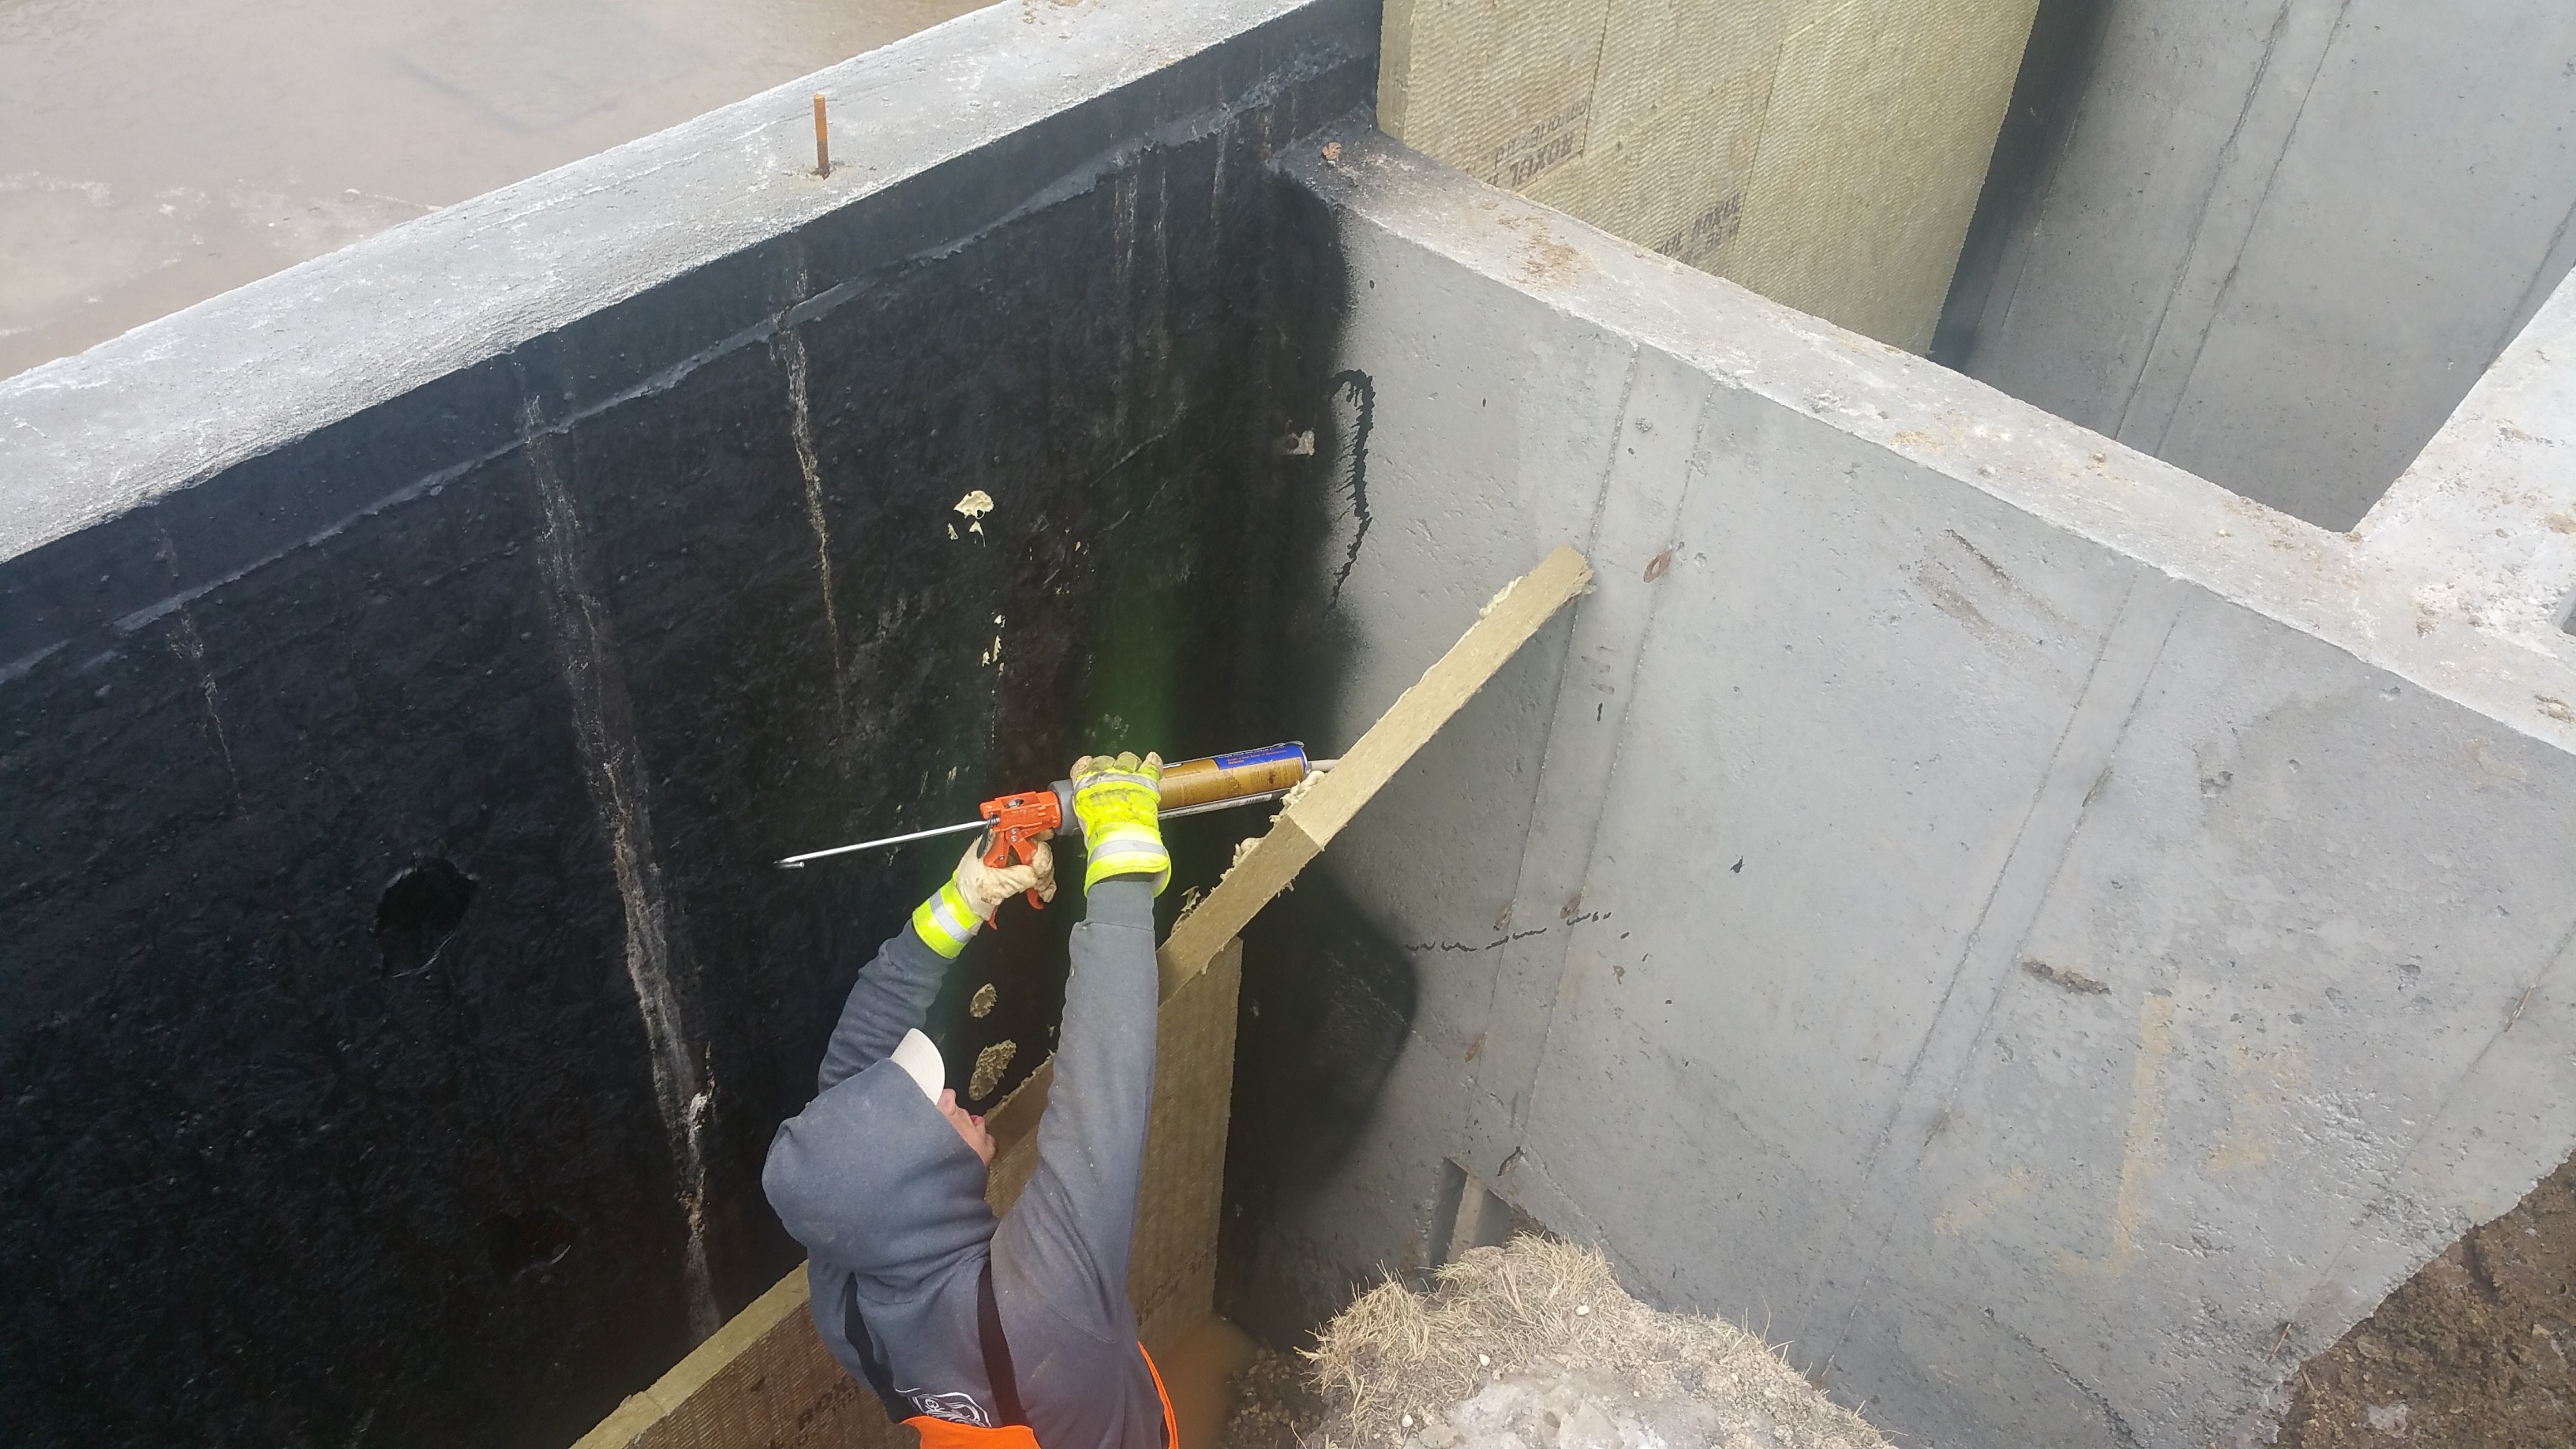
For the walls, first we used a spray-on waterproofing membrane from Tremco:
After the waterproofing was complete, we began installing the two layers of Roxul Comfortboard 80 (a dense, rigid form of insulation that can be used below grade, to the exterior side of wall sheathing, and even under a basement slab), which will give the basement foundation walls an R-20 of insulation value.
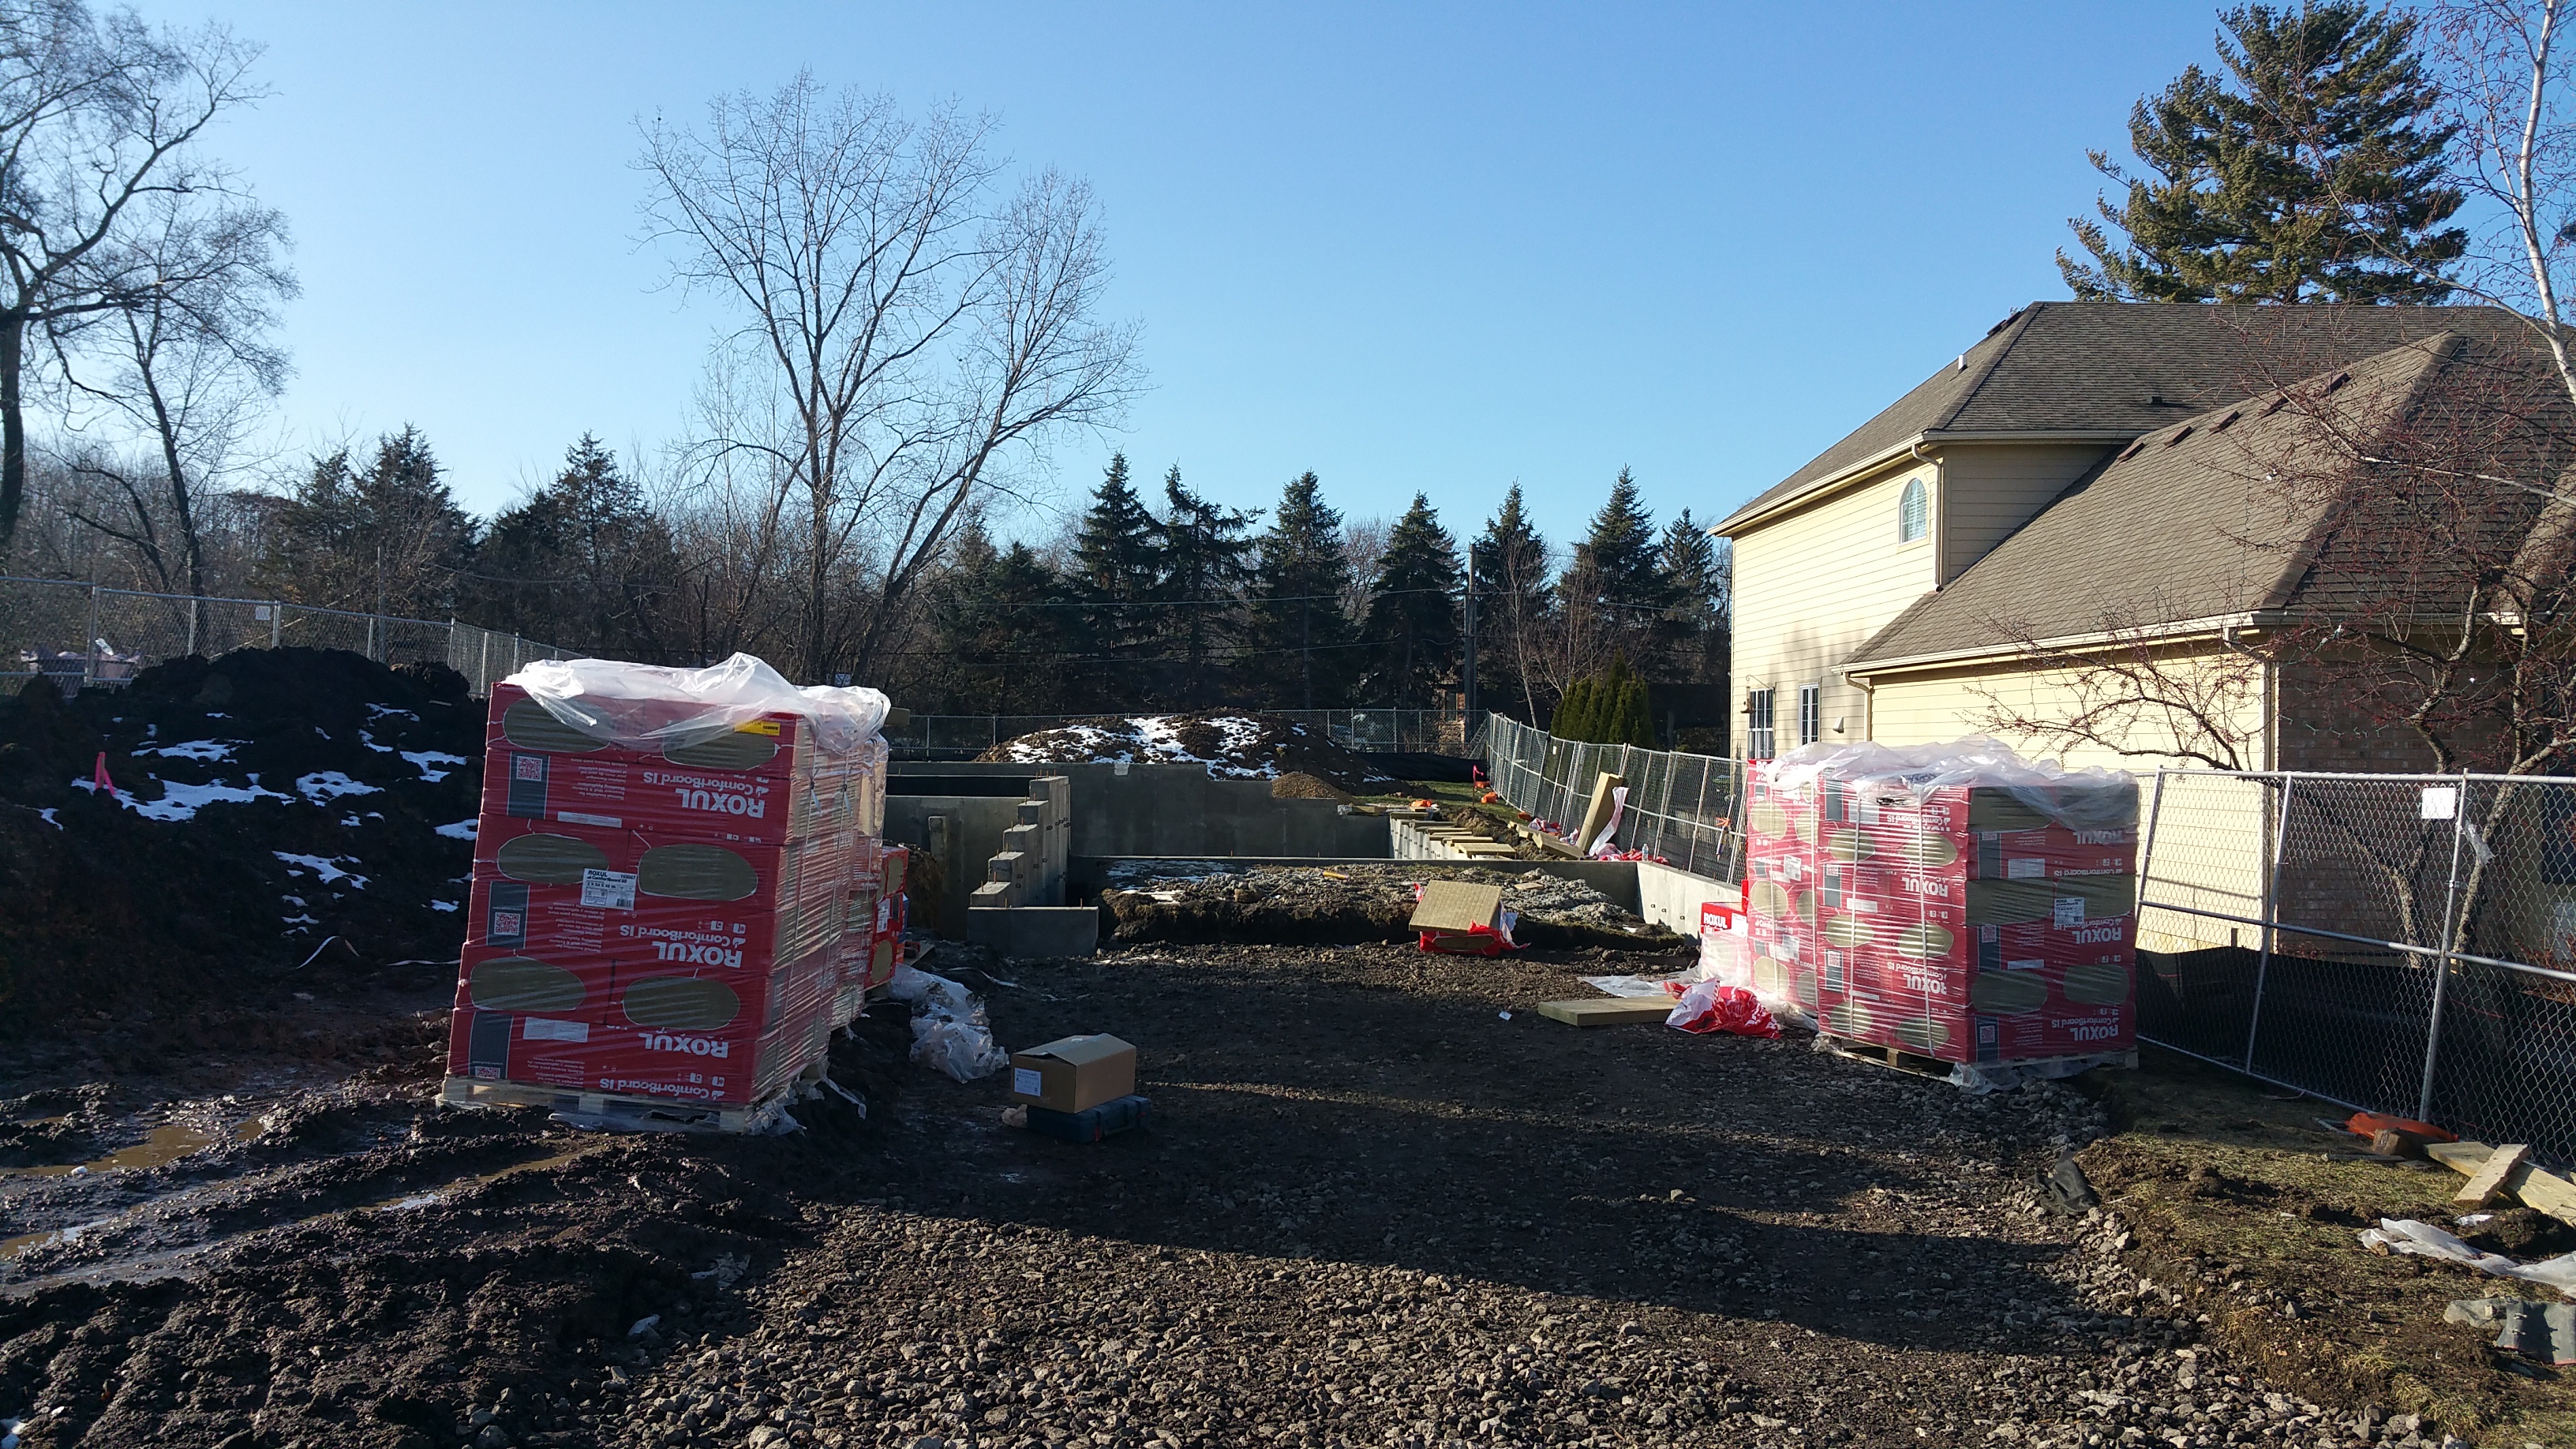
Roxul delivery shows up on site (Comfortboard 80: 2″ and 3″ thick). Roxul is showing up in the Big Box stores here in the Chicago area, so it’s becoming easier to order.
When questions came up about how to install Roxul, or which product to use where, their technical help via email was great — in our case, Fiona Schofield, who gave us a lot of useful information — including the document below, a study on the long-term condition of Roxul (aka stone, rock, or mineral wool) in a below grade application (i.e. up against an exterior foundation wall):
In addition, after finding the video below online, in which what looks to be a European version of Roxul is attached to a cinder block wall with an adhesive, or a thinset mortar,
I contacted Fiona and heard back that it was ok to use an adhesive for our first layer (PL Premium, or similar polyurethane adhesive caulk), so long as we used a mechanical fastener for the second layer. In effect, the first layer just needs to stay on long enough for us to get the second layer up and attached with a mechanical fastener. This really saved us some time since the guys didn’t have to drill two full sets of holes.
Sammy hitting the back of the Roxul with Liquid Nails before setting it into position. The adhesive worked really well at keeping the Roxul in place, even when the foundation was damp in certain areas.
The guys also didn’t seem to mind cutting or otherwise working with the Roxul. We used serrated knives we purchased from Home Depot, made especially for cutting rock wool…
This knife, purchased from Home Depot, works really well cutting the Roxul.
…which worked fine, but then after some experimenting, the guys also began using a small, handheld sawzall (reciprocating saw), and even a table saw, to get the exact-sized pieces we needed to ensure staggered seams. I had my doubts about the table saw, but Phil said the Roxul cut easily, and it really didn’t seem to kick up a lot of dust (although he did wear a dust mask for protection).
Billy and Nils (in the hole in the background) gluing up the first layer of Roxul.
Once the first layer of Roxul (2″ thick) was in place, we could then install our second layer of Roxul (3″ thick) over the top of it.
After a lot of research, and even posting a question on Green Building Advisor…
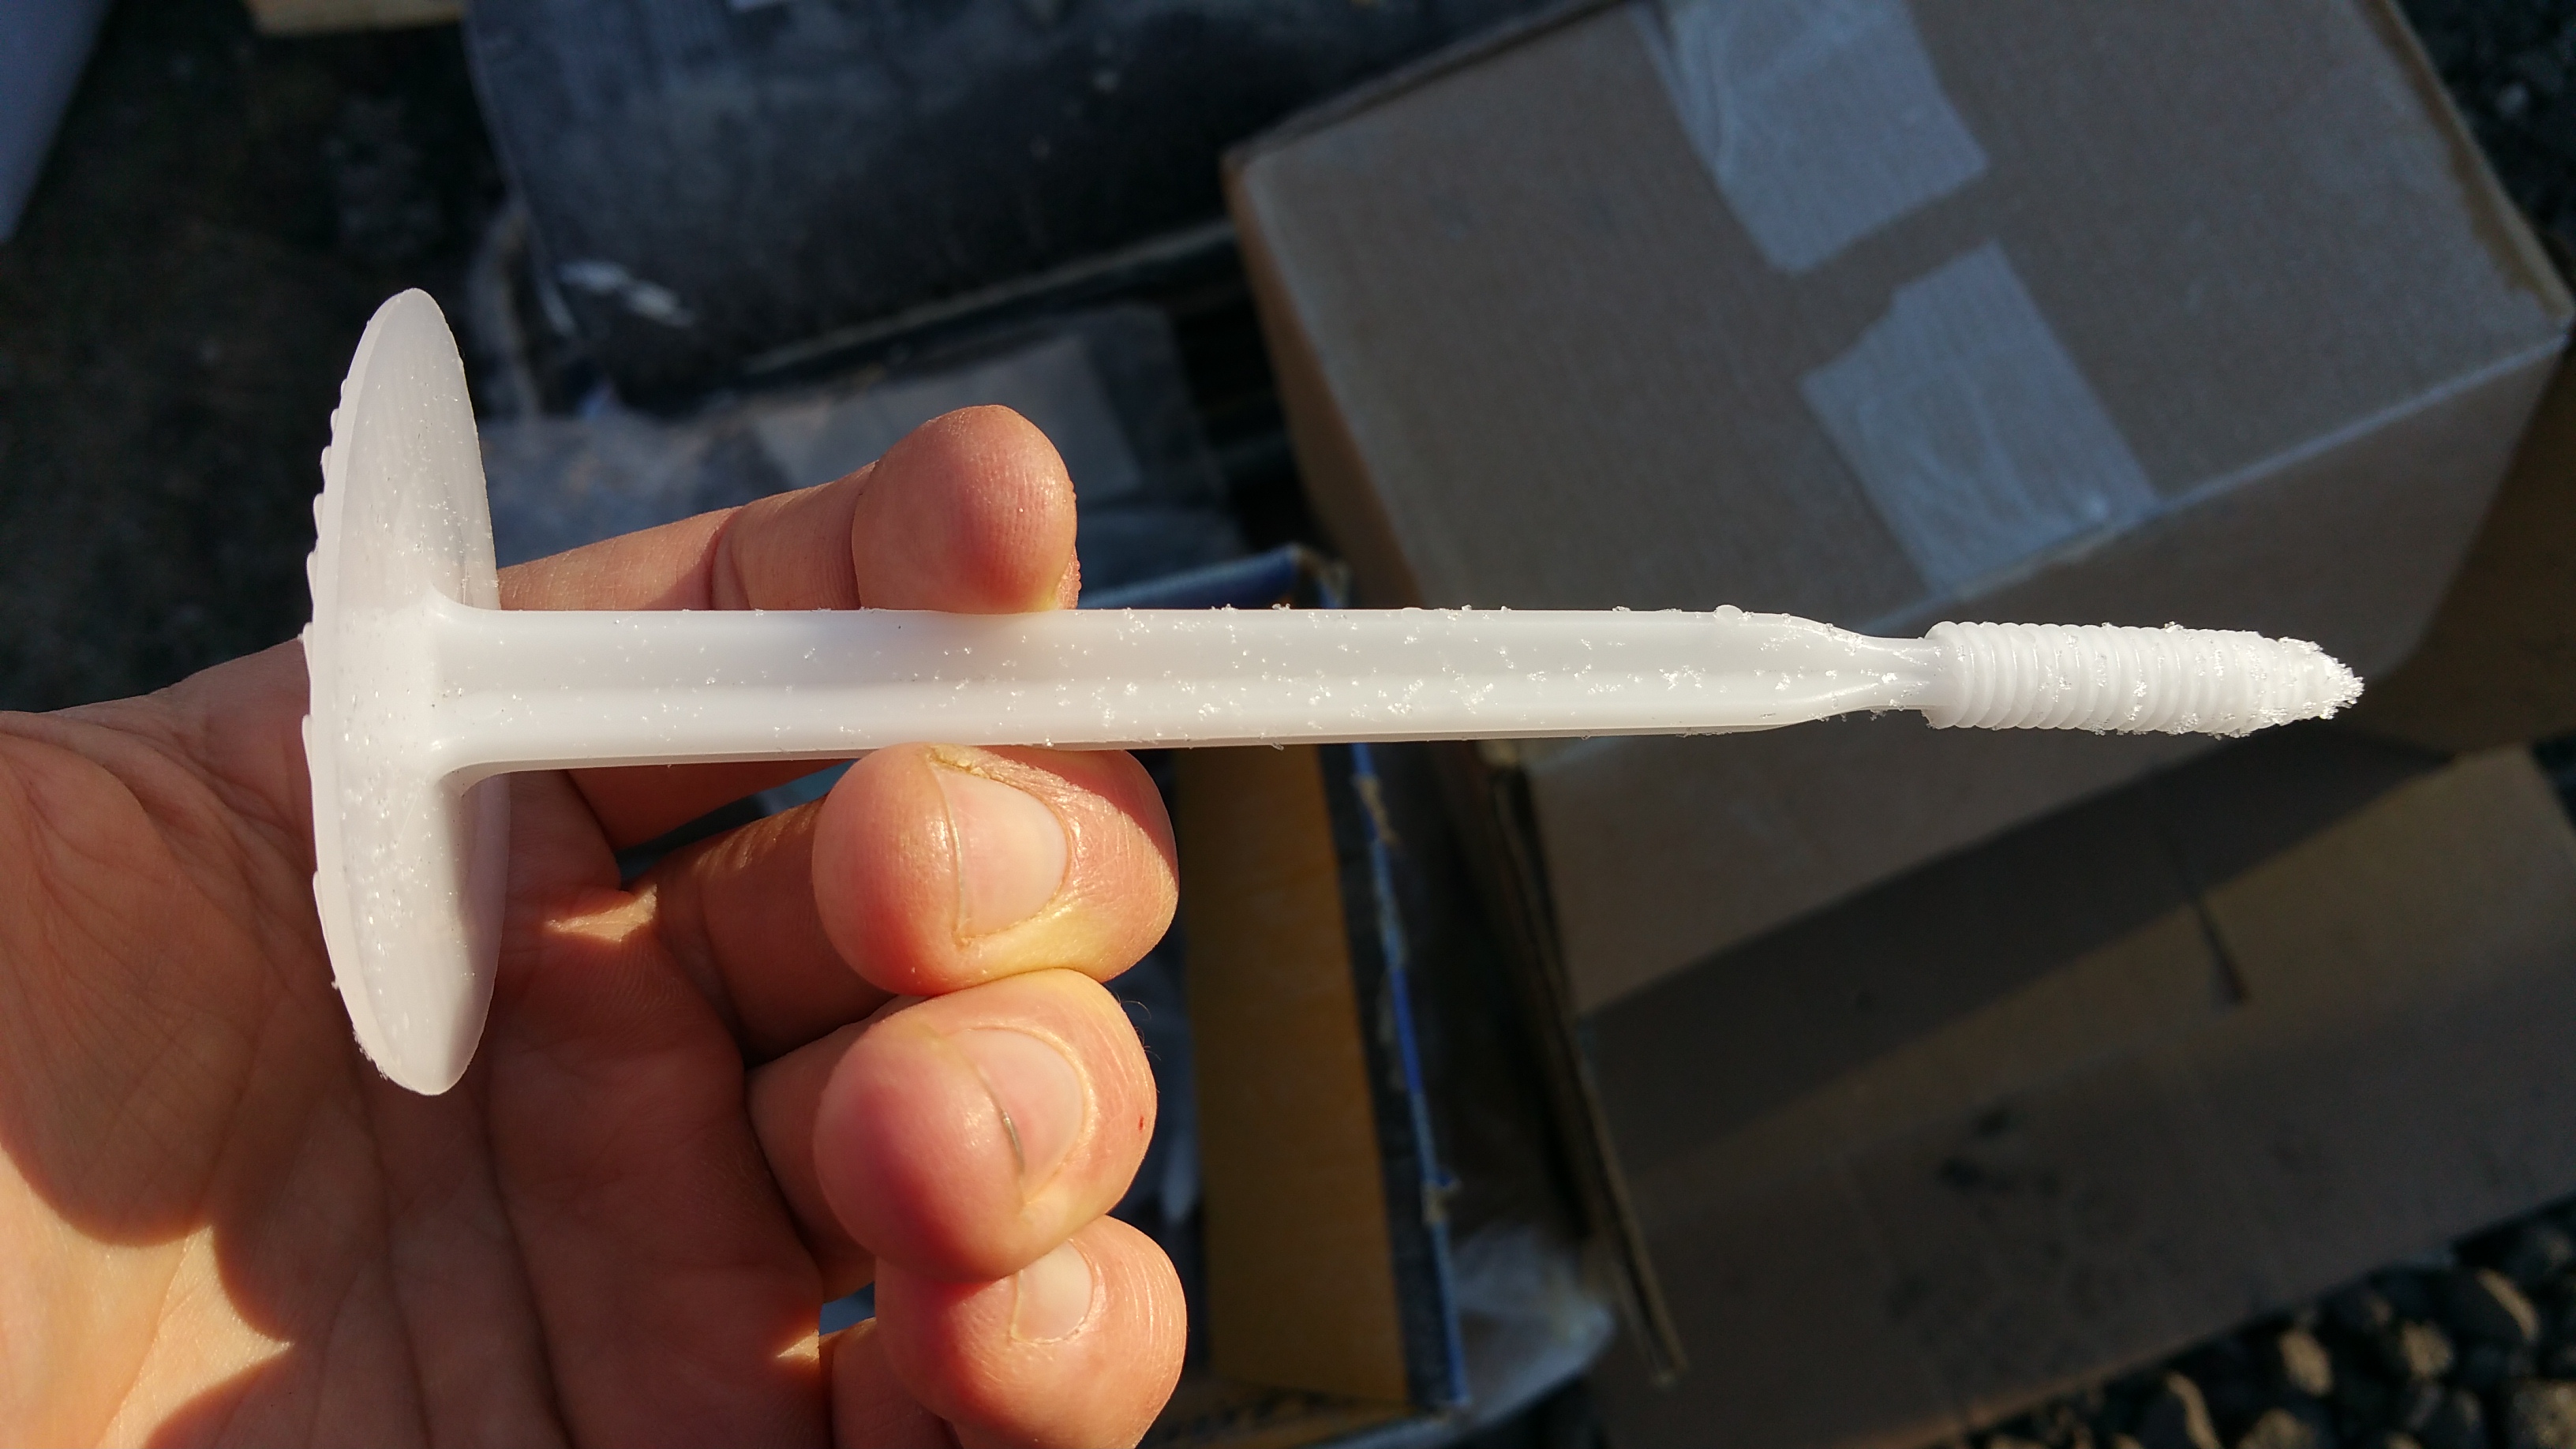
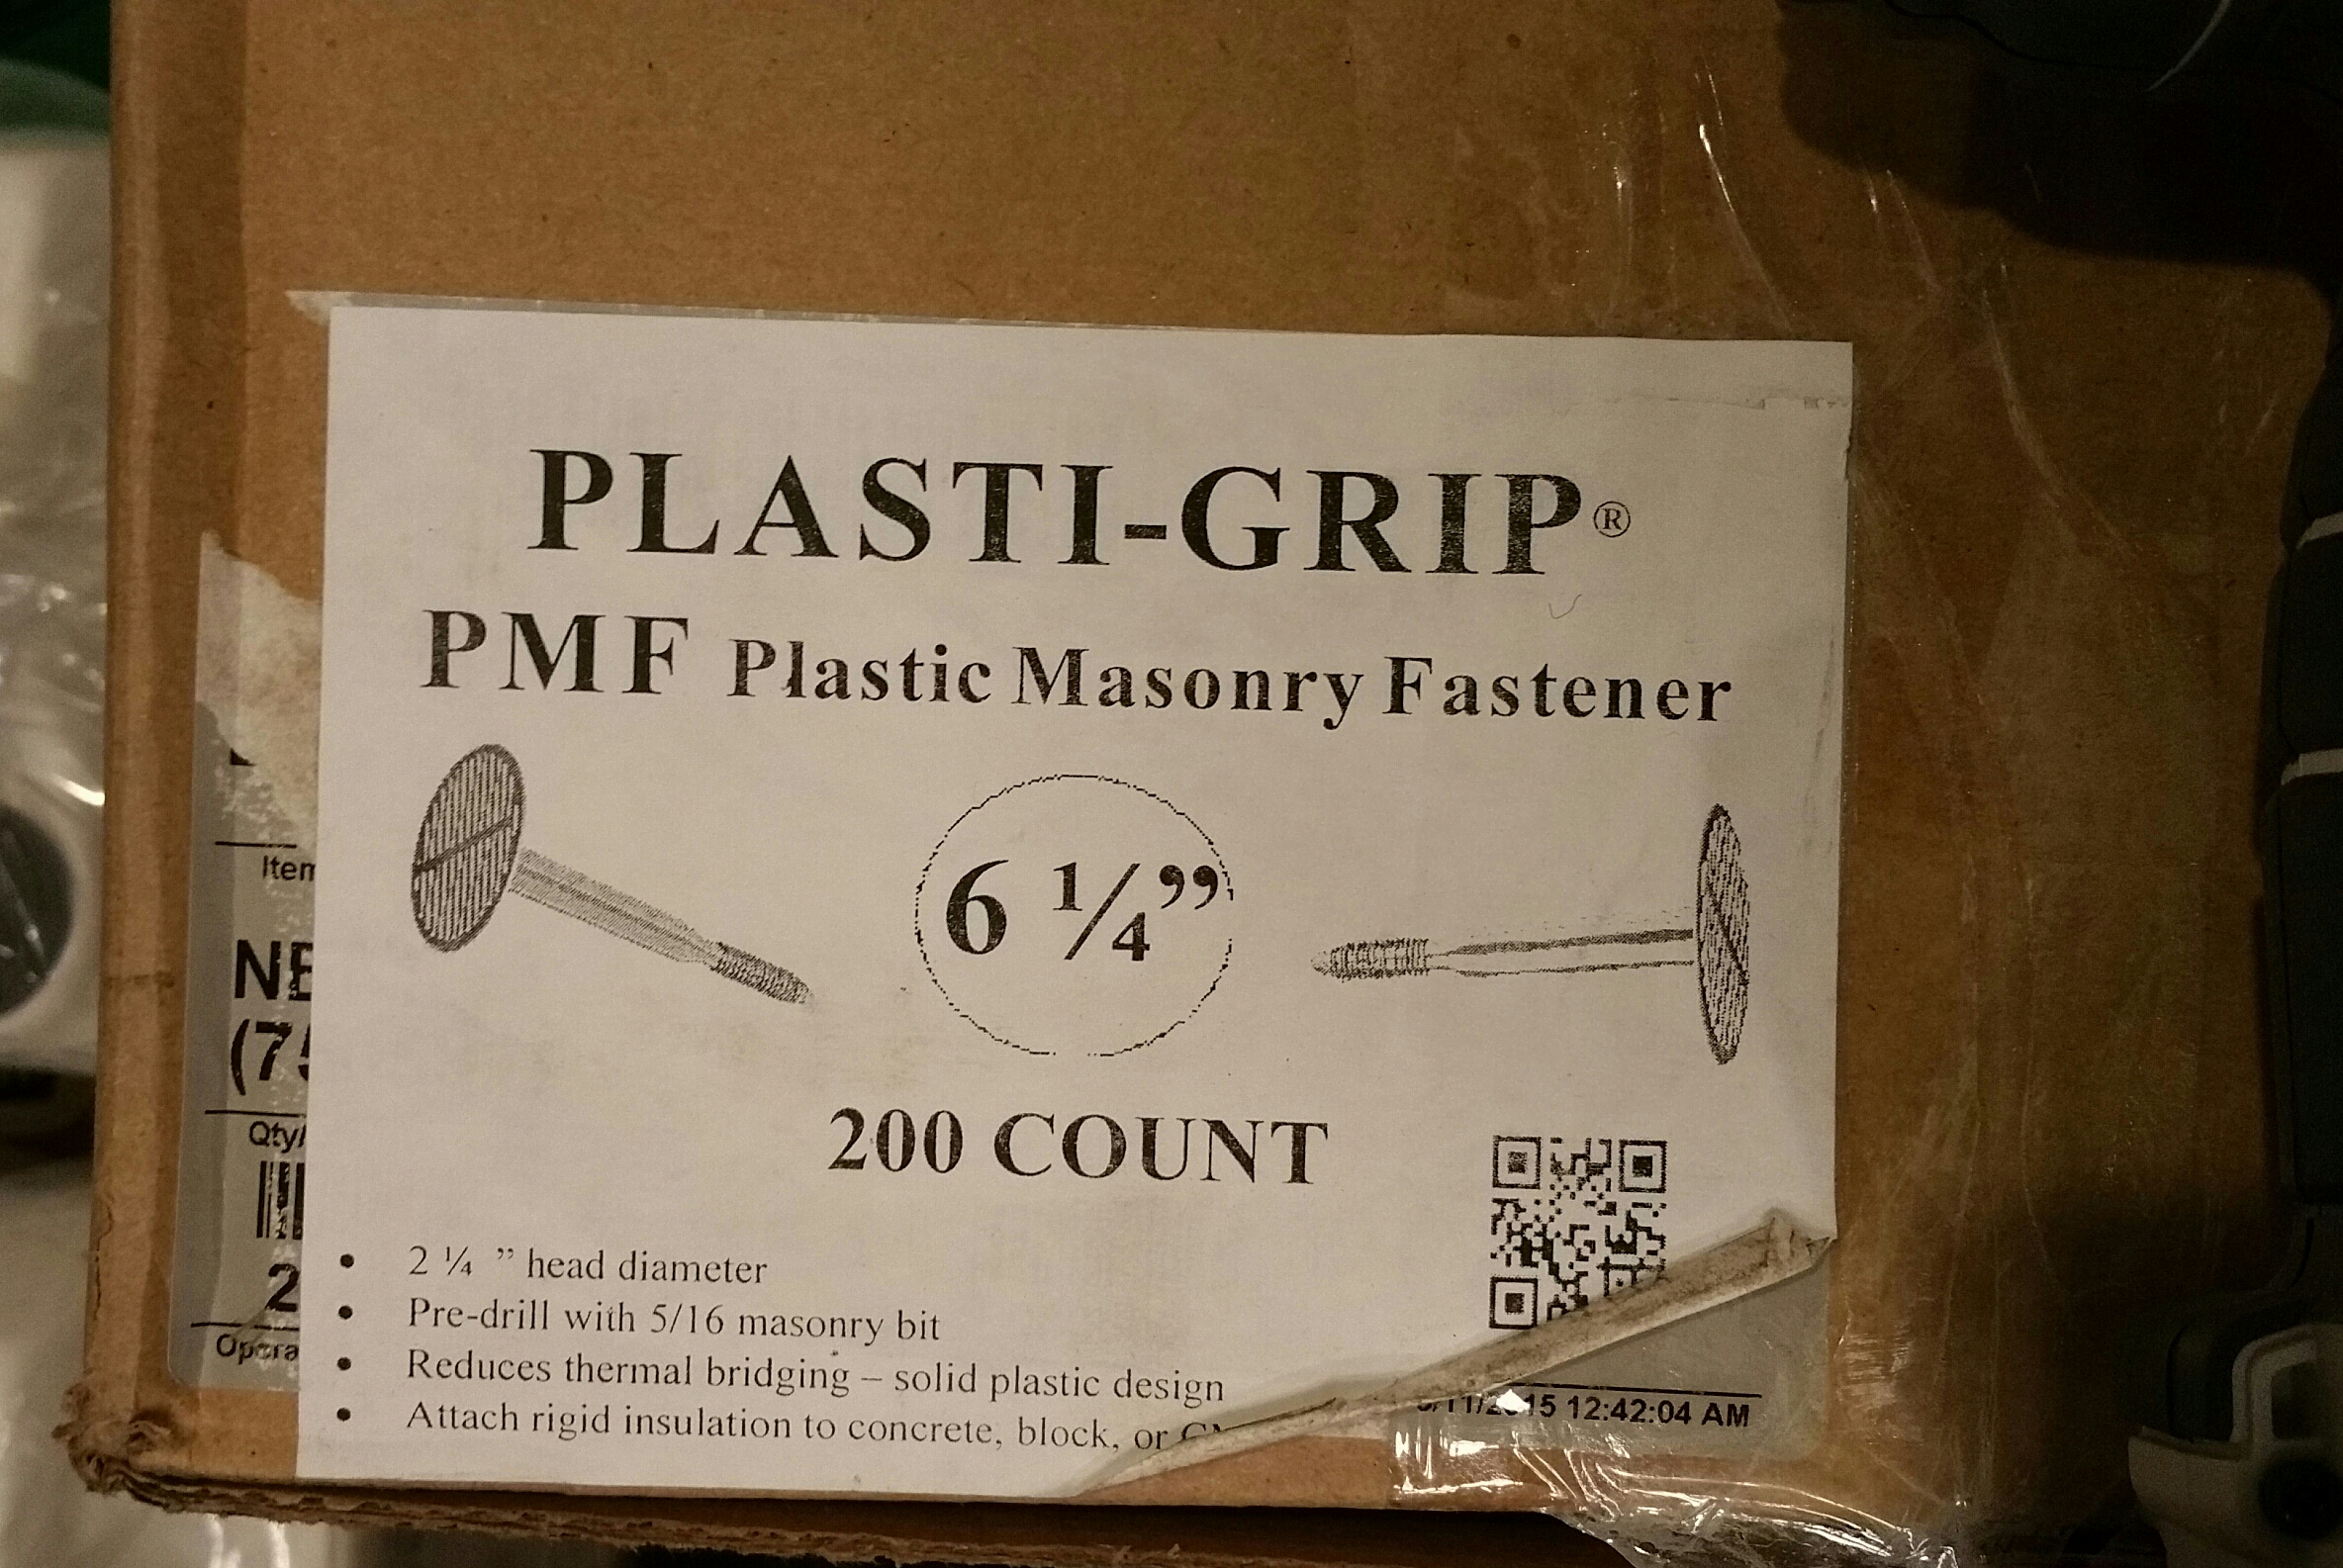
…we decided to go with the Rodenhouse fastener (Plasti-Grip PMF):
These really are as easy to install as depicted in the video. Using a hammer drill with a 5/16″ bit, the guys drilled a hole to the depth of the fastener, before tapping the PMF fastener home with a hammer. It’s a genuinely straightforward process. Sometimes a fastener wouldn’t sit perfectly, but as long as a majority of the fasteners on each board did, it didn’t seem to be a problem. Based on what I read online, they were much easier to work with than if we had to use Tapcon or similar concrete screws.
Close-up of the Rodenhouse PMF fastener.
They weren’t cheap, but they were well worth the cost in materials for the savings in labor (and frustration). And Mitch Mahler, from Rodenhouse, was easy to work with via email in terms of ordering or getting answers to technical questions.
The box the fasteners came in.
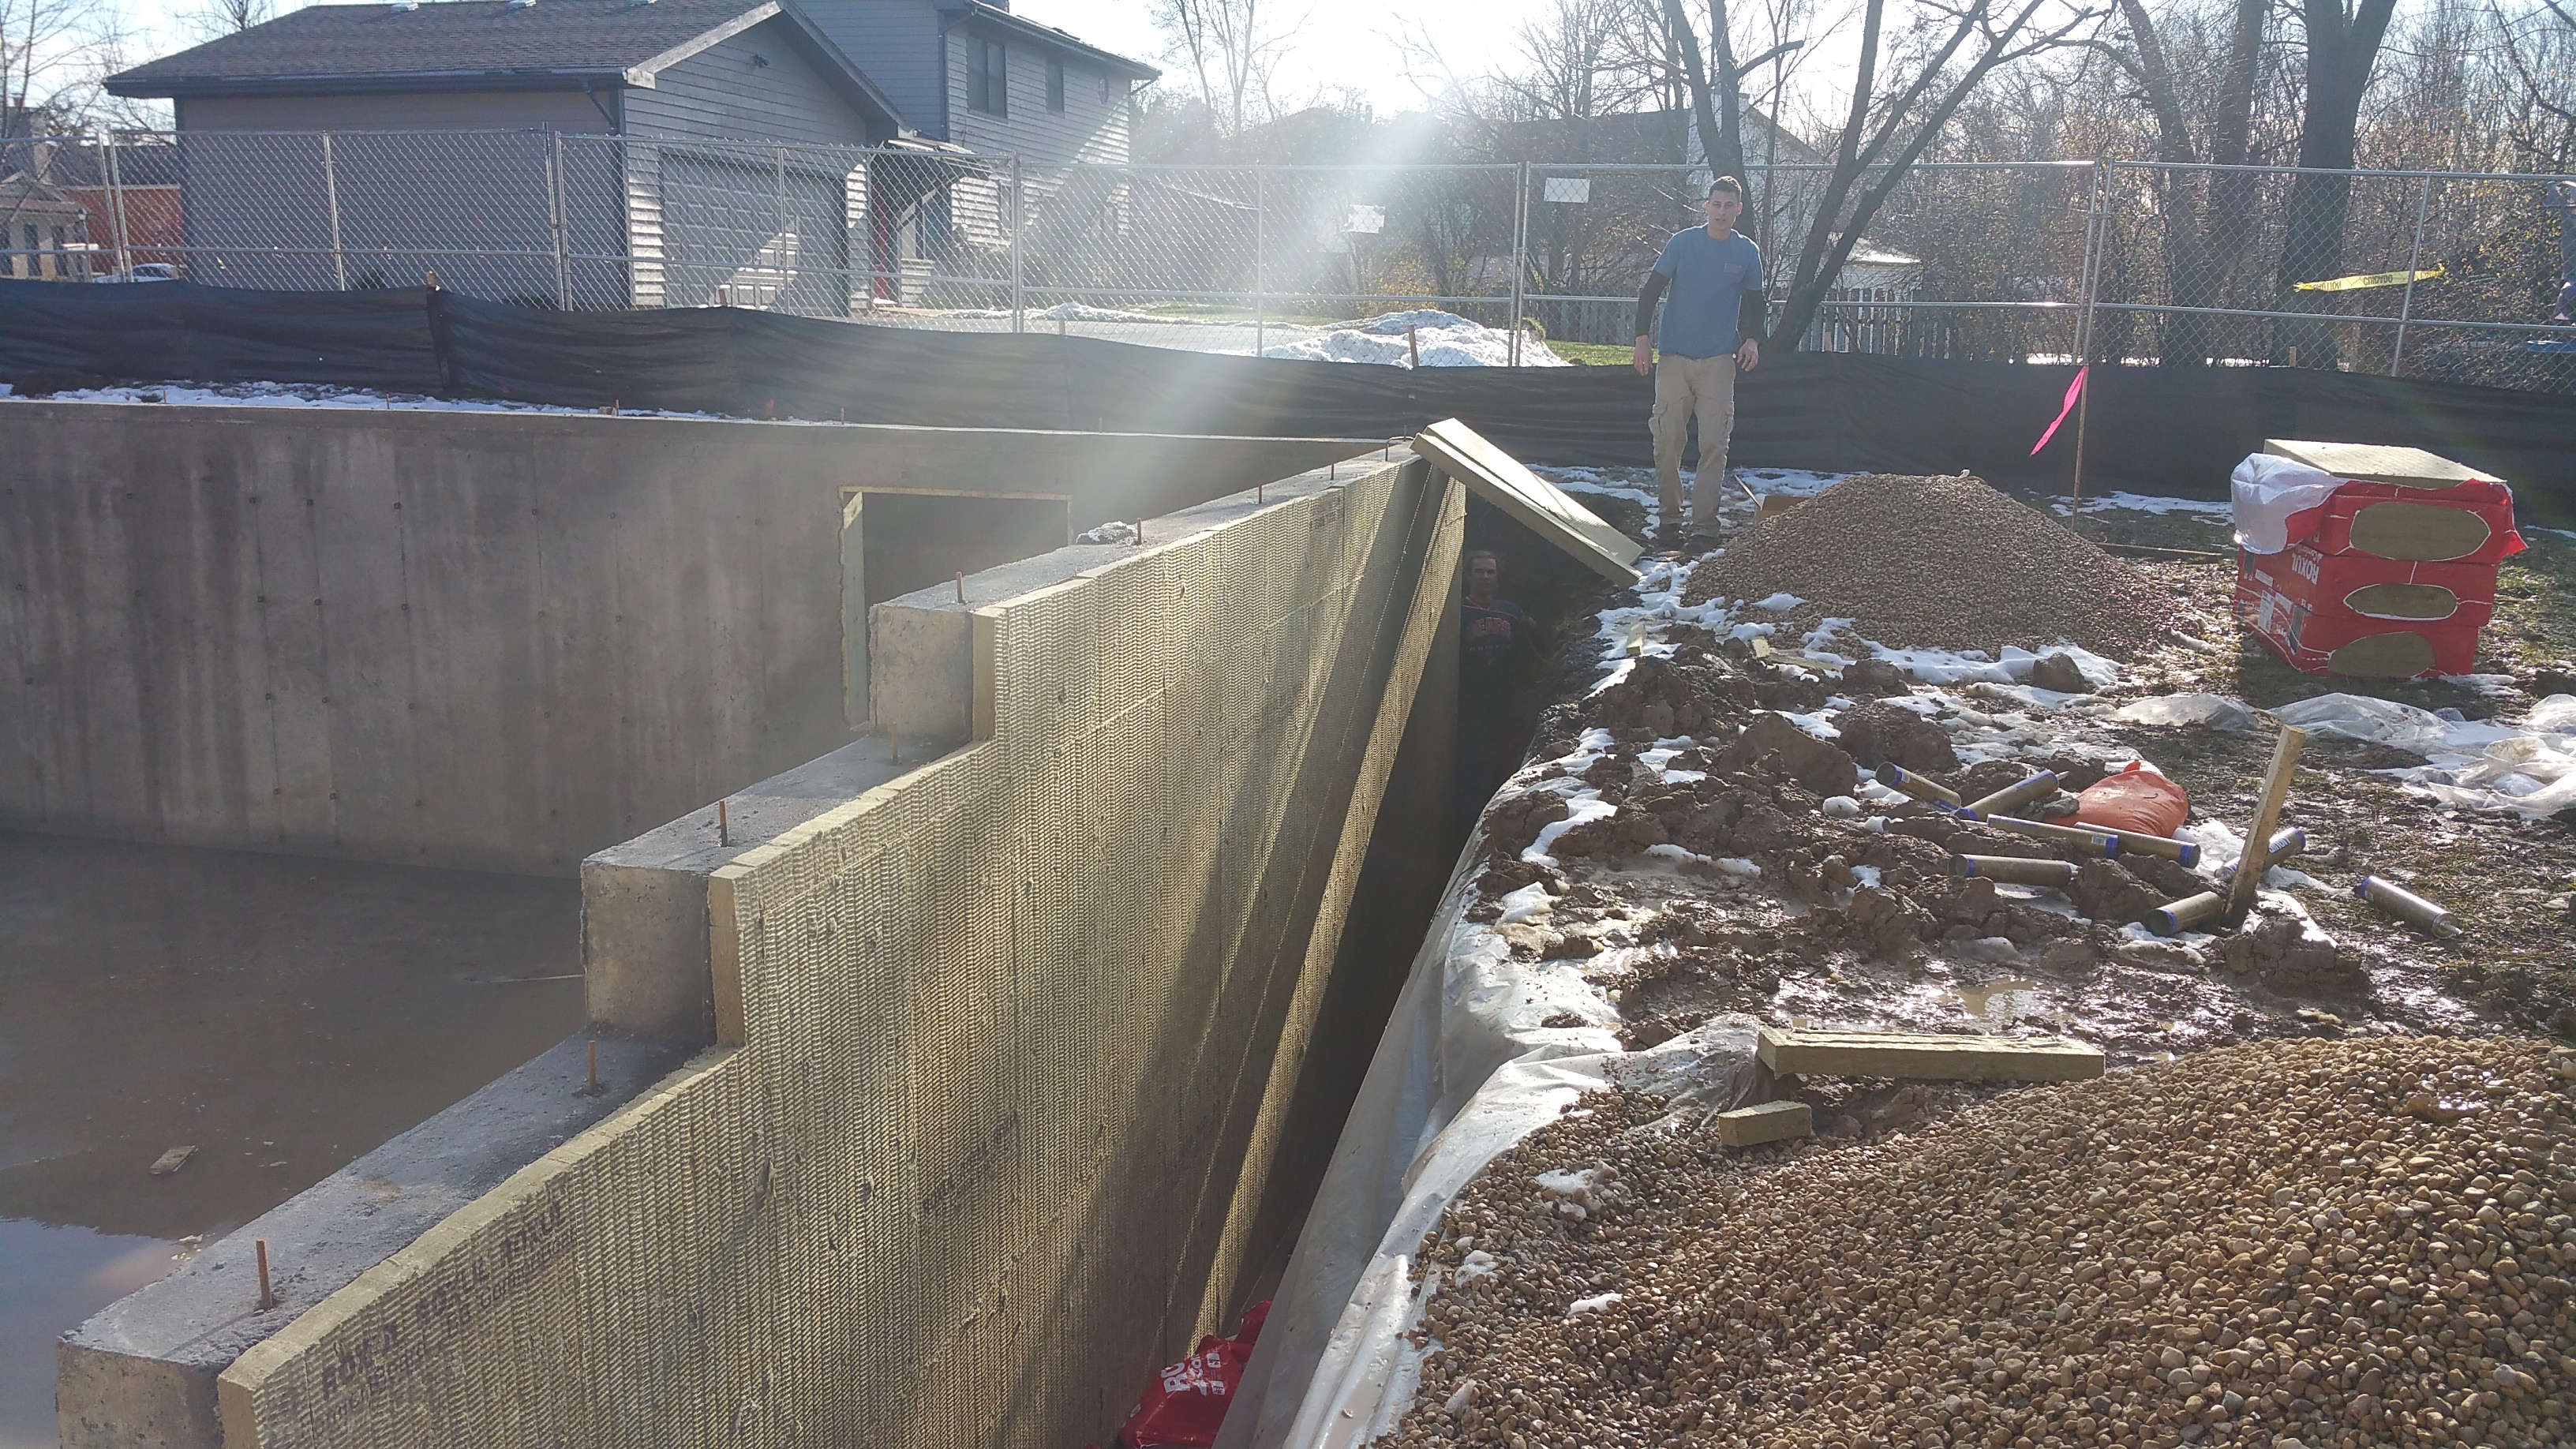
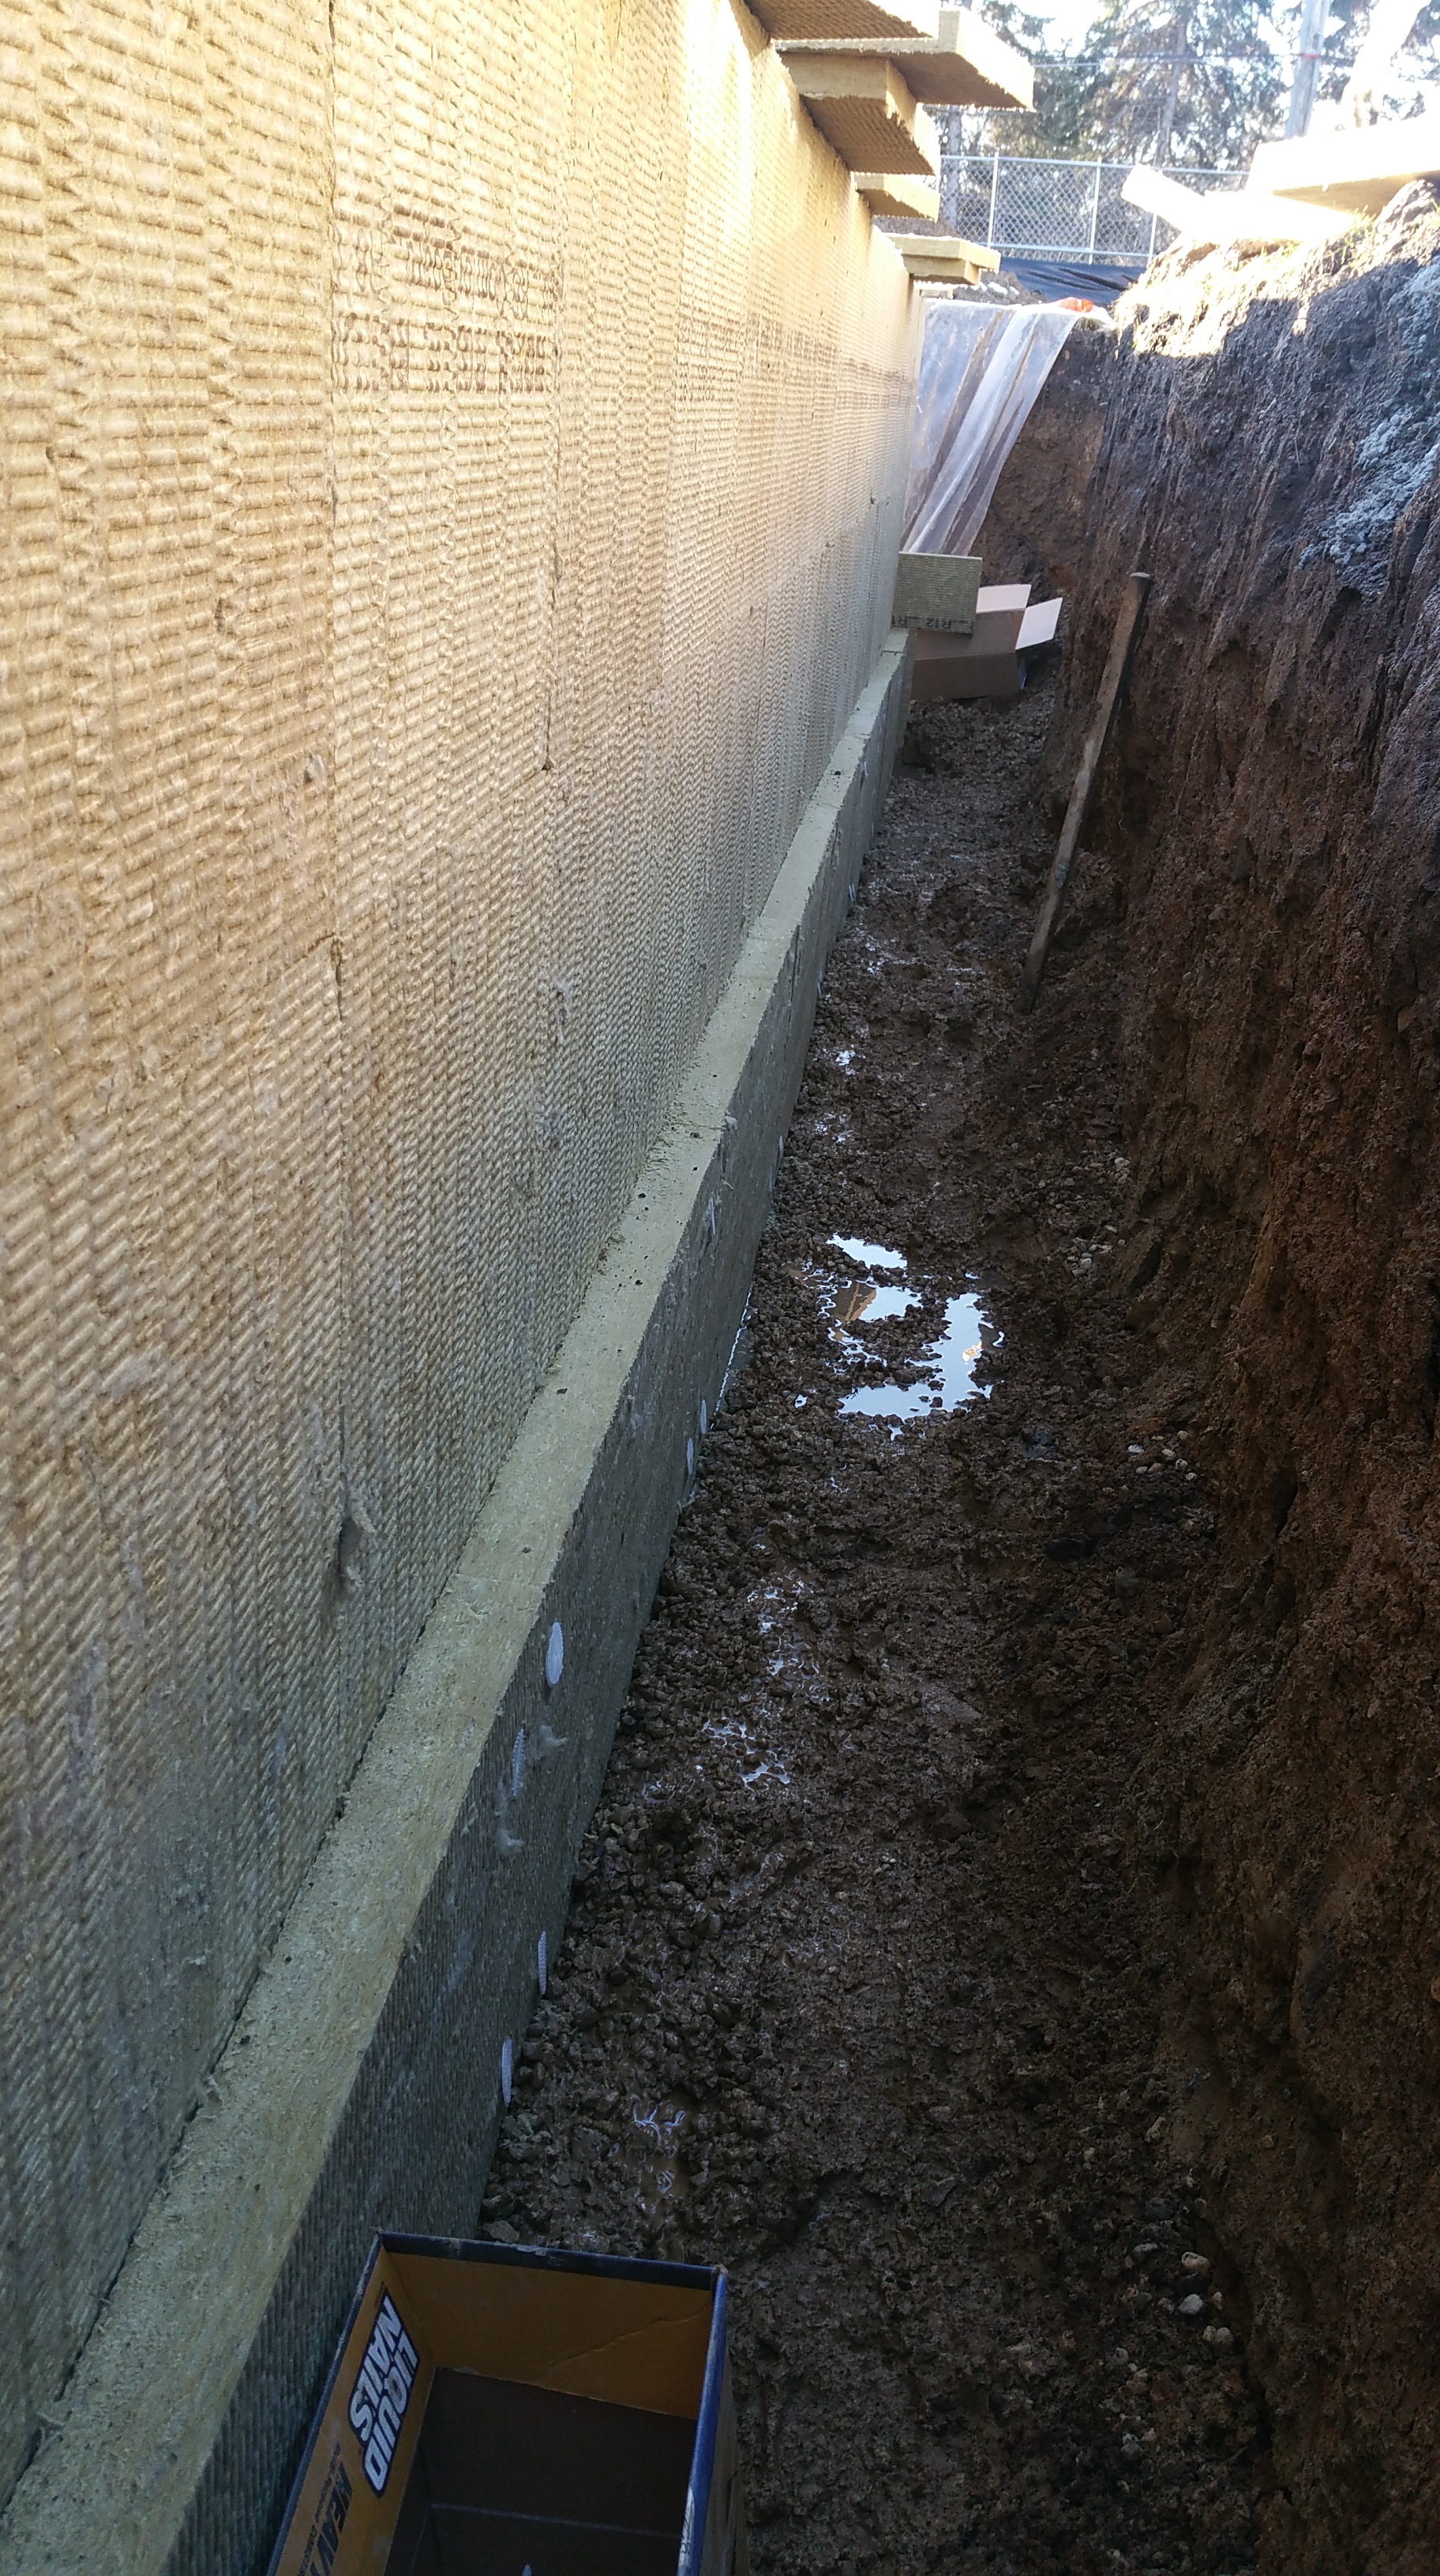
In the trenches, as the second layer of Roxul gets attached with the Rodenhouse fasteners.
Long, narrow piece of Roxul with 3 Rodenhouse fasteners.
Normally, Roxul recommends 5 fasteners per piece (4 in the corners, 1 in the middle), but we found that 4 on a normal piece, and 3 for a long, narrow piece worked fine — at least for the foundation, where the backfill will help to keep the Roxul in place over the long haul.
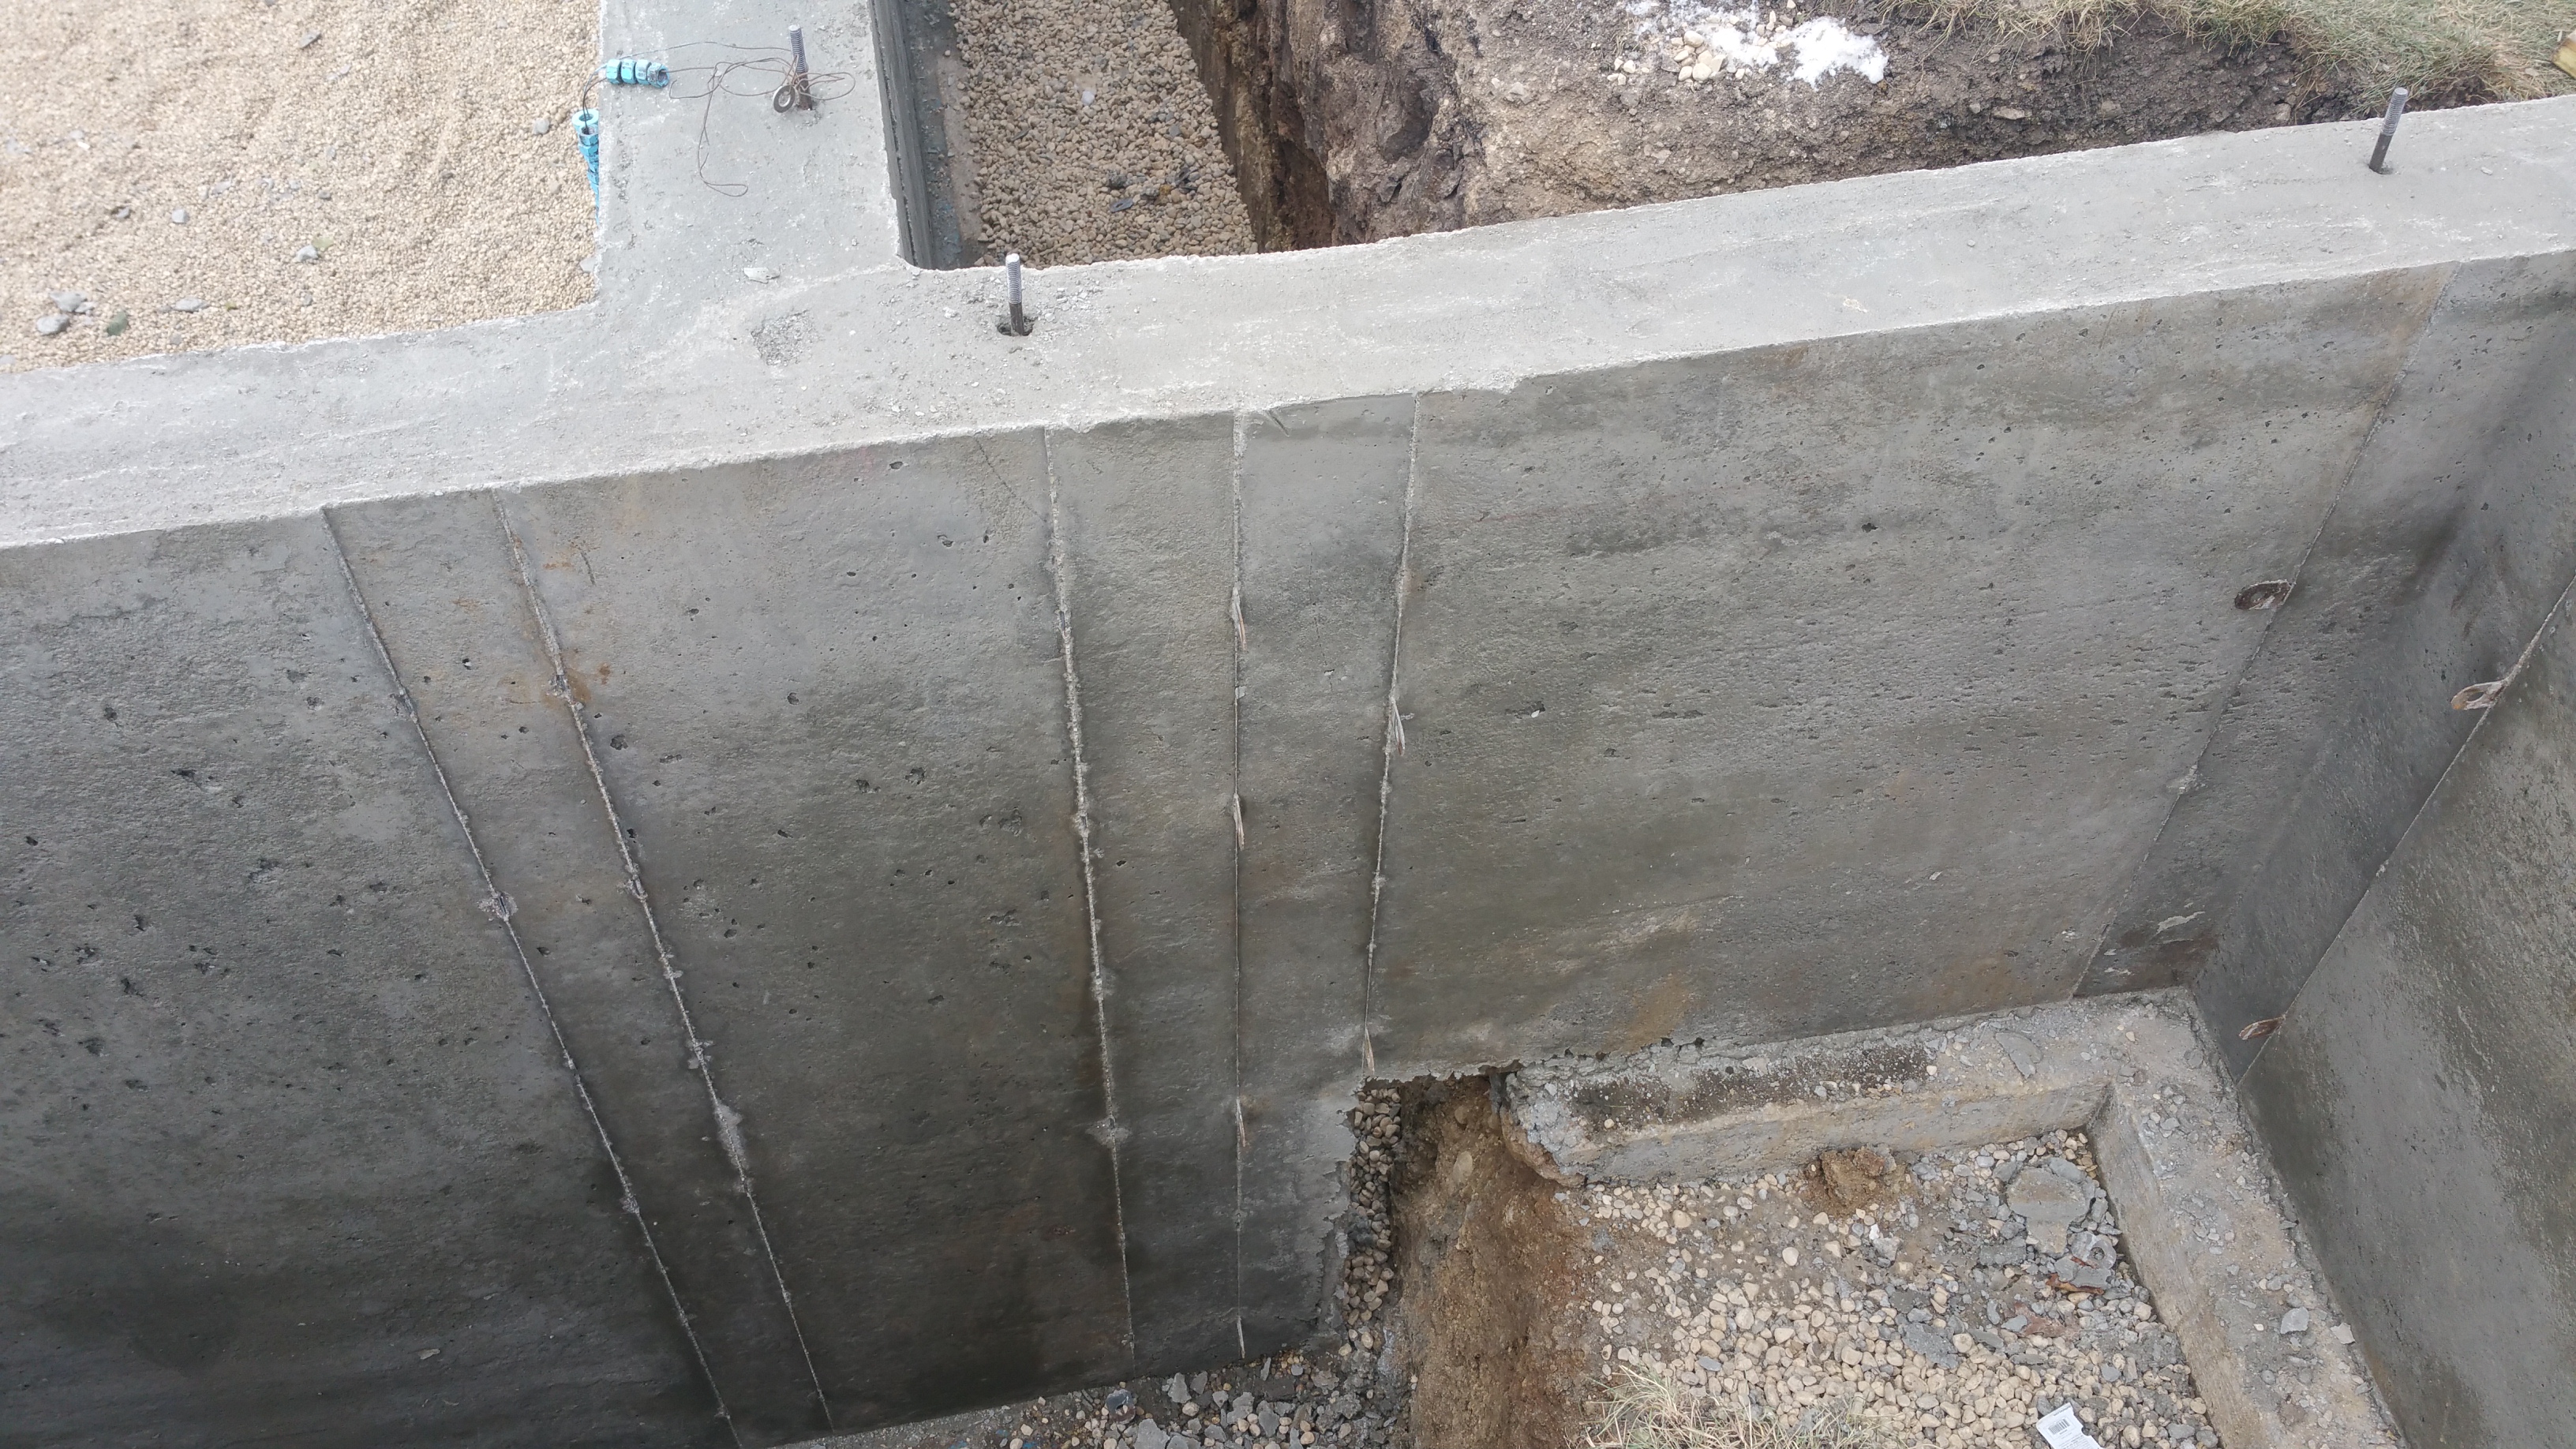
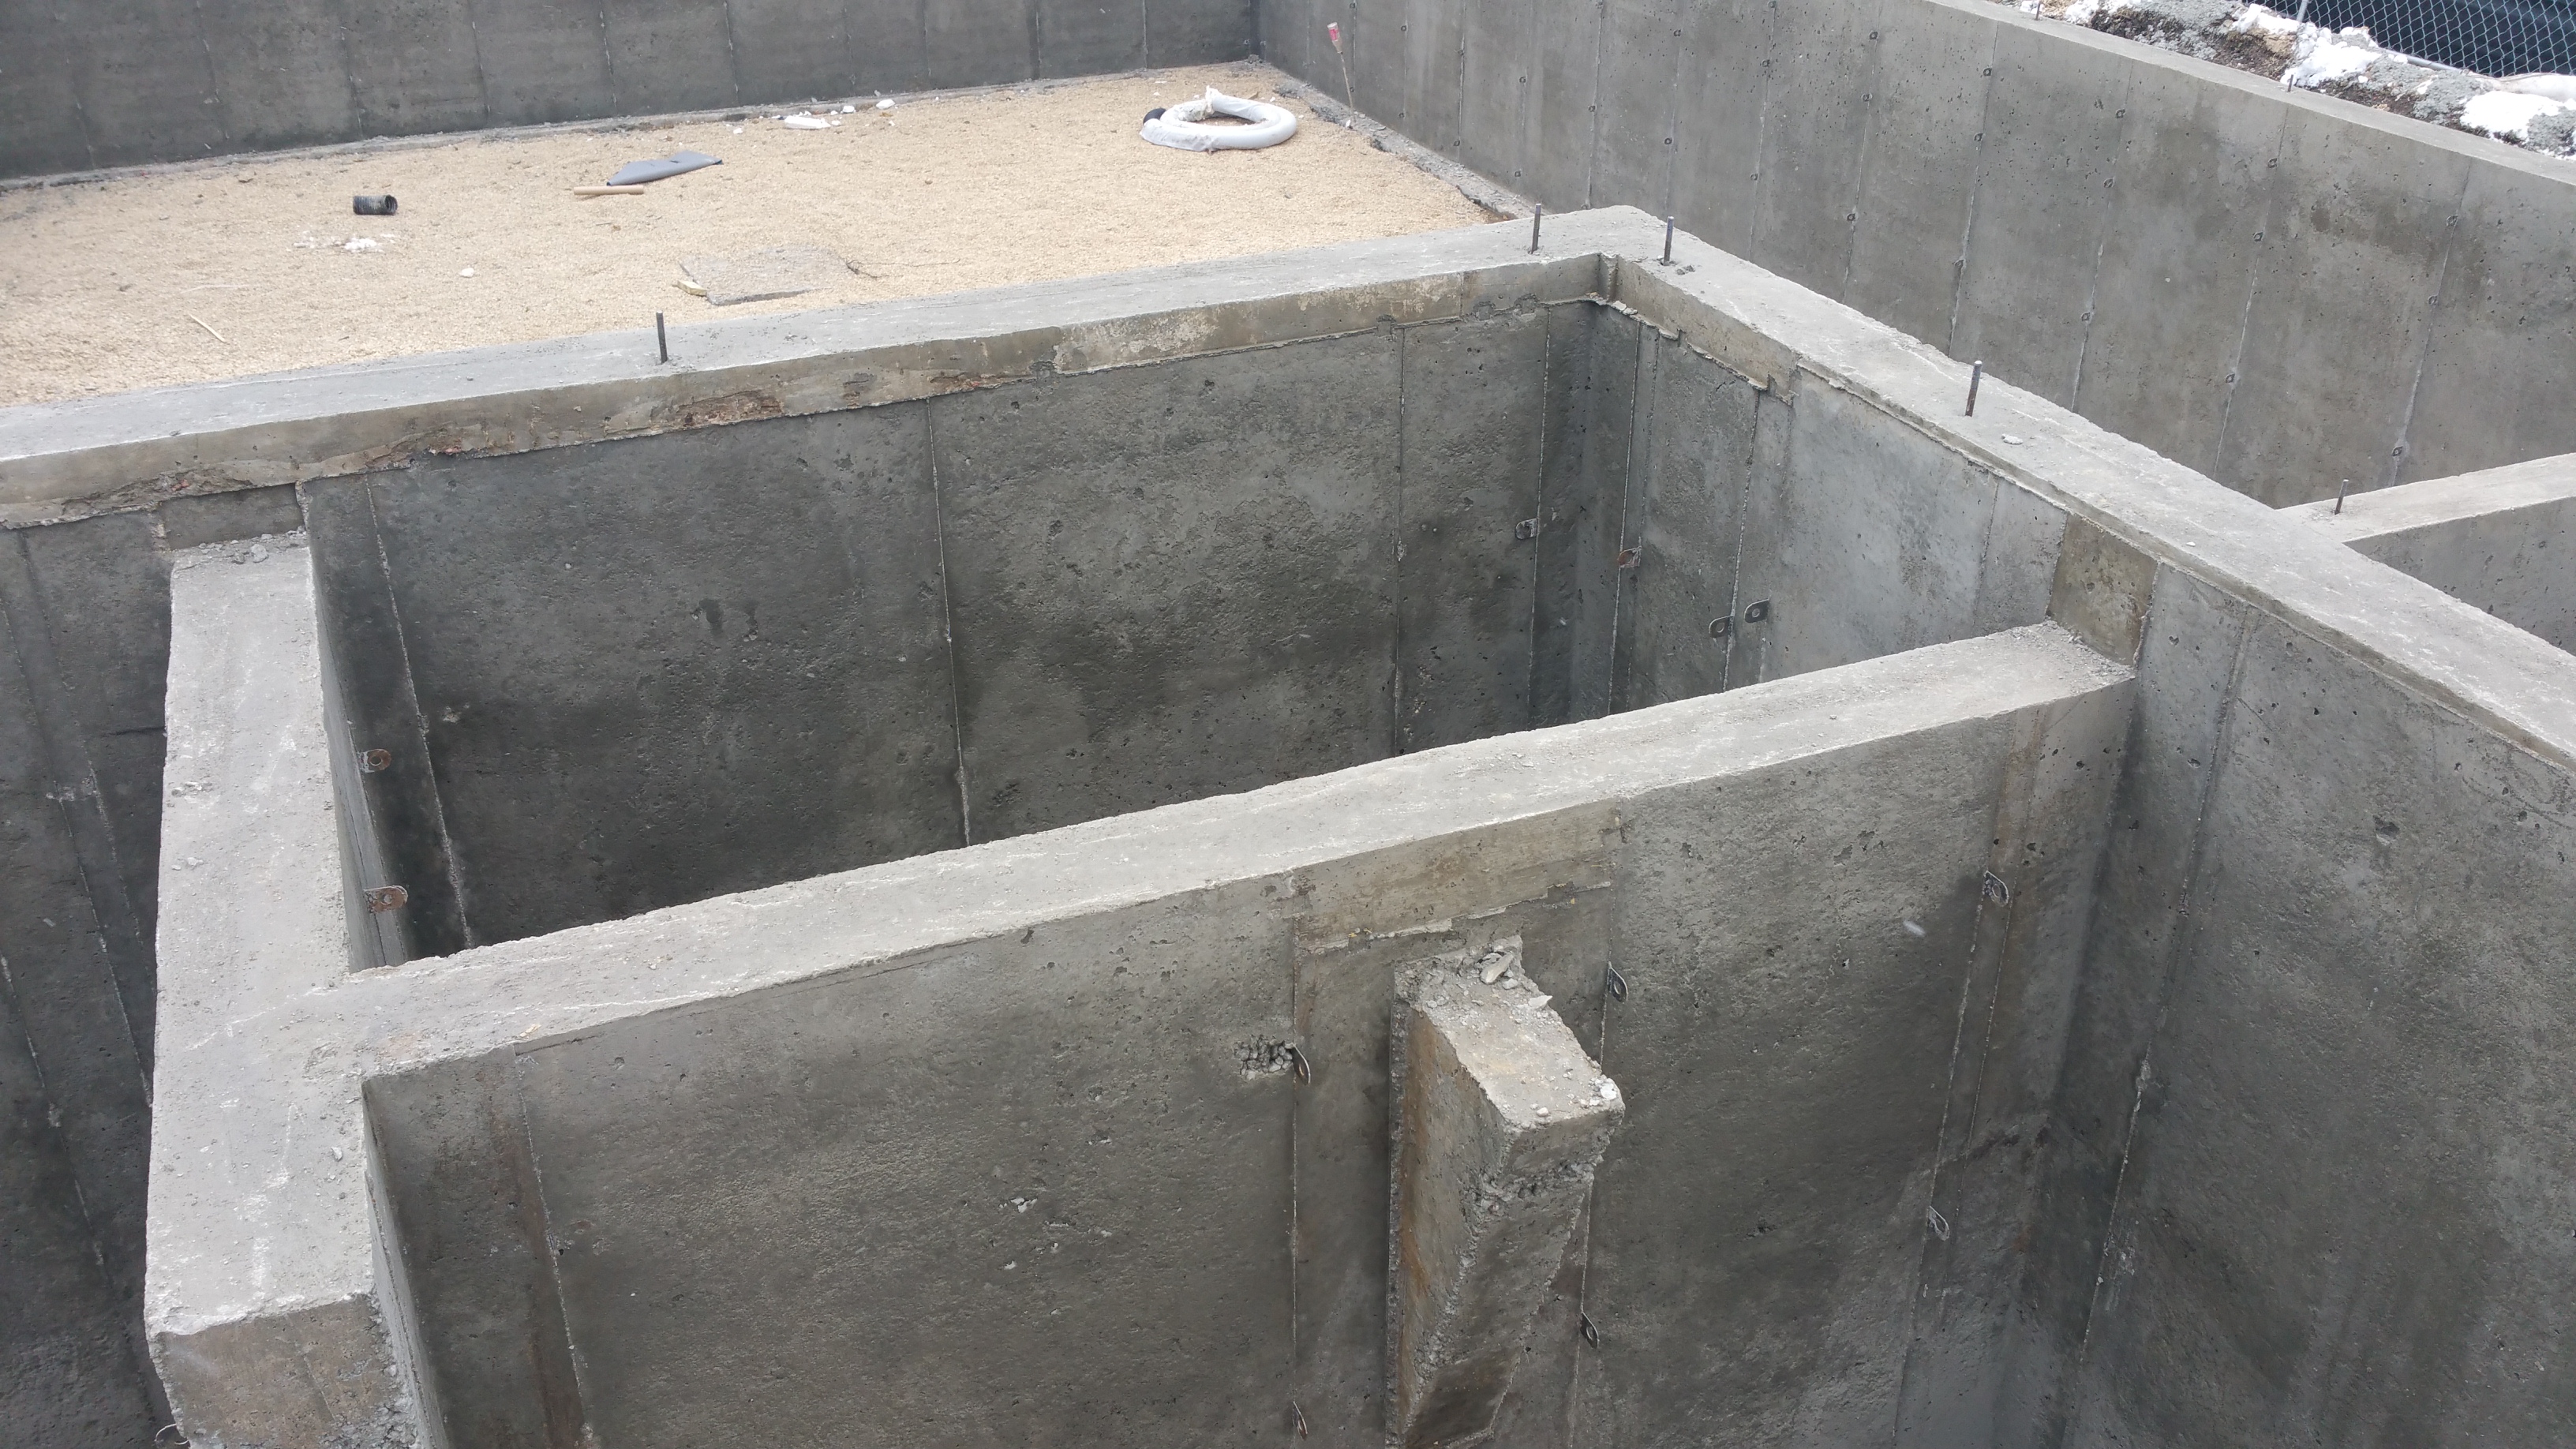
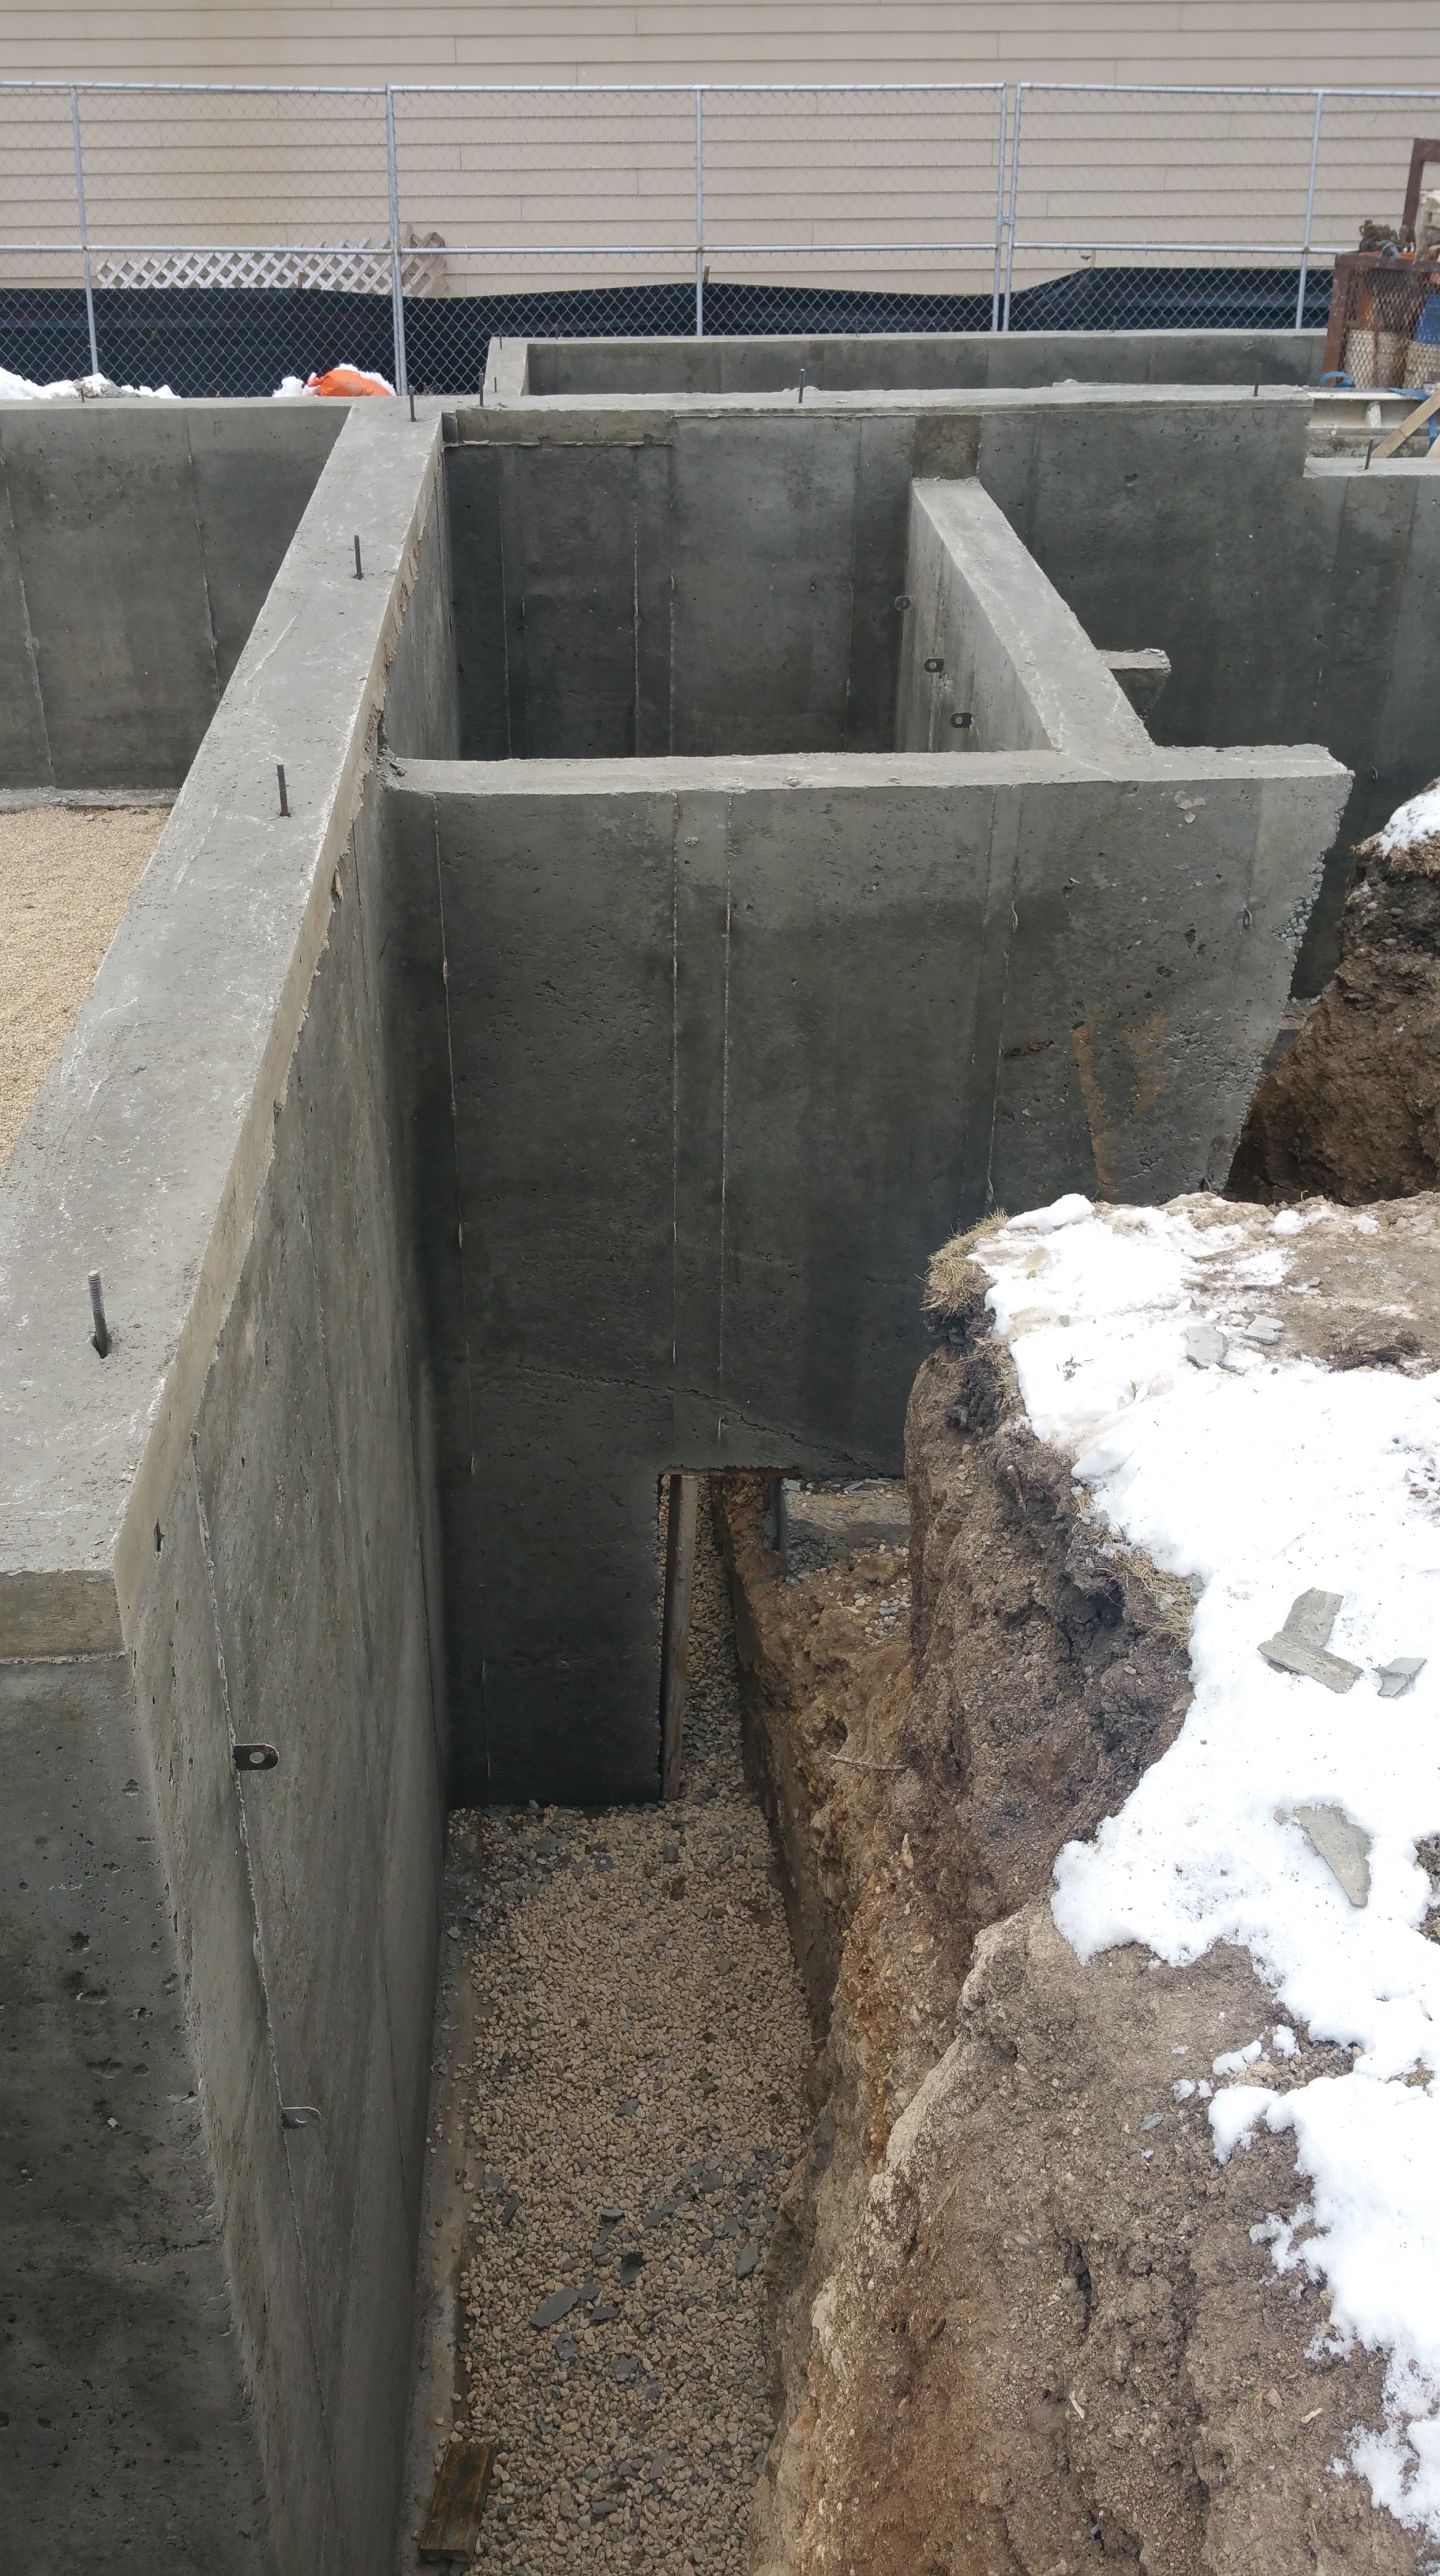
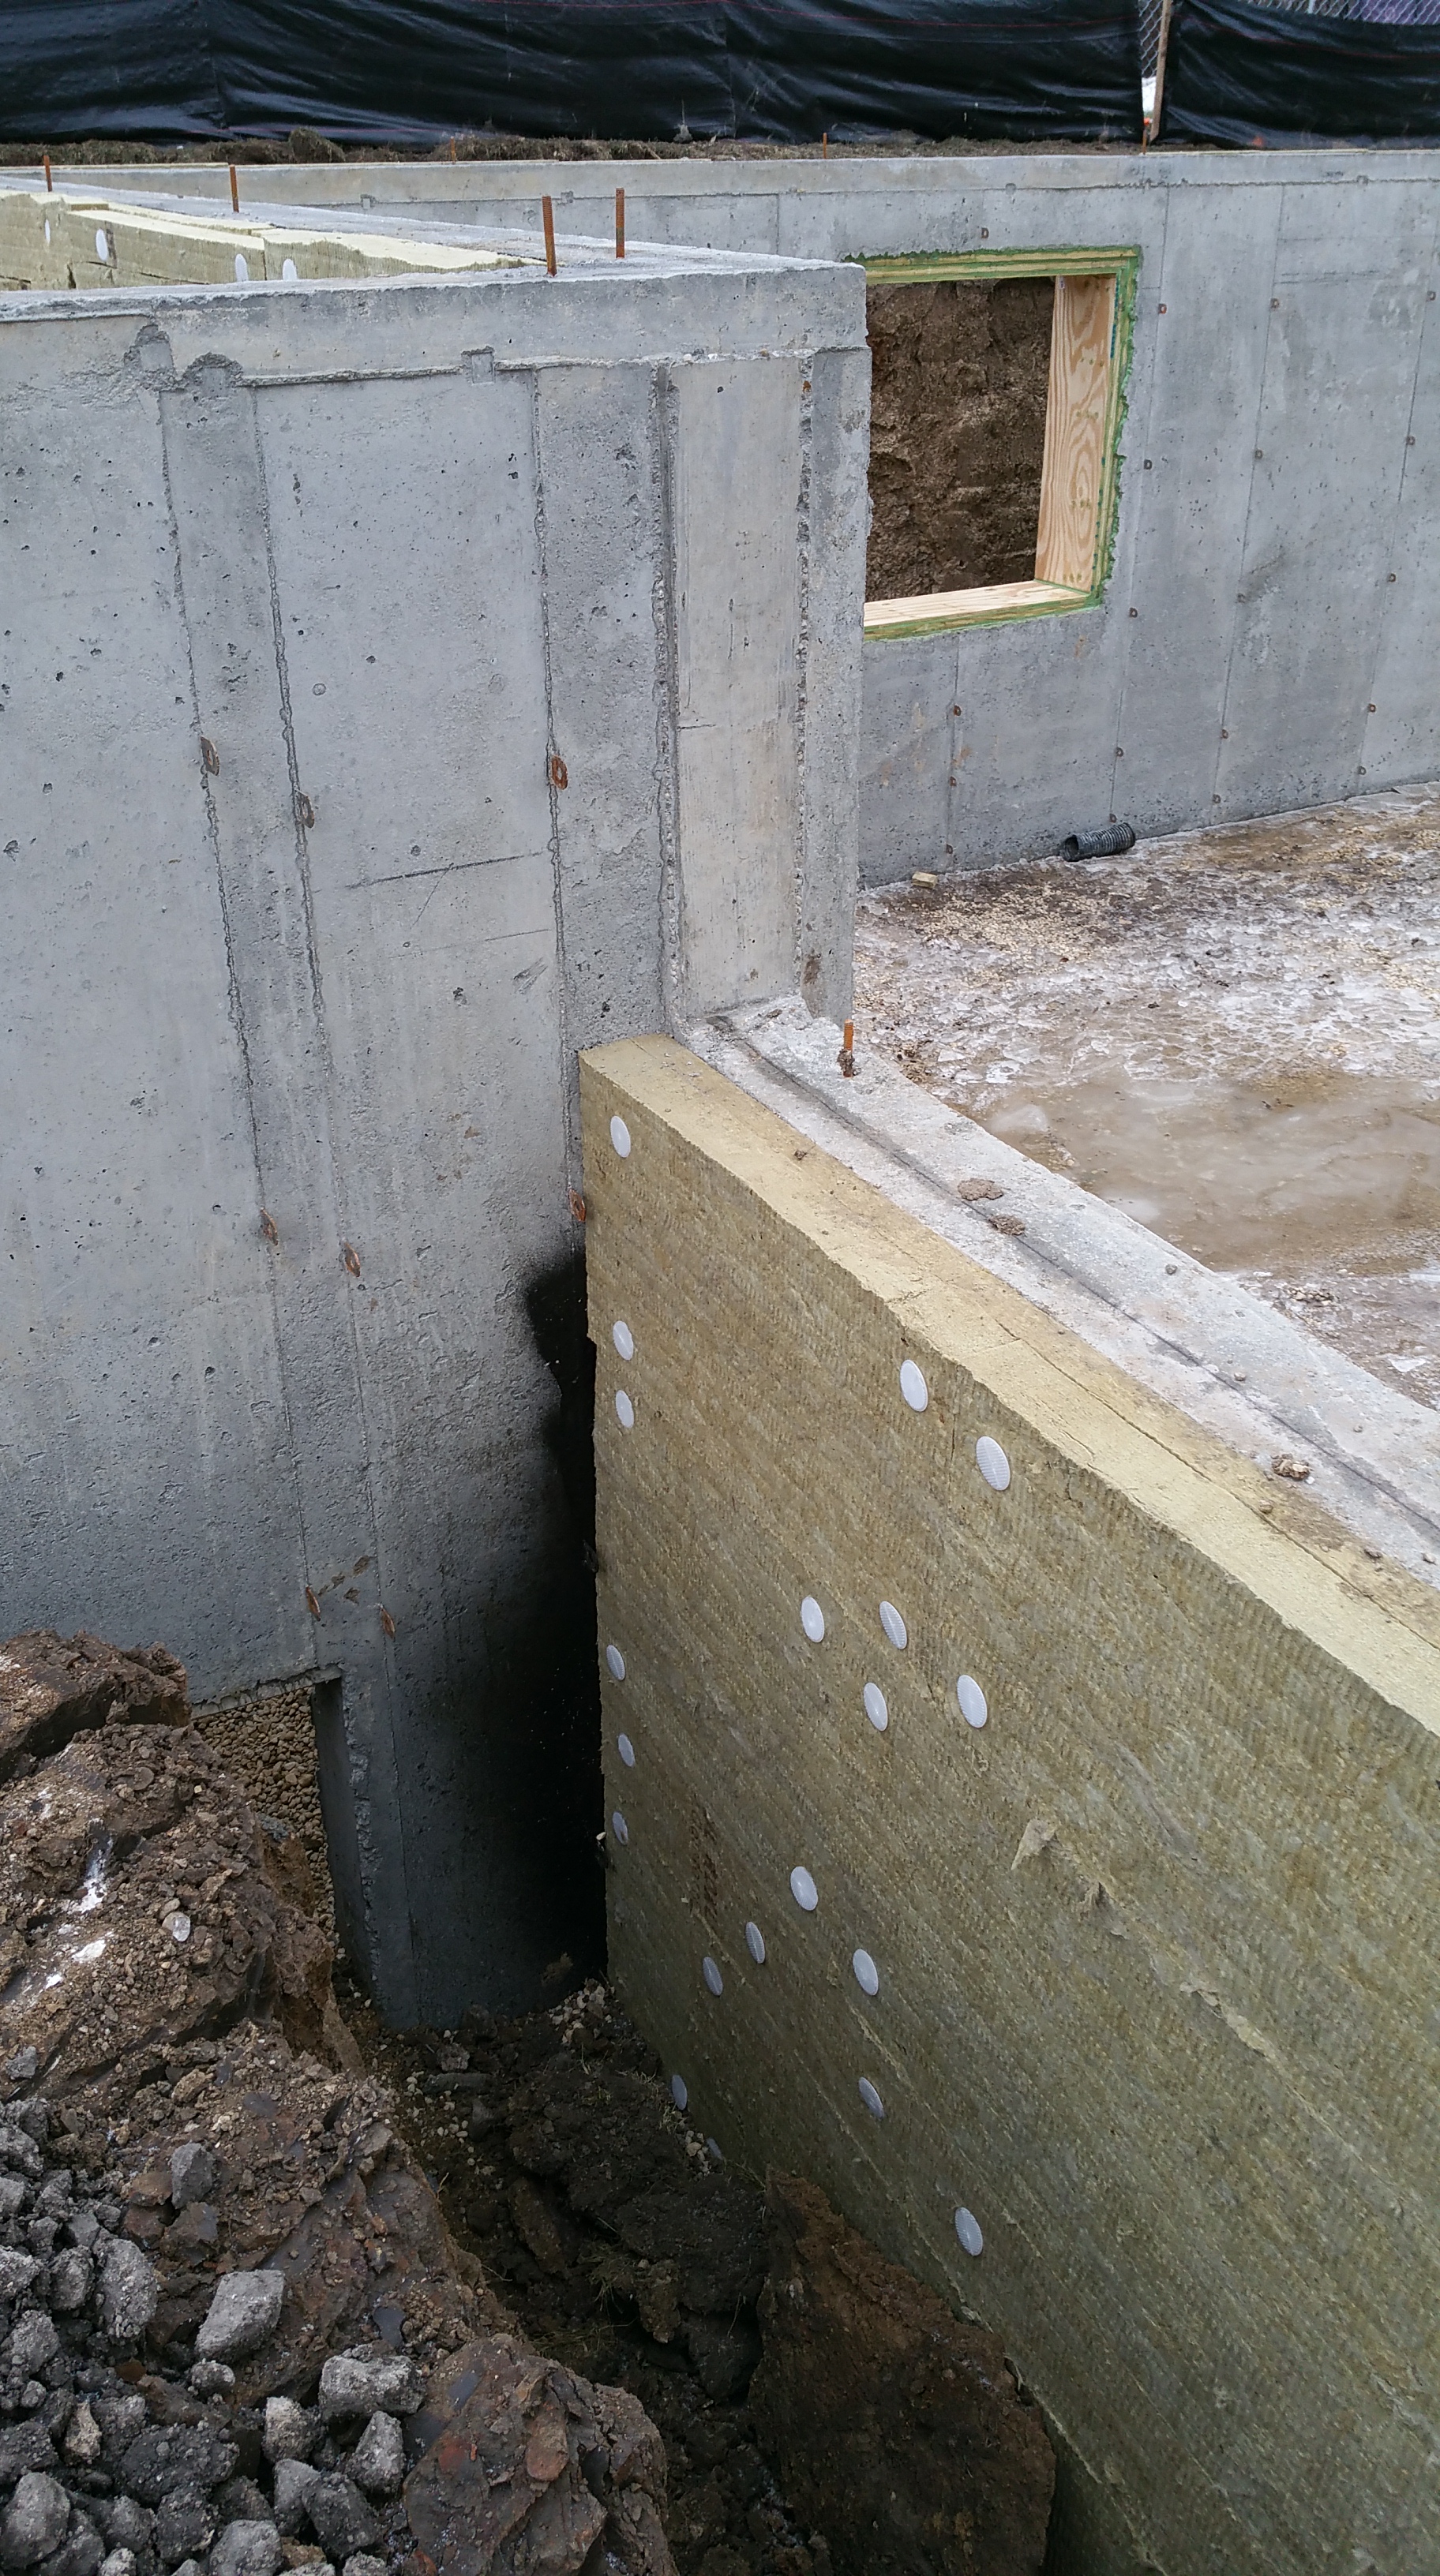
Thermal Bridging in the Foundation
Following Passive House science principles, we tried to remove as many points of thermal bridging in the structure as we could. One area where this was addressed in the construction drawings was a 7″ thermal break between the basement foundation and the attached garage foundation. In other words, there would be no physical connection between the garage and house foundations at all. The only connection would occur above, at the level of framing, where they would be tied structurally together. The idea was that we could place our two layers of Roxul (2″ + 3″) in that gap, thus maintaining our 5″ of Roxul on the exterior of the foundation, uninterrupted (the key point here) around the perimeter of the basement foundation.
On the day the footings were installed, however, our concrete subcontractor expressed serious reservations about the long-term structural stability of the framed house and garage above this gap — in effect, he was worried that over time the two foundations might settle and move apart, wreaking havoc with the framed structures above.
So I was back to post another question on Green Building Advisor (a fantastic resource for any green build or self-build) on the topic:
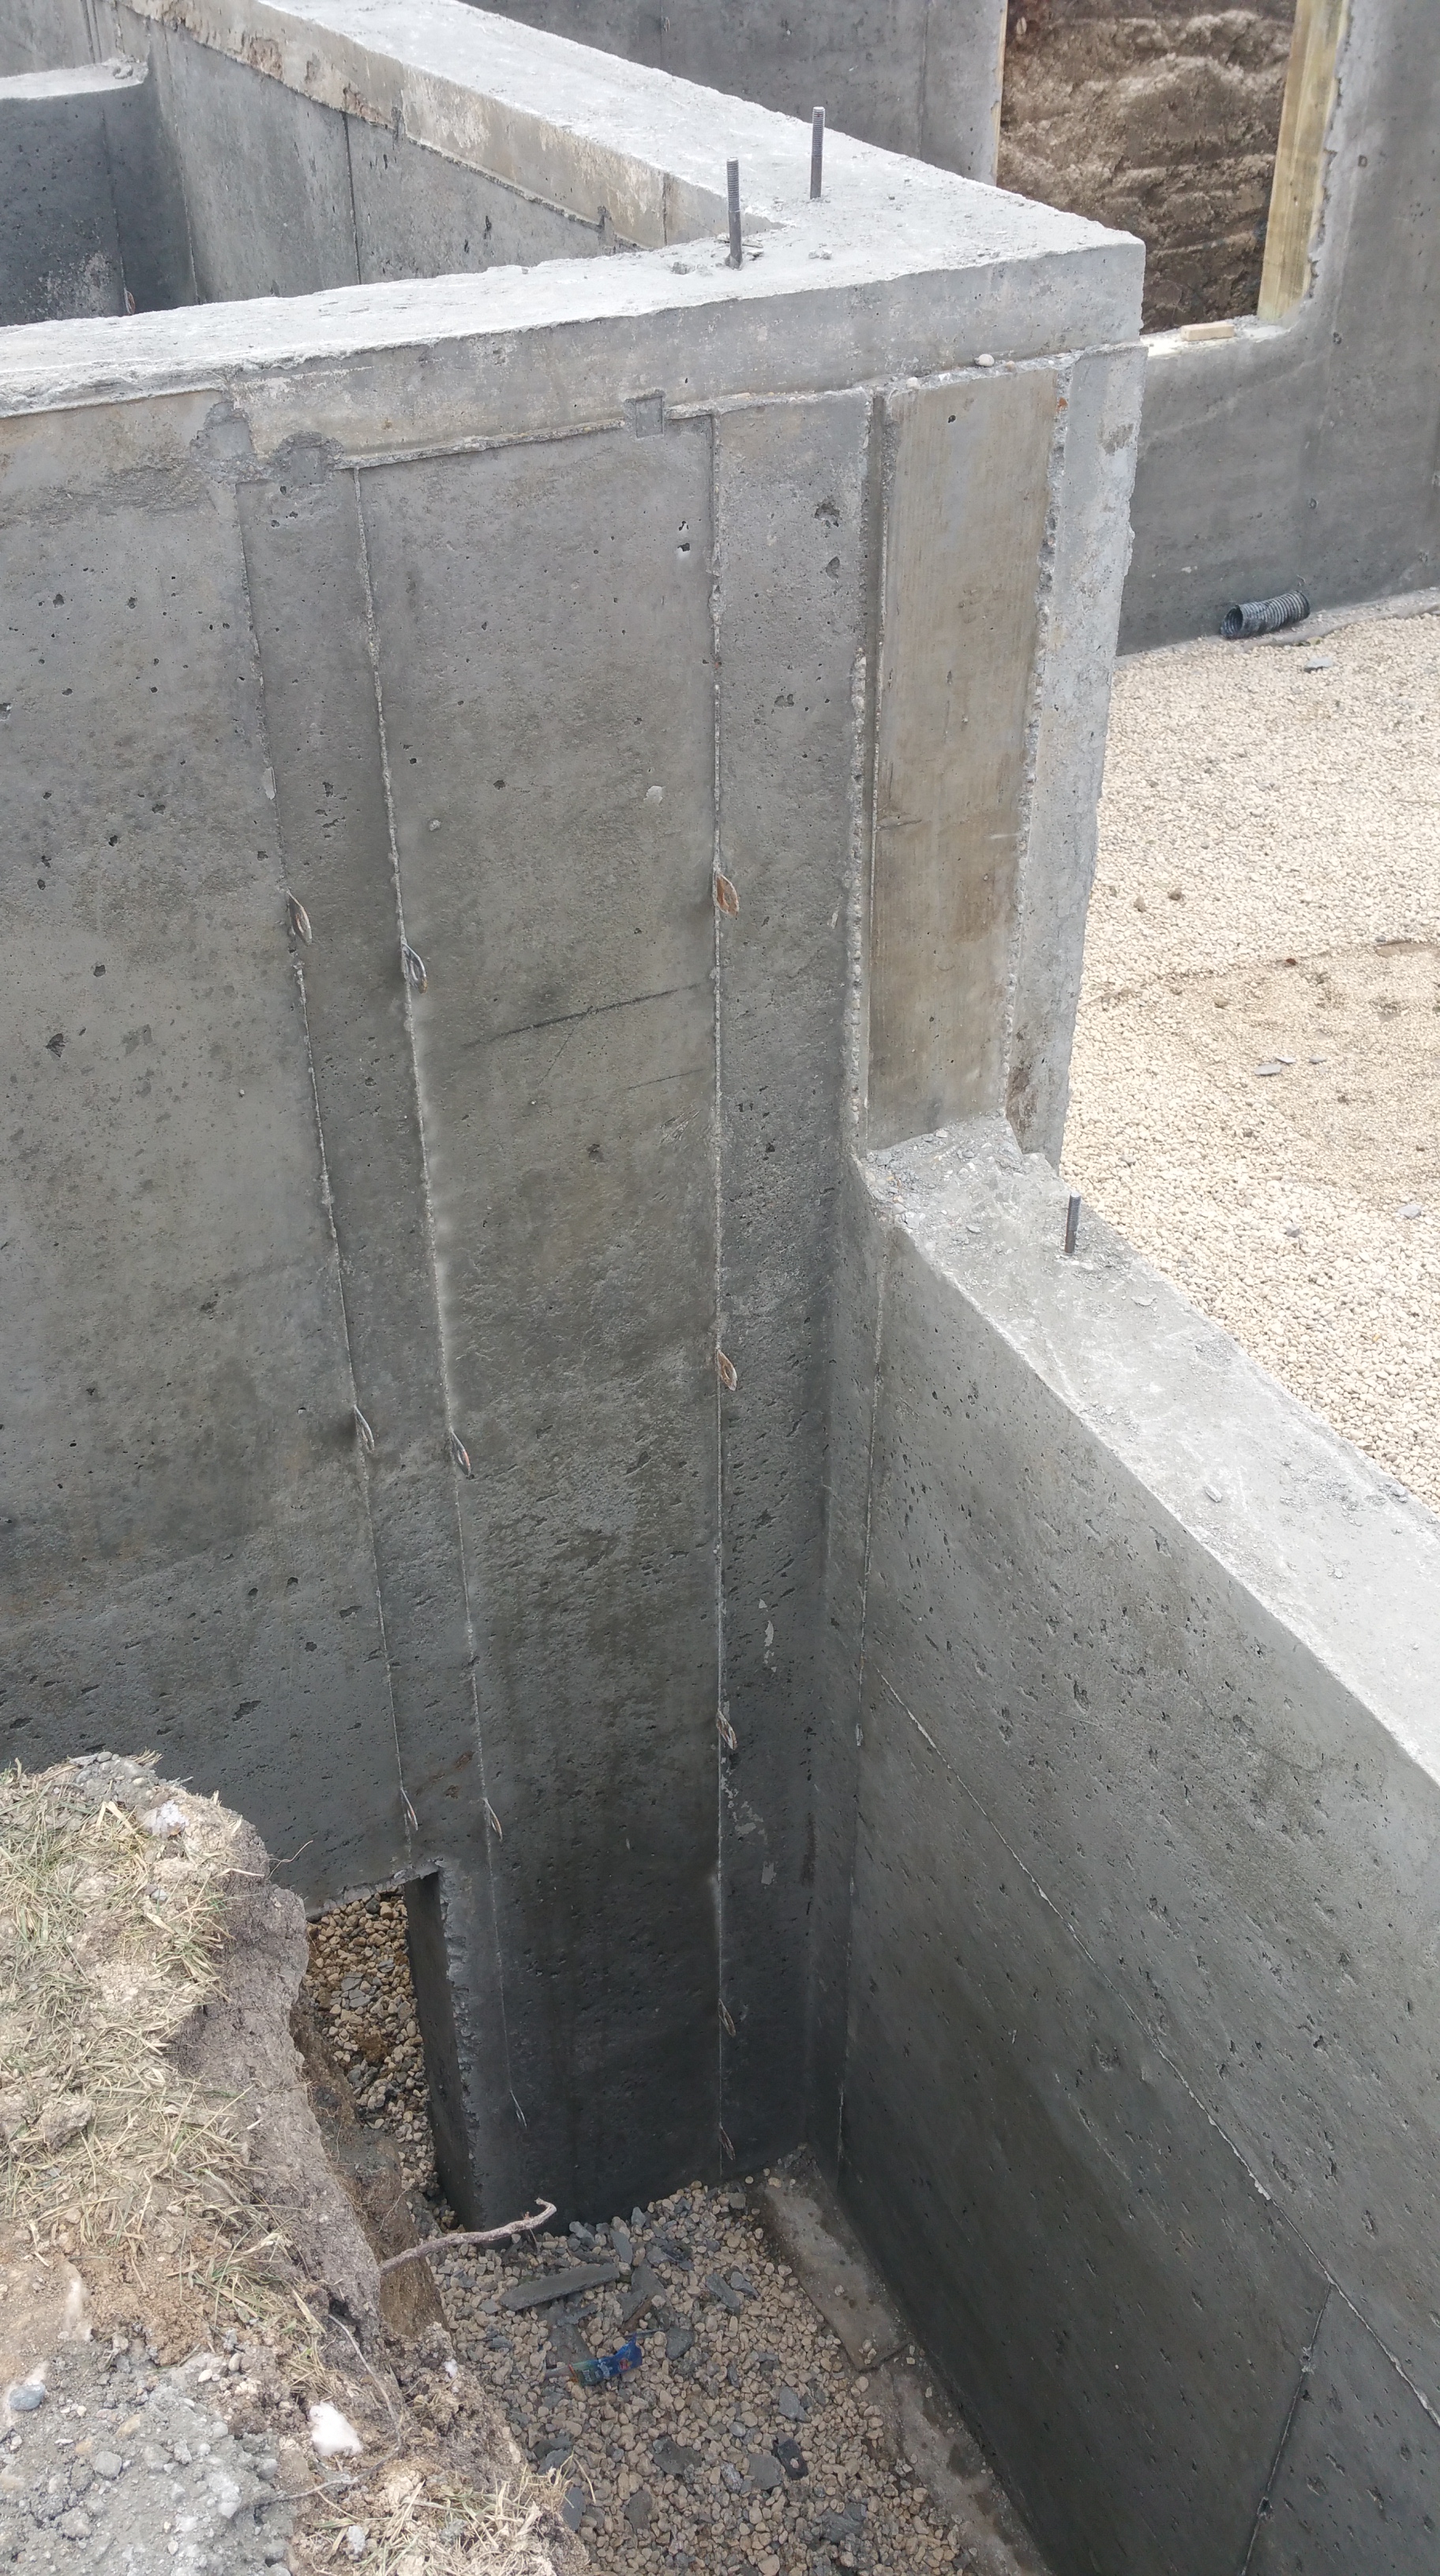
Garage foundation meeting up with corner of house foundation (north side of house).
Close-up of this garage-house foundation connection, from inside the garage.
Front porch. Thermal bridge from garage to house is off to the far right.
Inside corner of garage where garage-front porch-house connect.
Outside corner of front porch. Technically, another thermal bridge from porch to house foundation.
Wing wall for side porch stoop. Yet another thermal bridge to the house foundation.
Unfortunately, there just doesn’t seem to be a lot of information available as to how to proceed. In the end, we decided to ignore these connections, hoping that the thermal bridging at these two points (garage-house, garage-front porch-house), in particular, won’t be all that significant (to our heating and AC costs, or, for example, cold getting into the foundation and then rising up and getting into the wall assembly above these two points where it could become interstitial condensation — unwanted, and potentially dangerous, moisture in the wall).
I assumed Passive House builders would incorporate rigid foam insulation into the concrete forms at these points, but I couldn’t find any pictures or descriptions showing or talking about this in books, magazines, or anywhere online. Either Passive House builders ignore these kind of connections, or I just missed the information somehow.
*** If anyone knows of good sources on this, let me know, and I will post links here to help others in the design stage of their own build ***
Update: David Goodyear is building a Passive House in Newfoundland, and he has successfully used rigid foam between the house and garage foundations. You can read about it on his blog here:
AFTER: Wrapped in snuggly blanket of Roxul. The wing wall was eventually entirely covered except for the tops.
Below are the other points of thermal bridging in the foundations, now covered in Roxul:
Corner of garage foundation meeting up with house foundation (standing inside garage).Same corner, from outside, looking at house foundation to the right.Garage-front porch-house connection (from inside garage).Outside corner of front porch meeting up with house foundation.
We did our best to cover these thermal bridges, but clearly it’s imperfect, so all we can do is hope there won’t be a significant energy penalty associated with these connections.
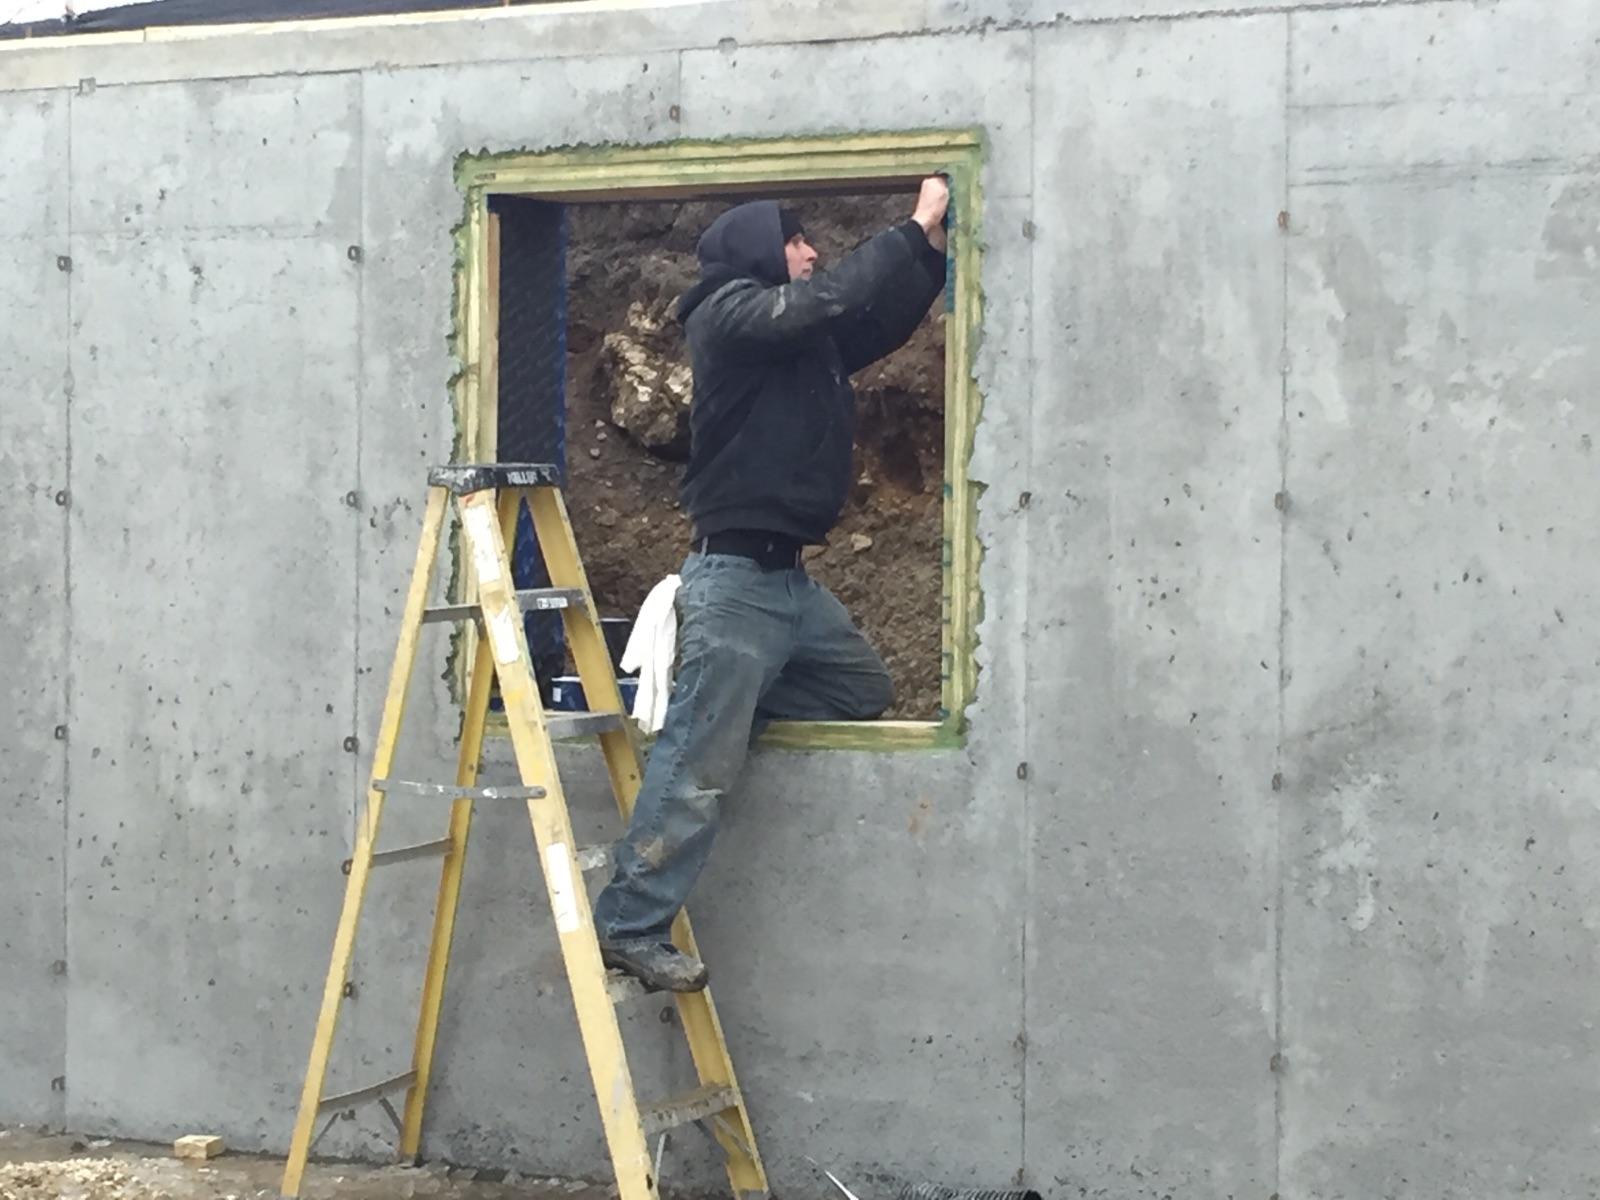
Basement Windows and Roxul
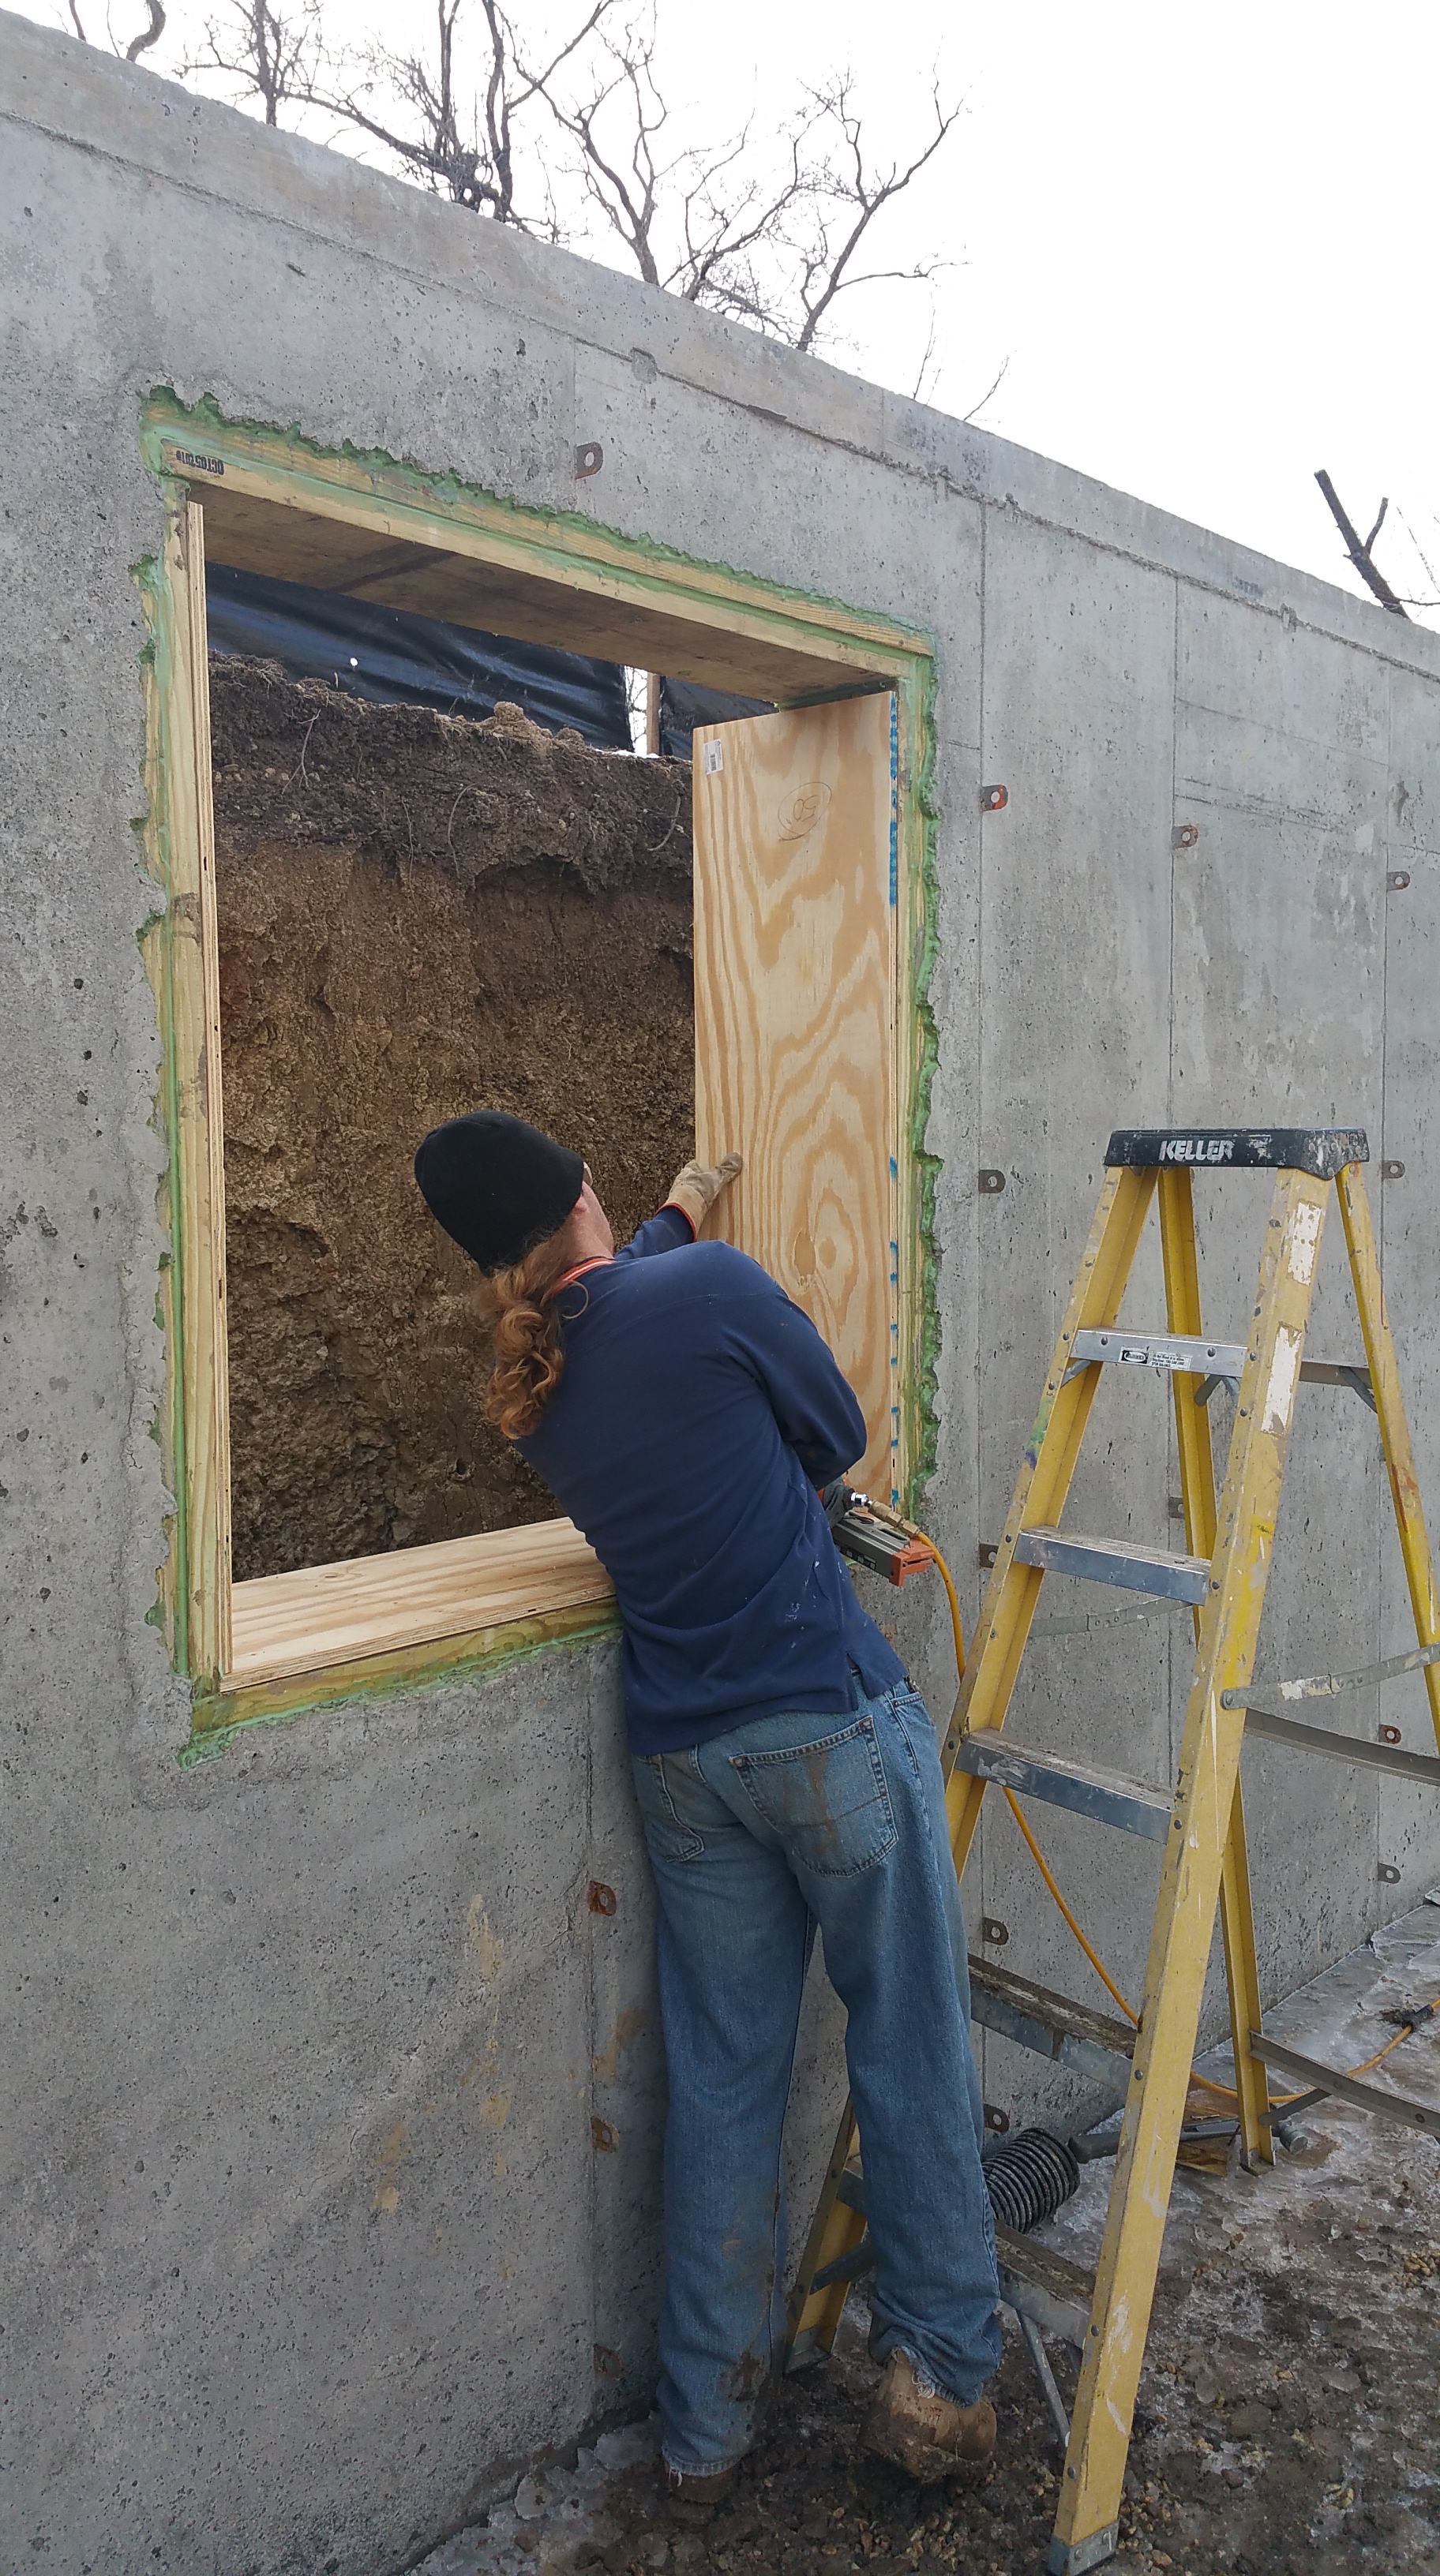
As the Roxul was going on the foundation, Phil and Nils installed window bucks for the two basement windows. The bucks were sized so they meet up flush with the two layers of Roxul. Eventually a layer of HardieBacker board and two coats of Tuff II (the product we’ll be using for the parge coat) will cover the window bucks, and also the transition between the top of the foundation walls and grade around the perimeter of the house.
Nils installing the basement window bucks as the Roxul is being installed on the exterior side of the foundation.
I initially intended to use the R-Guard line of liquid membranes by Prosoco for air sealing and waterproofing all seams and window/door openings, but cold temperatures made this impossible (they require 40° F and rising, which would be the exception rather than the rule here in Chicago for December and January). Maybe because of years house painting (caulking and drywall patching) the liquid membranes seem easier to use and less fussy to get right (the big issue with the tapes is avoiding wrinkles and properly shingle flashing to get water moving in the right direction).
Our Plan B was the series of Pro Clima products sold by 475 High Performance Building Supply. Most of them, including the sealant, can be used down to 14° F without issues.
Another option would’ve been the line of Siga tapes, another popular choice used in Europe, available from Small Planet Supply.
So as the window bucks went in, I followed, applying Contega HF sealant to all the seams and gaps. The sealant is acting as our first layer of air blockage. It’s super sticky, so I don’t doubt that it’s permanently flexible. I did a mock-up of our wall assembly months ago, and the HF on the seams is still tacky to the touch. It goes on light green, then slightly darkens as it dries.
Contega HF sealant in a 20 oz. sausage. It’s also available in the more familiar 10 oz. caulk tubes.
A few suggestions for using the HF Sealant:
I’ve found that completely snipping off the metal clip on the end of the sausage (as opposed to just cutting a couple of small slits around it) prevents it from getting jammed in the front end of the gun.
If I have a half-finished sausage of HF at the end of the day, I put it in a tightly wrapped plastic bag overnight (see photo below), which allows me to use it within a day or two without any problems.
Use a tiny spatula (see photo below) to tool the HF into place rather than your finger, as you normally would with a caulk — it’s just too sticky.
Because the HF is so sticky, I wear Nitrile gloves, so when it starts to get everywhere — and it will get everywhere if you let it — I just simply change to a new pair.
For clean up, the Citrus Solvent we’ve been using with the tung oil works great.
The Newborn brand of sausage gun we’re using for the HF sealant. Found it on Amazon. A really well-made tool.
Found this on Amazon. I thought it was construction grade, but it’s made for kitchen use. It’s durable, and I like the thin blade since it offers more “feel” than a thicker blade, making it easier to tool the HF into place without displacing too much of it in the process.
It’s easy to forget the realities of a construction site when planning details, like the use of the Pro Clima tapes. I pictured it being a pretty straightforward process, not a winter day in the 20’s, fingers numb, propped up on an unbalanced ladder in the hole, while the other guys are cutting wood and Roxul around me — a case of adapt or die, I guess, and a reminder not to be overconfident about the products you’ll be using, or the installation process that inevitably goes with them.
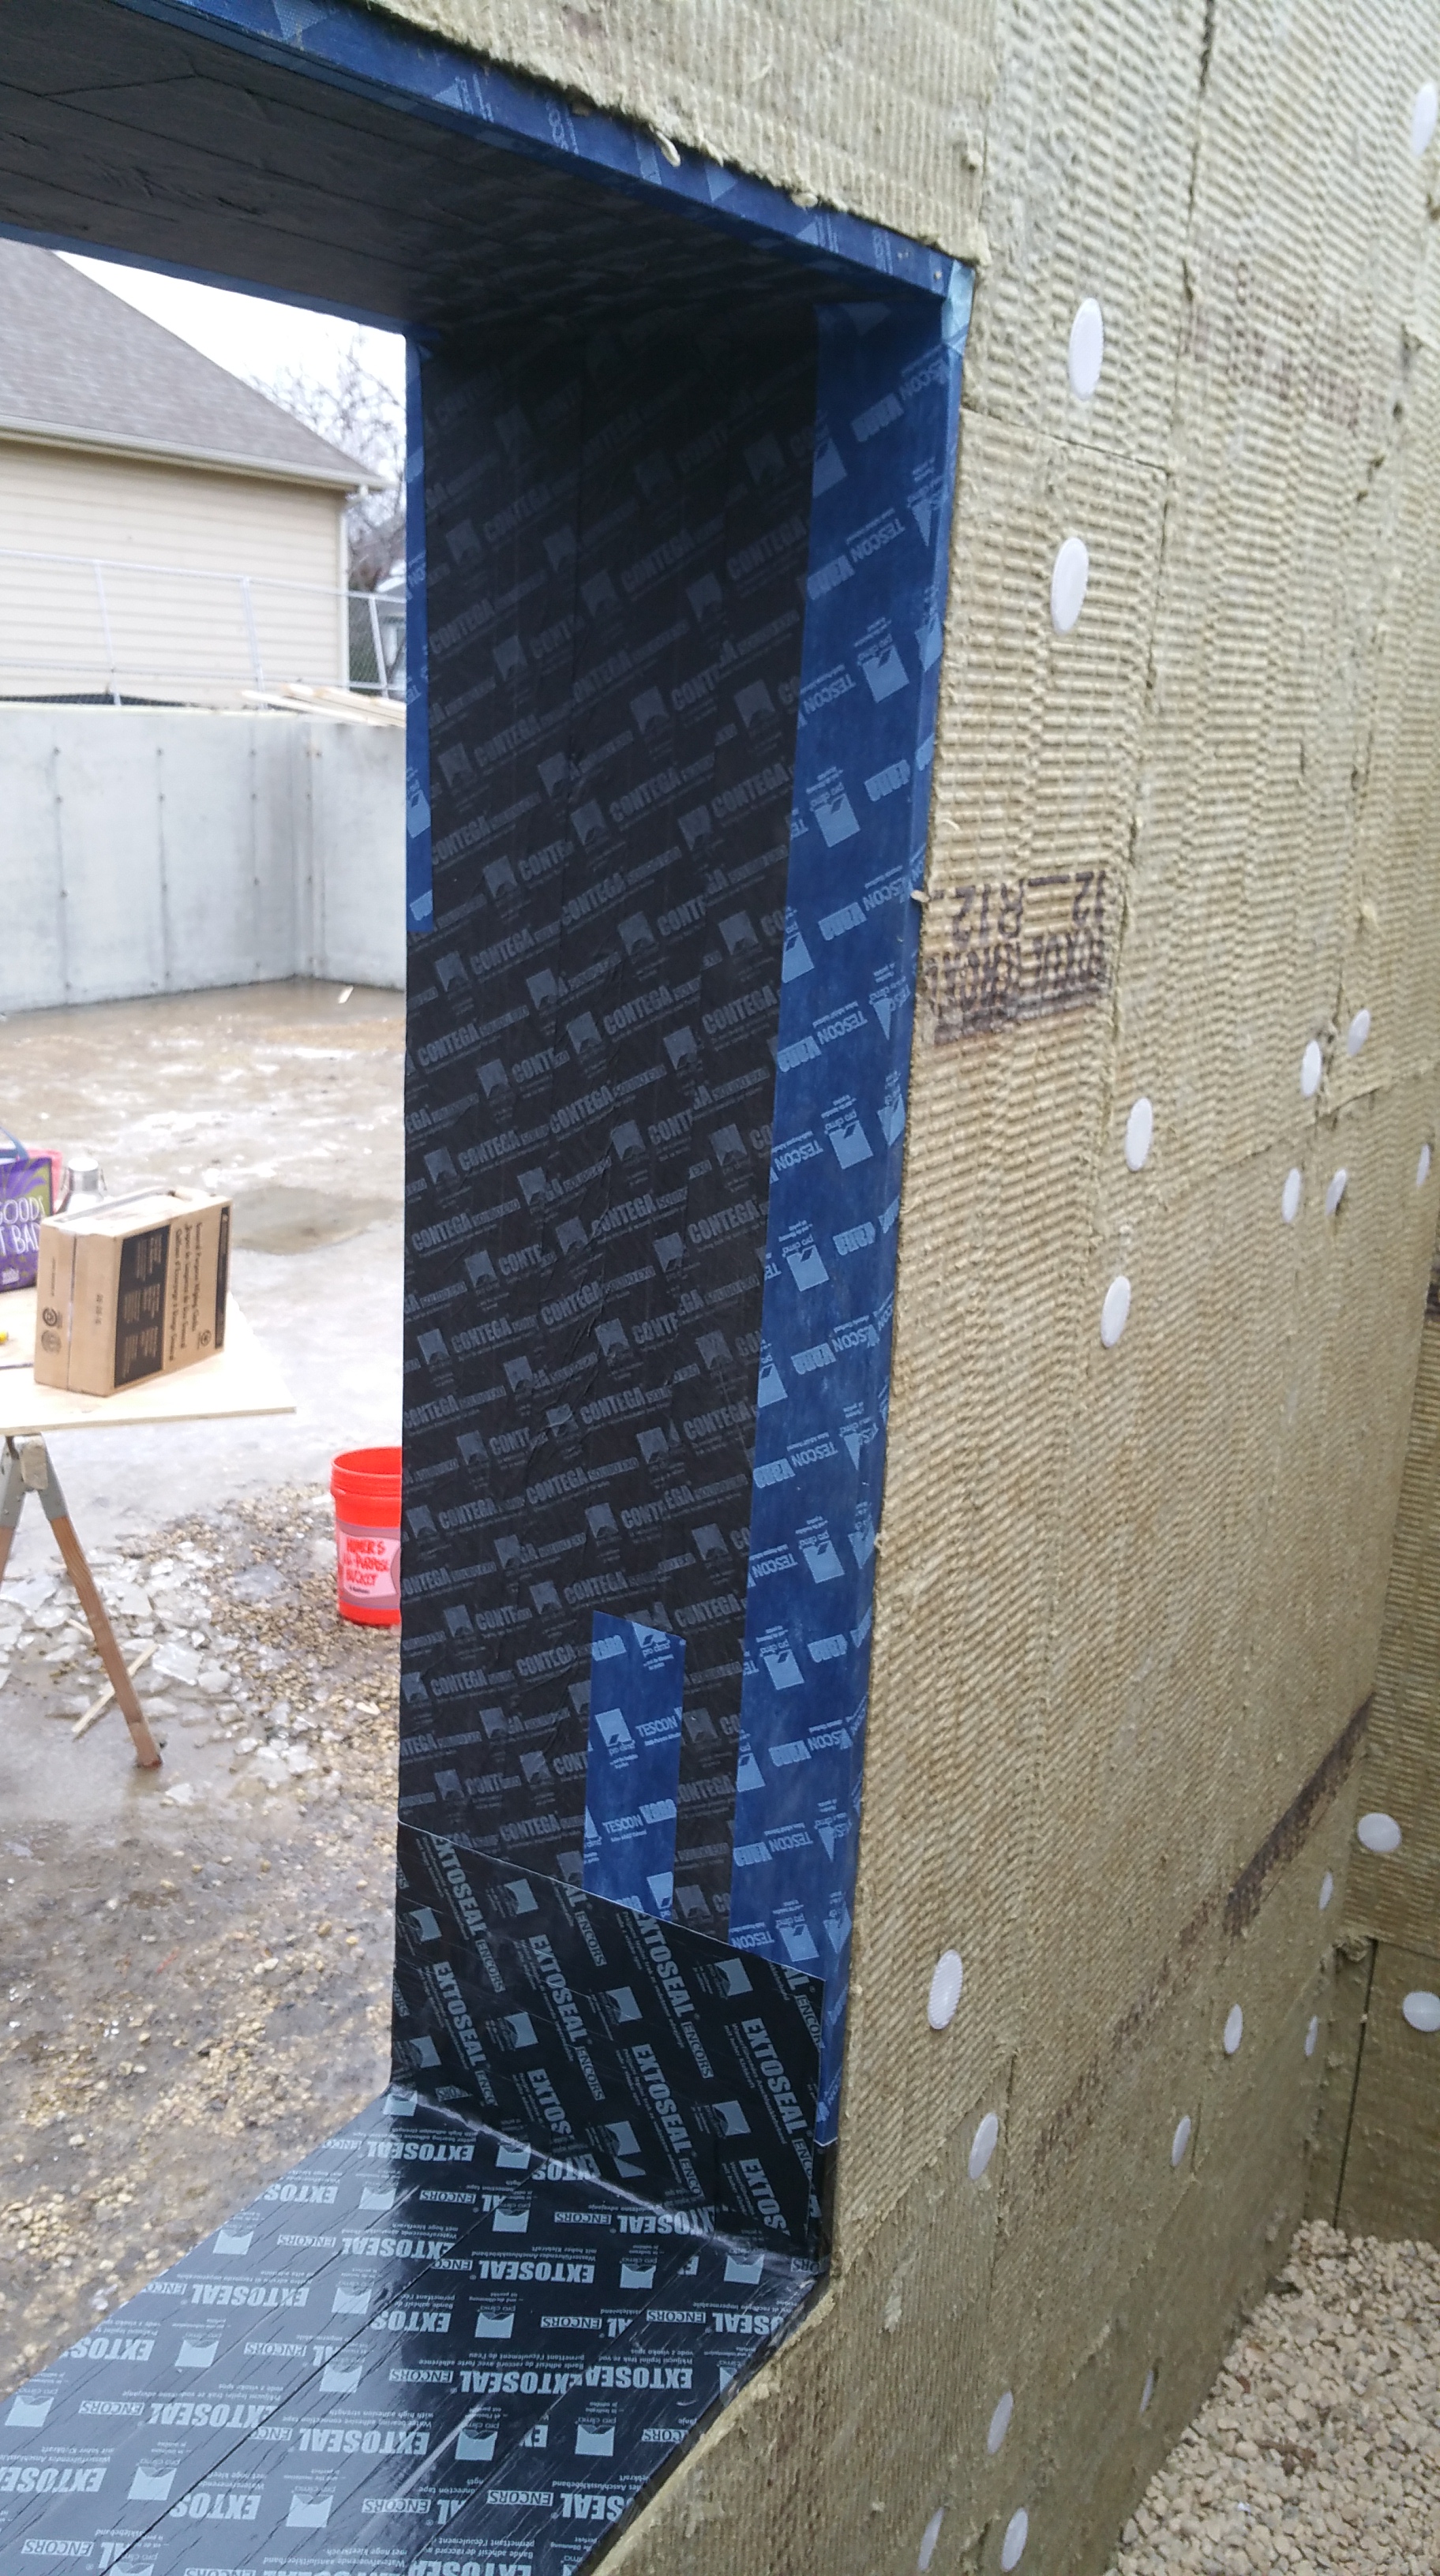
Applying the Pro Clima tapes to the exterior side of the window bucks.
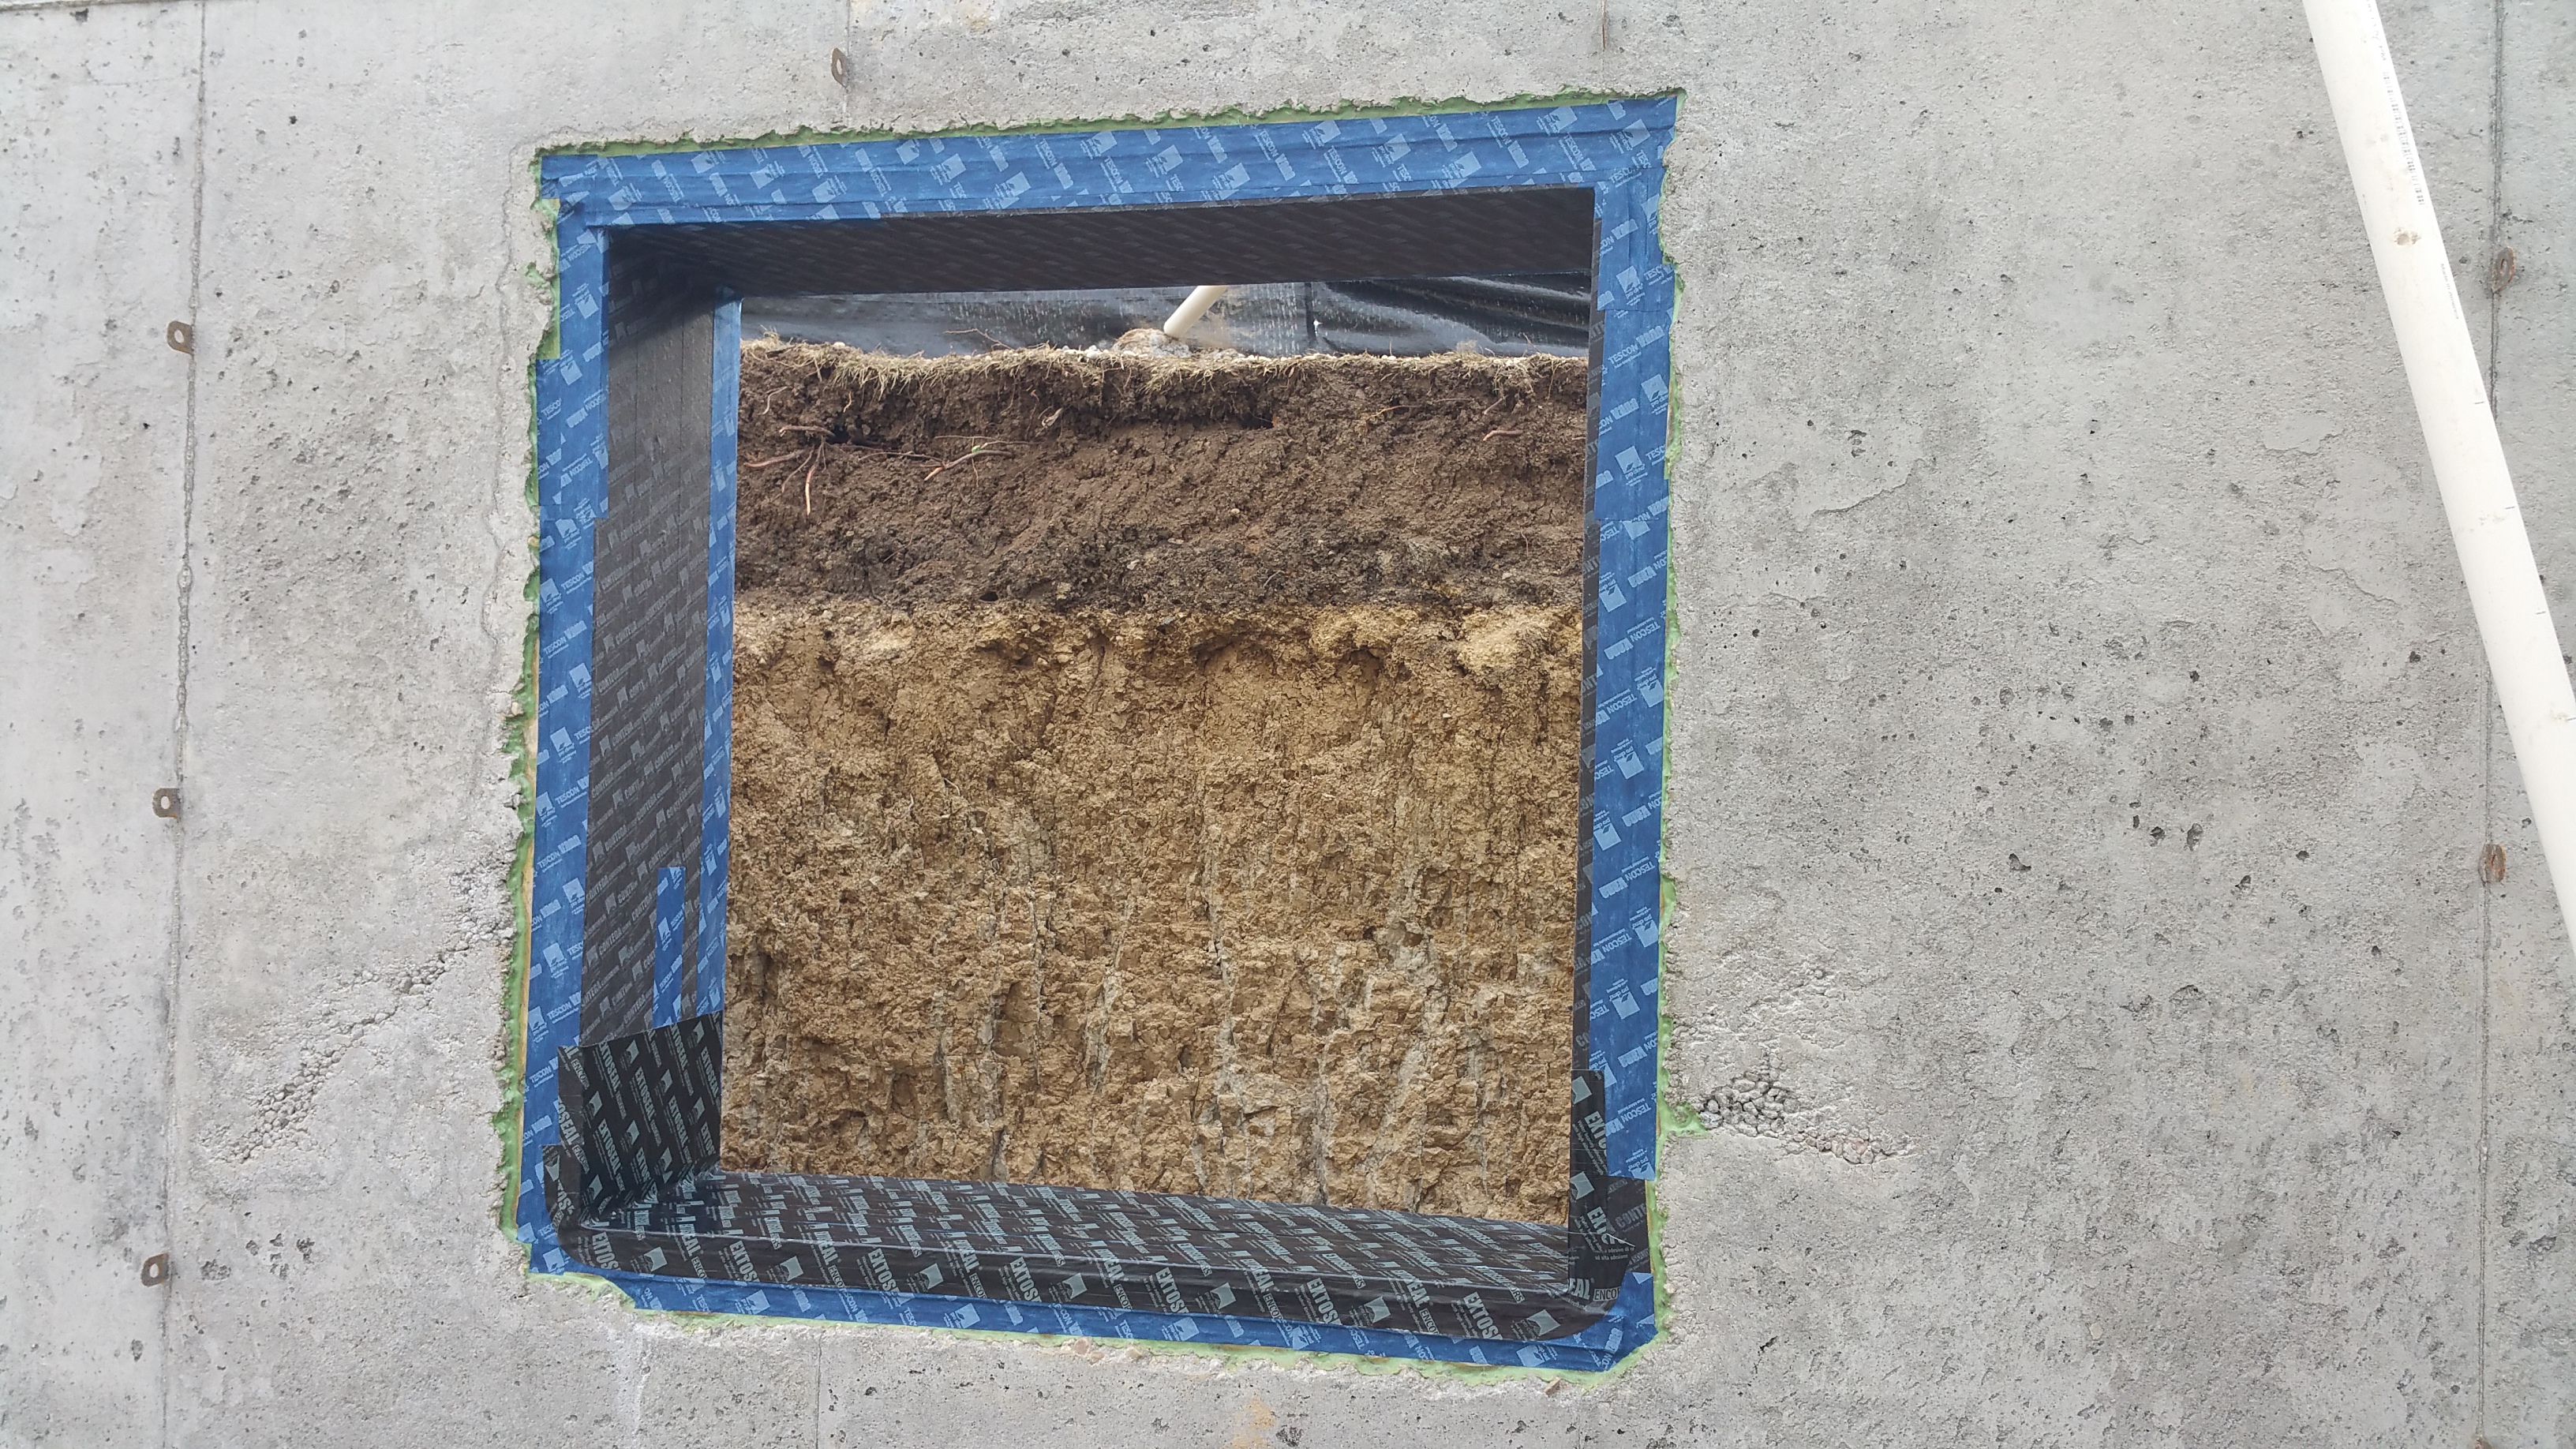
It was important that the connection between the window bucks and the concrete of the foundation be air sealed and made water tight before it gets completely covered by the two layers of Roxul.
It’s been in the 20’s and 30’s, so the HF sealant took a couple of days to firm up before I could then apply the series of Pro Clima tapes. I’m using a combination of tapes, including the Tescon Vana (the bright blue), Profil (light blue — great for making inside and outside corners), Contega Solido Exo (black, 6″ wide), and the Extoseal Encors for our sills (475 HPBS has a great series of videos showing how to use each tape).
Finishing off the buck from inside the basement.
We knew the bucks would be sitting for some time, exposed to the elements, before the windows actually show up, so we decided to completely cover the openings just to be safe. This gave me extra practice using the tapes, which definitely helped, and it meant not stressing out every time the forecast called for rain or snow.
Basement window buck covered in Contega HF sealant and Pro Clima tapes.
The only tape that’s giving me fits is the black Contega Solido Exo. It’s thinner than the other tapes, so it has a propensity to want to stick to itself (wrinkles are more difficult to avoid), and I find it much harder to pull it away from its peel-and-stick backing than the other tapes. I worried that the Extoseal Encors might be difficult to get right, but it — along with the Tescon Vana and Profil tapes — has been surprisingly easy to work with.
This video was my Bible for installing the Extoseal Encors:
In lieu of on-site training from someone who’s used a specific product consistently, videos like this one are invaluable when using new products and you want to get the details right. Without videos like this, you’d be in for a frustrating process of trial and error.
For instance, even with this excellent video, I noticed when I did our mock wall assembly that because the Extoseal Encors can stretch around corners it’s easy to stretch it too much, thereby inadvertently thinning it out. I’ve found that when I get to a corner it’s better to just fold it around the edge rather quickly, without overthinking it too much, which helps to maintain the thickness of the material at and around the corners (arguably the product’s strongest attribute in helping to avoid water damage).
I can’t recommend enough doing a mock wall assembly, or practicing on scraps, to get a feel for using these products, before you find yourself on-site doing it for real.
Basement window buck sealed and taped on the exterior side before being covered in Roxul.
Basement window buck surrounded by two layers of Roxul.
Close-up of outside edge of basement window buck and Roxul connection.
We’re almost ready to climb out of the hole. It will be exciting to watch the guys start framing so we can see the basic form of the house begin to take shape.
Tools ready to head to the next job site. Concrete guys (they’re mostly guys) are the unsung heroes of construction (excavators should be included as well) — like offensive linemen in football, no one pays much attention to them until a mistake is made.
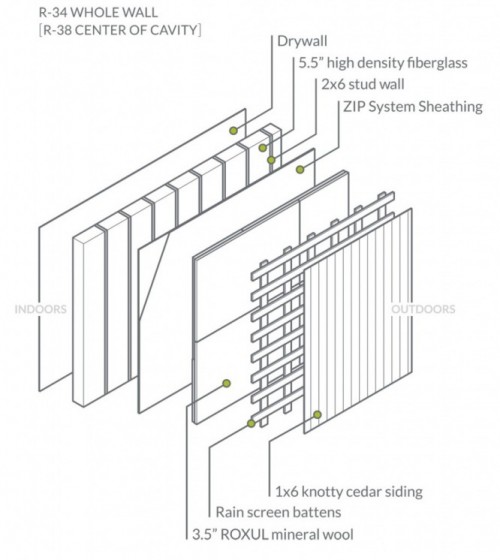
When choosing what to put in our walls, we knew we wanted to try and balance high R-values (well above the current building code) with a limited environmental impact.
we decided to use many of the following elements employed by Hammer & Hand:
Hammer & Hand wall assembly for their ‘Madrona House’.
In terms of materials, there are any number of options for putting a wall assembly together. For instance, we really wanted to use the sheep wool, but cost and worries (unfounded or not) about availability, led us eventually to Roxul (the Hammer & Hand videos below proved especially helpful in this regard).
After seeing the wall assemblies Hammer & Hand has been using, and how they’ve evolved over time, we felt the Madrona House set-up represented a good balance between cost-environmental impact-availability-ease of installation. We will also be following their lead by using the Prosoco R-Guard series of products to help with air-sealing our building envelope.
Nevertheless, we did make a couple of changes to the Madrona House set-up. For example, we’re using 4″ of Roxul Comfortboard 80 on the exterior side of the Zip sheathing (based on our colder climate zone), and we will be using Roxul R23 batts in the stud bays, along with the Intello vapor retarder, stapled and taped to cover the stud bays. Otherwise, we will be sticking pretty close to the Hammer & Hand Madrona House wall assembly.
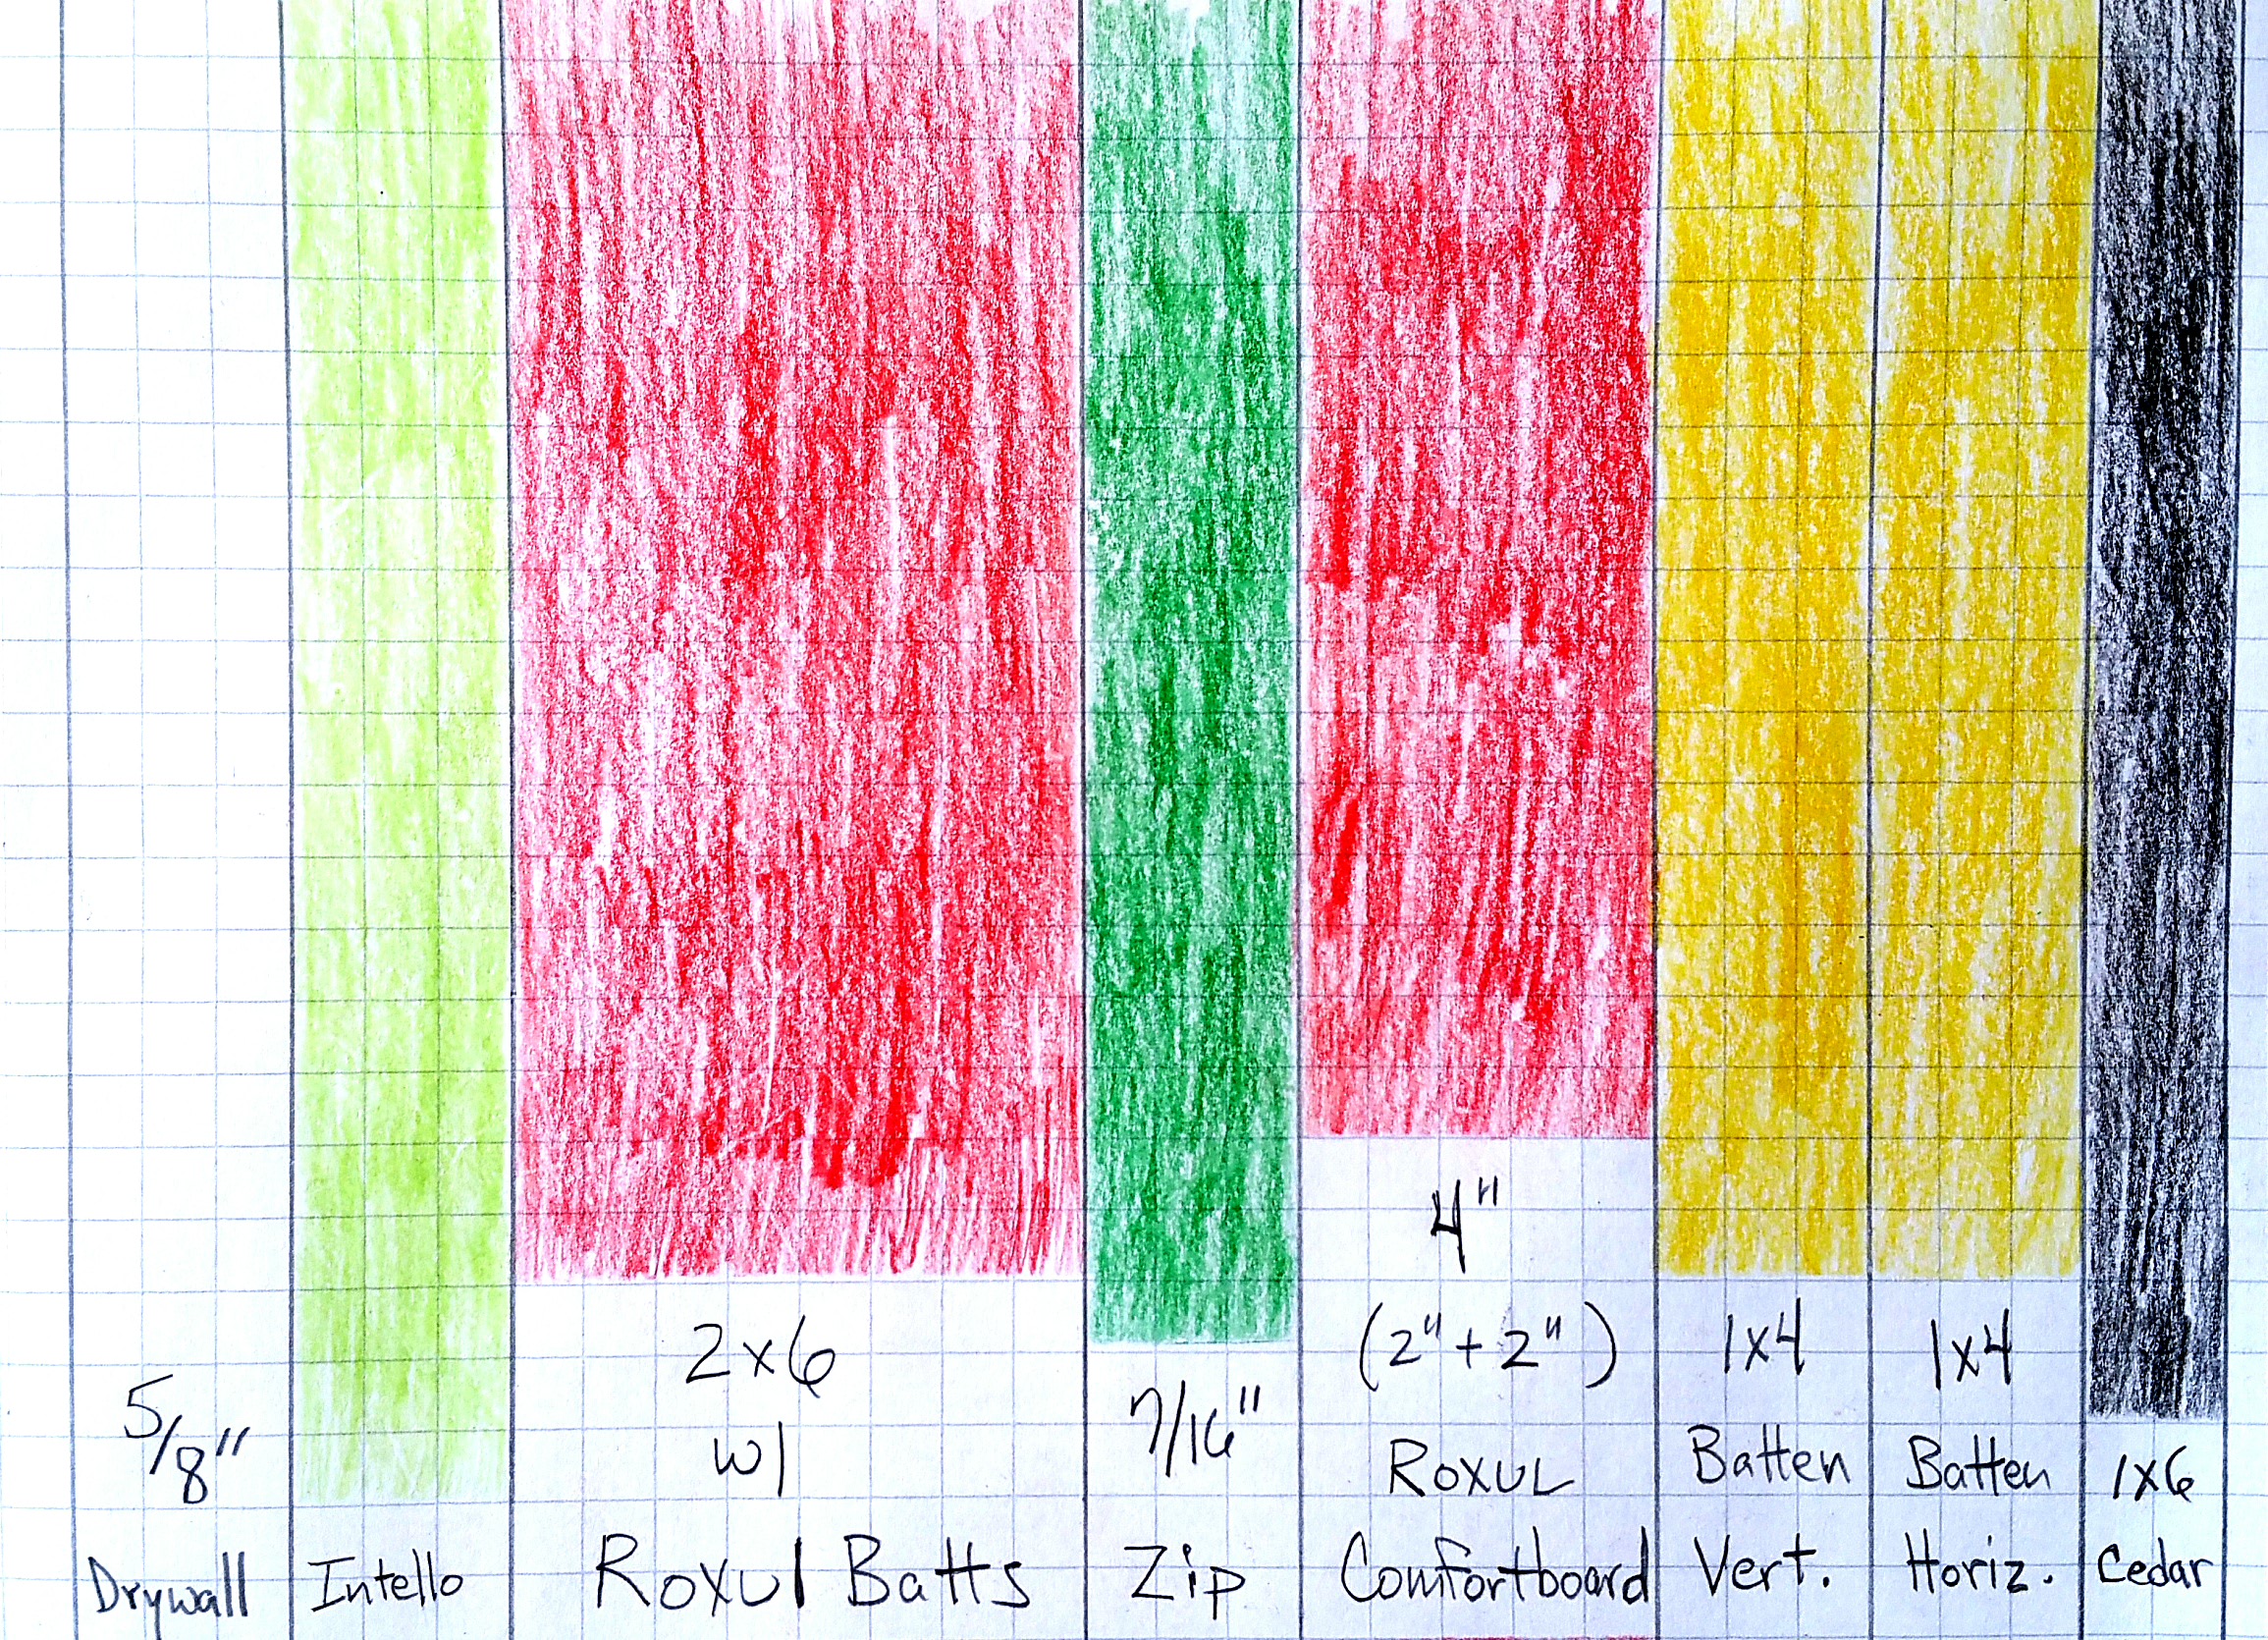
So from drywall to exterior siding (interior – exterior), this will be our wall assembly:
Roxul R23 Batts in 2×6 stud bays (24″ o.c.) (roxul.com)
Zip board (for structural sheathing and WRB; seams covered w/ Joint and Seam Filler)
4″ of Roxul Comfortboard 80 (two layers: 2″ + 2″)
2-Layers of 1×4 furring strips (aka battens or strapping) as a nailing base for the cedar siding
1×6 T&G Cedar (charred and oiled with a few boards left natural as an accent — most of it oriented vertically, hence the need for a second layer of furring strips).
A crude rendering of our wall assembly using my daughter’s coloredpencils.
A collection of helpful videos explaining the various elements we’re going to use, and why they’re effective:
Without the information available from sources like Building Science Corporation (they have a lot of interesting research documents) and design-builders like Hammer & Hand(not to mention Green Building Advisor and similar sites and forums that allow consumers to Q&A with expert builders and designers in “green” architecture), trying to build structures to such exacting standards (e.g. Passive House – Pretty Good House – Net Zero) would be exceedingly difficult, if not impossible, for those without previous, direct experience in this type of building program. I can’t express how thankful I am that so many individuals and businesses like these are willing to share their years of experience and knowledge with newbies like myself.
Here are the Hammer & Hand videos that initially sparked my interest in using Roxul rather than foam:
Instead of using tape for exterior seams, we are going to use the R-Guard series of products from Prosoco:
For various interior seams and connections we anticipate using the Tescon Vana tape, or an appropriate gunned sealant.
In the summer my wife and I teach a class together, called Excel 2, which is one small component of a larger, overall Excel Program (my wife is a high school Social Studies teacher).
Typically, Excel students come from first-generation immigrant families. They are college-bound students who have exhibited great potential, but who are in need of some encouragement, particularly in regards to taking Advanced Placement (AP) courses (huffington post). For most of our students, they will be the first ones in their family to attend college, so it is understandably an intimidating prospect in any number of ways.
The course itself is three weeks in the summer session, its focus on developing reading and writing skills by utilizing non-fiction reading assignments. We emphasize the importance of correct spelling, proper grammar usage, and attention to detail by requiring multiple revisions to several thesis paragraphs, which are themselves based mostly on college-level reading assignments.
You can imagine how well this goes over with incoming high school sophomores and juniors — especially in summer. We’ve tried to overcome this dilemma (how to motivate young high school students to tackle a course based on rigor when many of their friends are out enjoying summer break) by delving into topics they are intimately familiar with, but hopefully in ways they have not yet confronted.
Some of our Excel students with my wife, Anita: (front row) Aubrey and Imani, (back row) Eduardo, Anita, Cecelia, and Karen.
As a whole, 50% of the students attending Palatine High School qualify for free and reduced lunch. Not surprisingly, then, the Excel students face some unique, if not daunting challenges, both in and out of the classroom. In addition to the normal stresses associated with being a teenager, many of them deal with balancing school work with long work hours at low-paying jobs (helping their families make ends meet), social pressures to stray down the wrong path (in any number of ways), and even (most heart-breaking of all) confronting what researchers term being food insecure — in plain English, not always knowing when or where they will get their next meal.
We present the class to the students as an opportunity to test themselves, to really see where they are, currently, in terms of a whole host of skills. The main goal of the Excel 2 program, therefore, is to really challenge their abilities, not just in terms of reading and writing skills, but also soft skills such as interpersonal communication, the importance of body language, time management, and self-discipline.
Essentially, we try to give them a college-level course experience, hoping it better prepares them for the eventual reality. In other words, we’d rather they struggle in high school with us than have it happen when away from home for the first time, off on their own, at college (atlantic)(newsweek)(washington post).
Here’s an example of our ever-changing syllabus: Excel 2 – 2015
As you can see from the reading assignments, we encourage our students to start asking questions about everyday things they may be taking for granted. We hope this sharpens critical thinking skills, but we also hope it encourages them to be more active participants in their lives, rather than just sleepwalking through their days as passive consumers.
Consequently, when it came time for us to find a new place to live, we saw it as a good opportunity to practice what we preach:
What exactly do you want from a new house?
If you’re going to buy a house (and you’re lucky enough to even contemplate doing so), what should it look like? A condo? A townhouse? Or a single-family residence?
In which neighborhood are you going to buy?
How many square feet do you want (or need)? How many bedrooms? Do you want (or need) a formal living room or dining room? Do you want (or need) a basement?
What architectural style appeals to you?
How are you going to furnish the interior?
Should you care about indoor air quality (IAQ)? And if you do, how do you protect it or improve it?
What do you want in your walls and attic for insulation? How much do you need?
How much will utilities cost? Are there cost-effective ways to reduce those costs?
Are renewables — solar, wind, or geothermal — worth considering? How long is the payback period?
Do you want your house to be environmentally friendly — and what does that mean anyway?
Instead of moving into the typical, leaky, not very environmentally friendly suburban condo, townhome, or house (we were leaving behind the latter), we thought it would be more interesting to see just how “green” we could make our next house.
Because we wanted a yard to do plenty of landscaping and gardening, we narrowed the choices down to a single-family house. And, instead of tackling the challenges that come with a retrofit, we decided to try building new.
Much like hearing Jonathan Ive talk about an Apple keyboard, we appreciated the detail required to meet the certified Passive House standard. At the time (summer 2014), this seemed like the way to go.
After the experience we had with our original builder(2015), and then subsequently trying to learn as much as possible about the Passive House standard, in addition to discovering the Pretty Good House concept along the way, our house plans have evolved into a kind of 3-headed hybrid: Passive House science+Pretty Good House+Net Zero (Zero Net Energy: ZNE).
The goal of all three: dramatically reduce the energy consumption of our house as much as possible (especially our dependence on the energy grid). We also want to do a significant amount of planting and growing in our yard, mostly xeric plants that require little additional watering, in order to combine house and yard into an eco-friendly system of sorts.
Our last home (approx. 2800 sq. ft.) was a fairly typical suburban tract house. It had builder-grade windows and doors (most of which had to be replaced after just a few years), very little insulation in the walls (the switch for the back porch light would actually ice up when temperatures fell below 20° F), and it had a great deal of under-utilized space (e.g. a two-story foyer, a formal living room and dining room, and a fourth bedroom, all of which saw little use).
With our new home (just over 1500 sq. ft. of living space), we’re trying to turn all of this on its head so we end up with something we really want and will enjoy. To paraphrase Kevin McCloud: ‘maybe it’s better to have a little bit of something special than a lot of something mediocre’.
An oft-quoted statistic (1)suggests a significant amount of our greenhouse gas emissions can be attributed to our structures (typically the figure is in the 40-50% range) — including residential, commercial, industrial, and governmental — so maybe change really does begin at home (SA)(greenbelt movement).
(1) According to a recent Fine Homebuilding article, “Better Than Average”, by Brian Pontolilo: “It’s not clear how much our homes contribute to greenhouse-gas emissions and to climate change. The most recent data available from the Department of Energy is from 2009-2010. Outdated as it is, this data indicates that residential buildings contribute around 20% of total U.S. greenhouse-gas emissions. This includes fossil fuels used on-site (e.g. natural gas for cooking and heating) as well as electricity.” (September, 2016 issue, p. 64)
The title of this blog entry was lifted from a lyric in this Talking Heads song:
The following is a review of our original builder, Evolutionary Home Builders(Geneva, Illinois):
Brandon Weiss – owner (also works with Dvele and Sonnen)
Patrick Danaher – architect and project manager
Eric Barton – chief field officer (now on his own as Biltmore Homes)
What was supposed to be a straightforward, pleasant experience building a rather compact, eco-friendly Passive House dragged on for a year and a half (roughly September, 2014 to December, 2015) to little effect. After spending $30,000, we have no house, of course, but also no drawings, and not even a partial refund. We gave them $30,000, and they gave us nothing in return.
Presumably, only those contemplating a build with Evolutionary Home Builders (EHB) will punish themselves by slogging through the following documentation, which lays out our unfortunate experience. The information is here to let consumers know what our experience was like. Consider it a cautionary tale.
Our (still empty) lot on April 8, 2016.
My wife and I put our house up for sale in spring, 2014, in hopes of moving closer to her work in Palatine, Illinois (she is a school teacher; I am a stay at home dad for our daughter). Faced with a decision on where to live, we decided to build a new home. After reading up on the options available, we concluded we wanted to build as “green” as possible, and building to the Passive House standard seemed like a worthwhile goal. We knew the numbers would be tight, in light of our limited nest egg, but we believed how we built our new home was just as important as what we built.
In doing our research, we came across Brandon Weiss and his project in River Forest — the first certified Passive House in the Chicago area. Based on his reputation (various certifications such as Master Builder and certified Passive House builder, and any number of articles from local media outlets detailing his projects in the area), we chose to move forward with Brandon and what had recently become Evolutionary Home Builders (EHB).
Even before purchasing a lot, we put down, in September, 2014, at Brandon’s request, $30,000 for a Design-Build Professional Services Agreement (PSA). At that time he assured us a Passive House was possible at $200-205/ sq. ft. for a single-story home under 2,000 sq. ft., and with a full 9’ basement included (the total dependent on the quality of finishes and any extras).
The PSA outlined a prospective budget for our 1600 square foot structure, with a total ranging between $375,000-410,000 (this included the initial $30,000). The timeline we were given included 90 days to design and 6-8 months to build. We assumed that this meant there was a good chance we could move into our new home by the end of 2015, or the early part of 2016 if hiccups occurred during the build process.
After some delay, the design phase only began in earnest towards the end of January, 2015. They were working off of drawings I had given Brandon back in June, 2014, during our initial meeting in his new office showing a 40’ x 40’ floor plan created on RoomSketcher, along with hand-drawn exterior elevation ideas. During the design phase their in-house architect, Patrick Danaher, changed it to a 49′ x 34′ structure.
It was not until the end of July, 2015, however, that we received our first official construction drawings. Nevertheless, we were very excited to see actual plans for our future home, and I kept insisting to my wife that no matter how much it felt like our project was an afterthought, EHB are supposed to be the experts in their field, so they will be worth the wait.
After additional delays, we were finally presented with hard budget numbers in late November, 2015. In that meeting, without any warning, we were given the following price to construct: $470,000. This seemed high, I assumed it must include the $30,000 PSA payment, and that I must be misunderstanding something. It was only while driving home, as my wife patiently explained to me that the $470,000 number did not include the $30,000 (therefore the total price would be $500,000), that I realized we could not afford to proceed with the build. Also worth noting: the $470,000 included nothing for contingencies or potential escalation costs.
In addition, during this budget meeting we requested a hard copy of the numbers to take with us. We were told no, we could not have it, that these numbers were only preliminary, and that a hard copy would only be made available to us after signing an official Build Contract (we were presented with various numbers in an Excel spreadsheet format, which proved more confusing than helpful — particularly since Patrick kept scrolling up and down, never allowing us to see the columns of numbers in their entirety).
In our subsequent email exchanges, a phone call with Brandon, and a face-to-face sit-down with Brandon, the claim was made repeatedly that the budget numbers contained intellectual property. Even if true, which seems doubtful, why was our $30,000 insufficient proof of our commitment to build with EHB? How could we make informed decisions without all of the budget numbers in front of us?
Moreover, the numbers presented to us were even worse than they initially appeared because Brandon had removed substantial value by changing a 9’ basement to an 8’ basement, removing a window from the basement (leaving us with only one), and by converting the concrete driveway to an asphalt driveway.
In effect, the $500,000 number should have really been $515-525,000 if the 9’ basement, the second basement window, and the concrete driveway had been left in (these items had previously been in the drawings, and they had always been understood to be included based on email exchanges and conversations in their office). The point is not that we had our hearts set on a concrete driveway, for example, rather it is how Brandon and his team appeared to manipulate the numbers in order to make them look less bad than they really were — it felt like they were trying to be devious.
Overall, then, the budgeting process struck us as fundamentally dishonest. When pressed repeatedly as to why the build budget was so different from the numbers outlined in the PSA, Brandon only offered a vague explanation, noting “additional Passive House components were necessary” — what these were, or why they were necessary, was never explained.
In our final meeting (the face-to-face sit-down), Brandon did finally admit that the energy modeling in the PHPP software showed a significant penalty for a single-story structure with a full basement. Since EHB sell themselves as experts in this field, and they had never done a single-story home before, and they had nearly a year to research potential issues with this type of structure, why were we only now — over a year into the design process — finding out about it?
No one, at any time, suggested we needed to convert our single-story structure into a two-story structure if we intended to hit the budget numbers as laid out in the PSA. There is also no language in the PSA regarding potential budget increases based on how the energy modeling turns out.
Our take away impression: EHB felt we would accept virtually any number given to us since we were so far along in the process and they already had our $30,000. That, in effect, we could not walk away, and that we would just accept the inflated price and move forward with the build.
Keep in mind, if we had proceeded, we would have ended up with a $625,000 2-BR, 2-Bath, 1666 sq. ft. single-story home ($500,000 to build + $125,000 for the lot), with no high-end finishes (not even any ceiling lighting in the family room or the two bedrooms), and before spending anything on landscaping (not to mention an 8’ basement with only one window). I was going to install 5” wide hickory wood flooring and wider trim for the door casings and baseboard, but the extra material cost would have been offset by my free, “sweat equity” labor. These were the only finishes in the house that could be construed as “high-end”.
More importantly, because no equivalent home exists in the Palatine market, our house would have been impossible to ever sell for anything near what we would have paid for it. This, in turn, raises the question: Even if we had accepted the $500,000 price ($625,000 with the lot), how were we ever going to secure financing for the project when the cost was so far above anything resembling market value?
This idea that their budget made the house financially irresponsible to build appeared to be entirely lost on Brandon. This is particularly disturbing given that the very first sentence of his PSA document specifies fiscal prudence as an explicit goal: “The goal of the parties is to build a well-constructed, healthy, super energy efficient and sustainable home at an economical price” [emphasis added].
Based on the PSA (which is all we ever had to go on), the budget we were expecting should have looked something like this:
$325-350,000 (Original 40′ x 40′ layout = 1600 sq. ft.)
$13,500-14,500 (Extra 66 sq. ft. = 1666 sq. ft.)
$20-25,000 (Water and sewer issue, and 2 retaining walls)
$20-30,000 (Garage)
$30,000 (Design-Build PSA)
$408,500-449,500 (TOTAL COST)
We’re not the unreasonable client who wants to add additional square footage, and additional high-end finishes, and then balks when the cost goes up. Note, too, that the numbers to build range from just over $203/ sq. ft. – $218.75/ sq. ft., so we were willing, even at the time of signing the PSA, to end up at nearly $220/ sq. ft. instead of the $205 Brandon initially quoted. Nevertheless, their budget came in at an astounding $249/ sq. ft. As a result, their budget leaves at least $70-90,000+ unexplained (again, at least $70,000 because of the missing 9’ basement, second window in the basement, and concrete driveway).
At that point, in December, 2015, we reached out to several of Brandon’s prior clients to see what their experience had been like (admittedly, we should have done this before handing over our $30,000). It was revealing, and quite depressing. Not one of them would feel comfortable recommending Brandon and EHB to family or friends without serious reservations. Most of his former clients flat out said they would not recommend Brandon or EHB under any circumstances. In fact, in our discussions, several common themes developed that were congruent with our own experience:
1. Poor communication skills:Via email, or in person, they (meaning Brandon, Patrick, and Eric) leave questions unanswered, and they fail to listen — therefore requests have to be repeated over and over, or else they are implemented incorrectly.
2. Budget numbers cannot be trusted:We heard repeatedly, from separate clients, that whatever you are told add at least 25% to get an accurate idea of real costs (whether in the PSA or the harder numbers of an actual Build Budget). It is important to emphasize, this is prior to any change orders on the part of clients. In other words, as it was explained to us, during the build process Brandon would come to the clients and repeatedly tell them what they had ordered was discontinued, or the item was out of stock, and the alternative was going to be more expensive. As the clients pointed out, in the middle of the build process, what choice do you have but to pay? In addition, we were told by clients, independently of one another, that Brandon and EHB had — rather perversely — done us a favor by manipulating the numbers prior to our build commencing, rather than after, since it allows us to walk away before losing significantly more money (which had been their own experience with EHB).
3. The design capabilities of EHB are mediocre at best:Every client we spoke with urged us to seek outside design help, both in the form of an architect and for any interior design work.
4. Don’t be fooled by the hype:Brandon is very good at marketing his projects, and he has enjoyed a great deal of free advertising by having his homes covered in local media outlets, and on the internet more broadly. So why have his clients, when given the opportunity, not spoken out about their negative experiences? We believe that, even after being put through a gut-wrenching build process, few clients will have the nerve to criticize Brandon and his team when a journalist calls to talk about what a unique home they have just built, and how great it must be to live in. Understandably, homeowners in this situation are already looking for reasons to justify what they have gone through — both emotionally and financially. The message we received from his clients: there is a wide gulf between surface (how EHB present themselves) and substance (what the design-build process is really like).
5. EHB builds a solid wall assembly:Every client was happy with the quality of their structure, but they were equally unhappy with how this was achieved — for reasons outlined above. Our conclusion: EHB is a conventional builder who can put up a better wall assembly. In every other respect, however, EHB fulfills the stereotype of the average homebuilder: over promises, under delivers, is sloppy with budget numbers, and plays fast and loose with their clients’ life savings.
I should also note, after the initial email and phone call letting EHB know we could not move forward, Brandon, during our final sit-down, explained how he was able to reduce the budget to $403,000 by getting donated materials from manufacturers, and by seeking lower numbers from their subcontractors. In other words, they were prepared to charge us $500,000, but now they could build the same house for nearly $100,000 less with no drop off in quality — either in materials or craftsmanship [?] . Furthermore, based on what their previous clients had told us, we had every reason to believe the $403,000 would climb back up to $500,000 as they clawed the money back with inevitable “unforeseen” expenses throughout the build process.
Since deciding not to move forward with Brandon and EHB, we have been told (1)there will be no partial refund of our $30,000, and that we cannot use the drawings (our lawyer has explained to us why this latter claim is unfounded). The PSA even claims we cannot build on our own lot with another builder for two years. Moreover, because of aforced arbitrationclause in the PSA, we have few legal options (#ripoffclause).
We were not looking for a full refund, we understand some real work has been done, but we do feel a partial refund of $15,000 is in order since we are not moving forward because of the actions of EHB — in other words, due to no fault of our own. The fact remains, if the budget numbers had been accurate and fair, we would have proceeded to build with EHB.
We also understand that the construction process is always imperfect, that compromises will always have to be made. Yet if the evidence available is examined, we believe the only conclusion is that Brandon and his company have demonstrated a willingness to violate their clients’ trust, and that they have engaged in behavior that, at the very least, is unethical.
Nevertheless, there is no reason why you should take our word for any of this. In fact, learn from our mistake and — prior to signing or doing anything — please reach out to their former clients as listed on their website and in the many articles published about their projects. In addition, I have the PSA that my wife and I signed, a year and a half of email exchanges between myself and Brandon (here’s a sampling), along with the construction drawings, in order to substantiate my claims.
It is worrisome that builders like Brandon fail to appreciate how their actions not only harm their own reputations, but how they put the very concept of Passive House, or even the notion of green building itself, at risk. If Passive House becomes synonymous with corrupt business practices, as a way for builders to pad their profits without offering substantial value, then the progress of the green building movement may find itself impeded, if not entirely halted. This would be unfortunate in light of the ever growing body of evidence that shows the negative impact our current code-built structures have on global warming.
Based on our experience, and the experience of Brandon’s former clients (as it was told to us), we would encourage anyone interested in pursuing Passive House certification, or green building generally, to look elsewhere besides EHB. Look for a quality builder with a great reputation for service and attention to detail who is willing to take on the challenge of constructing a better wall assembly. Much of the information regarding this type of building program is open-sourced and therefore readily available in books, magazines, and on the internet (e.g. PHIUS, Green Building Advisor, and Fine Homebuilding magazine — to name just a few great resources).
If you have questions about any of this, or if I can help in any way, please feel free to contact me at my email address:zewt@hotmail.com
“We agreed to look at their lot options to help them know the pros and cons of each lot.”When Brandon and Eric Barton were out looking with us at the lot we would eventually purchase, I drew their attention to the visible fall in grade present (roughly 3′- 4′ in some areas, moving high to low from south to north), wondering if a retaining wall would be necessary. They both responded that it would not be an issue. Yet we were told late in the design process that not one but two retaining walls are necessary because of the significant grade change, and that they will cost a couple thousand dollars. How is this helping us?
“We tell our clients … design and construction can take anywhere from 12-18 months.”We were never told any such thing. Again, we were told 90 days to design, 6-8 months to build. In fact, they brag about how quickly and efficiently they complete the build phase, so this is nonsense, particularly for a smaller house, like ours, that is just under 1700 sq. ft. (outside dimensions).
“… two large savings opportunities.”The “opportunities” we were offered included changing cathedral ceilings to flat ceilings throughout ($5,000), and moving the garage to the south end of the lot ($3,200), which would have entailed direct access to the interior, even though from the very start I had expressed how important it was that the garage not have direct access to the house(2). So they over-charged us, we believe, by $70,000-90,000+ and their solution was to reduce costs by $8,200, which also happened to further reduce the value of the house.
“Anita answered… ‘no reason to panic'”. It was me, not my wife, who said this. And as I explain above, I did not yet fully appreciate the significance of the numbers, due in large part to the convoluted way in which they were presented. Anita, on the other hand, rarely spoke during the meeting, having mentally latched on to the $470,000 number, assuming, unlike me, that the $470,000 did not include the $30,000 PSA payment, and terrified that even at $500,000 — without a 9′ basement and no high-end finishes — that I would still want to proceed with the build.
“…they did not want to look at the specs…” In our final sit-down with Brandon, it is true, we did not see the benefit of looking at the specs, and for two reasons: First, he had already claimed there was intellectual property rights involved with the budget numbers, so we did not want to be accused of stealing at a later date. Secondly, at that point, we didn’t trust anything he had to say. As far as we were concerned, he had engaged in bait-and-switch sales tactics, yet he expresses astonishment that we didn’t want to look at his numbers.
“…we have continued to work on the project for them.” Doing what, exactly?
“In our past experience… if a client needs to adjust price… there is a value engineering process to refine things.” How could price not be an issue for us when Brandon so badly overshot the budget laid out in the PSA? In addition, from our very first meeting with Brandon we were very open and transparent with him about what we had in savings, and how important it was that I do sweat equity work to help contain costs. The goal from the very beginning was to control costs — e.g. in terms of interior design choices — so that we could more easily hit the $375-410,000 budget number, and then, at that point, reduce the price even further with my sweat equity work. The notion that we should “value engineer” down from a bloated price of $500,000 is ridiculous. If Brandon was acting in good faith, why not warn us prior to the budget meeting that costs were way over, and then during the meeting walk us through those costs, component by component, to show us where all the money was going?
“…we have met the obligations of our agreement.” If you’ve gotten this far, I’ll let the reader evaluate this bold claim.
(2)It’s still a relatively recent idea, with a slowly growing awareness of the risks, but the research seems compelling: if you can’t avoid having an attached garage (in our case), at least avoid direct access to the garage from the house. And if that’s not possible, then start and back out, and turn off your car upon returning, as quickly as possible. It’s also worthwhile to keep chemical fertilizers, pesticides, any product containing solvents, and lawn equipment that uses gasoline and oil in a separate outdoor shed — again, if it’s at all possible.


You must be logged in to post a comment.